• Skip to primary navigation
  • Skip to main content
  • Skip to primary sidebar
  • Spring Recipes
  • Recipes
  • Order Meal Prep
  • Healthy Gut Baby Food Course
  • About

Allianna's Kitchen

menu icon
go to homepage
  • Spring Recipes
  • Recipes
  • Order Meal Prep
  • Healthy Gut Baby Food Course
  • About
    • Facebook
    • Instagram
    • Pinterest
    • Twitter
  • search icon
    Homepage link
    • Spring Recipes
    • Recipes
    • Order Meal Prep
    • Healthy Gut Baby Food Course
    • About
    • Facebook
    • Instagram
    • Pinterest
    • Twitter
  • ×
    Allianna's Kitchen » Recipes

    Blog

    mint smoothie 11 scaled

    March 10, 2024 Allergy Friendly

    Mint Smoothie

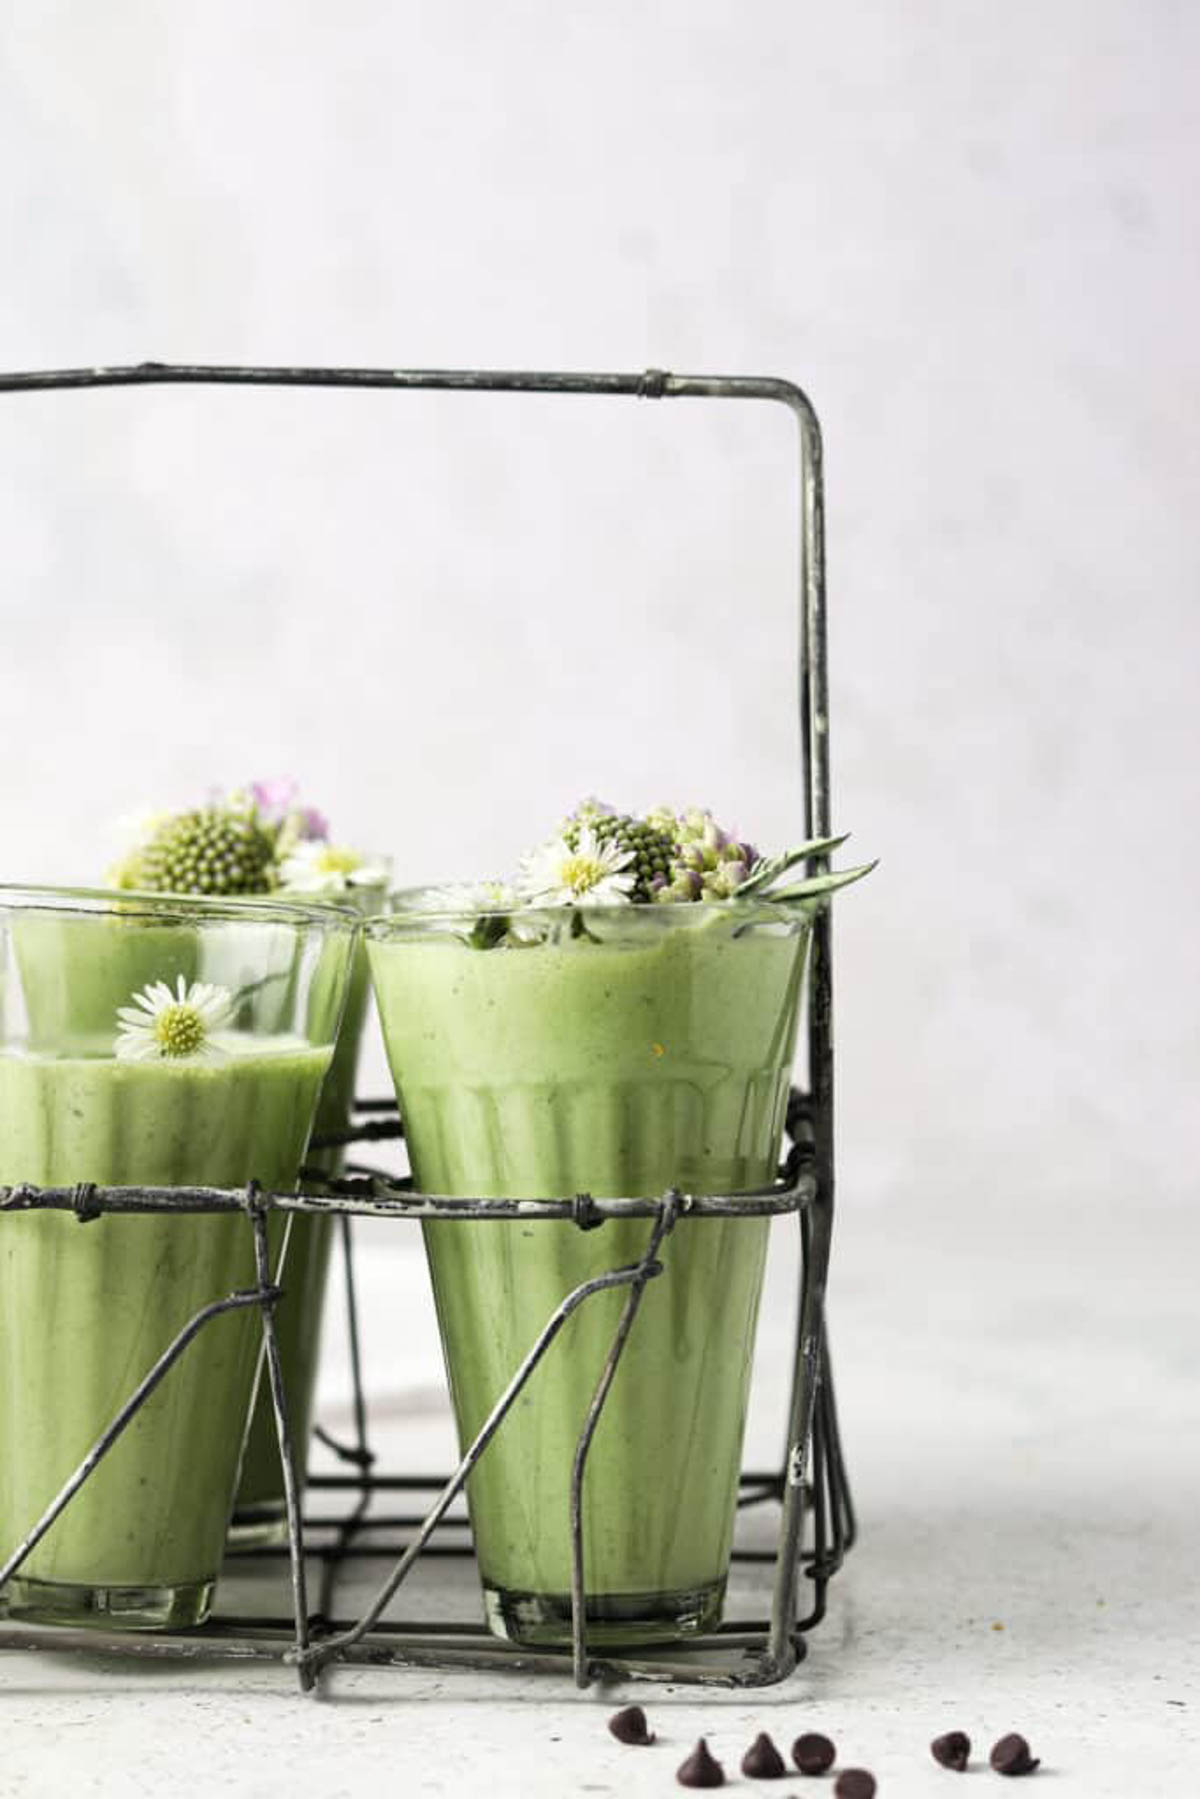
    This green healthy Mint Smoothie is perfect for all of your breakfast and snacking needs. It is naturally sweetened with ripe bananas and dates with the perfect splash of peppermint. This green smoothie recipe is paleo, Whole30, and AIP friendly. With this healthy smoothie only taking a few minutes to prep it is perfect for the times you need something quick and ready to go! We like to prep this recipe in advance at the start of the week for our breakfasts. 

    Six mint smoothies in a wire rack and garnished with fresh flowers and chocolate chips.

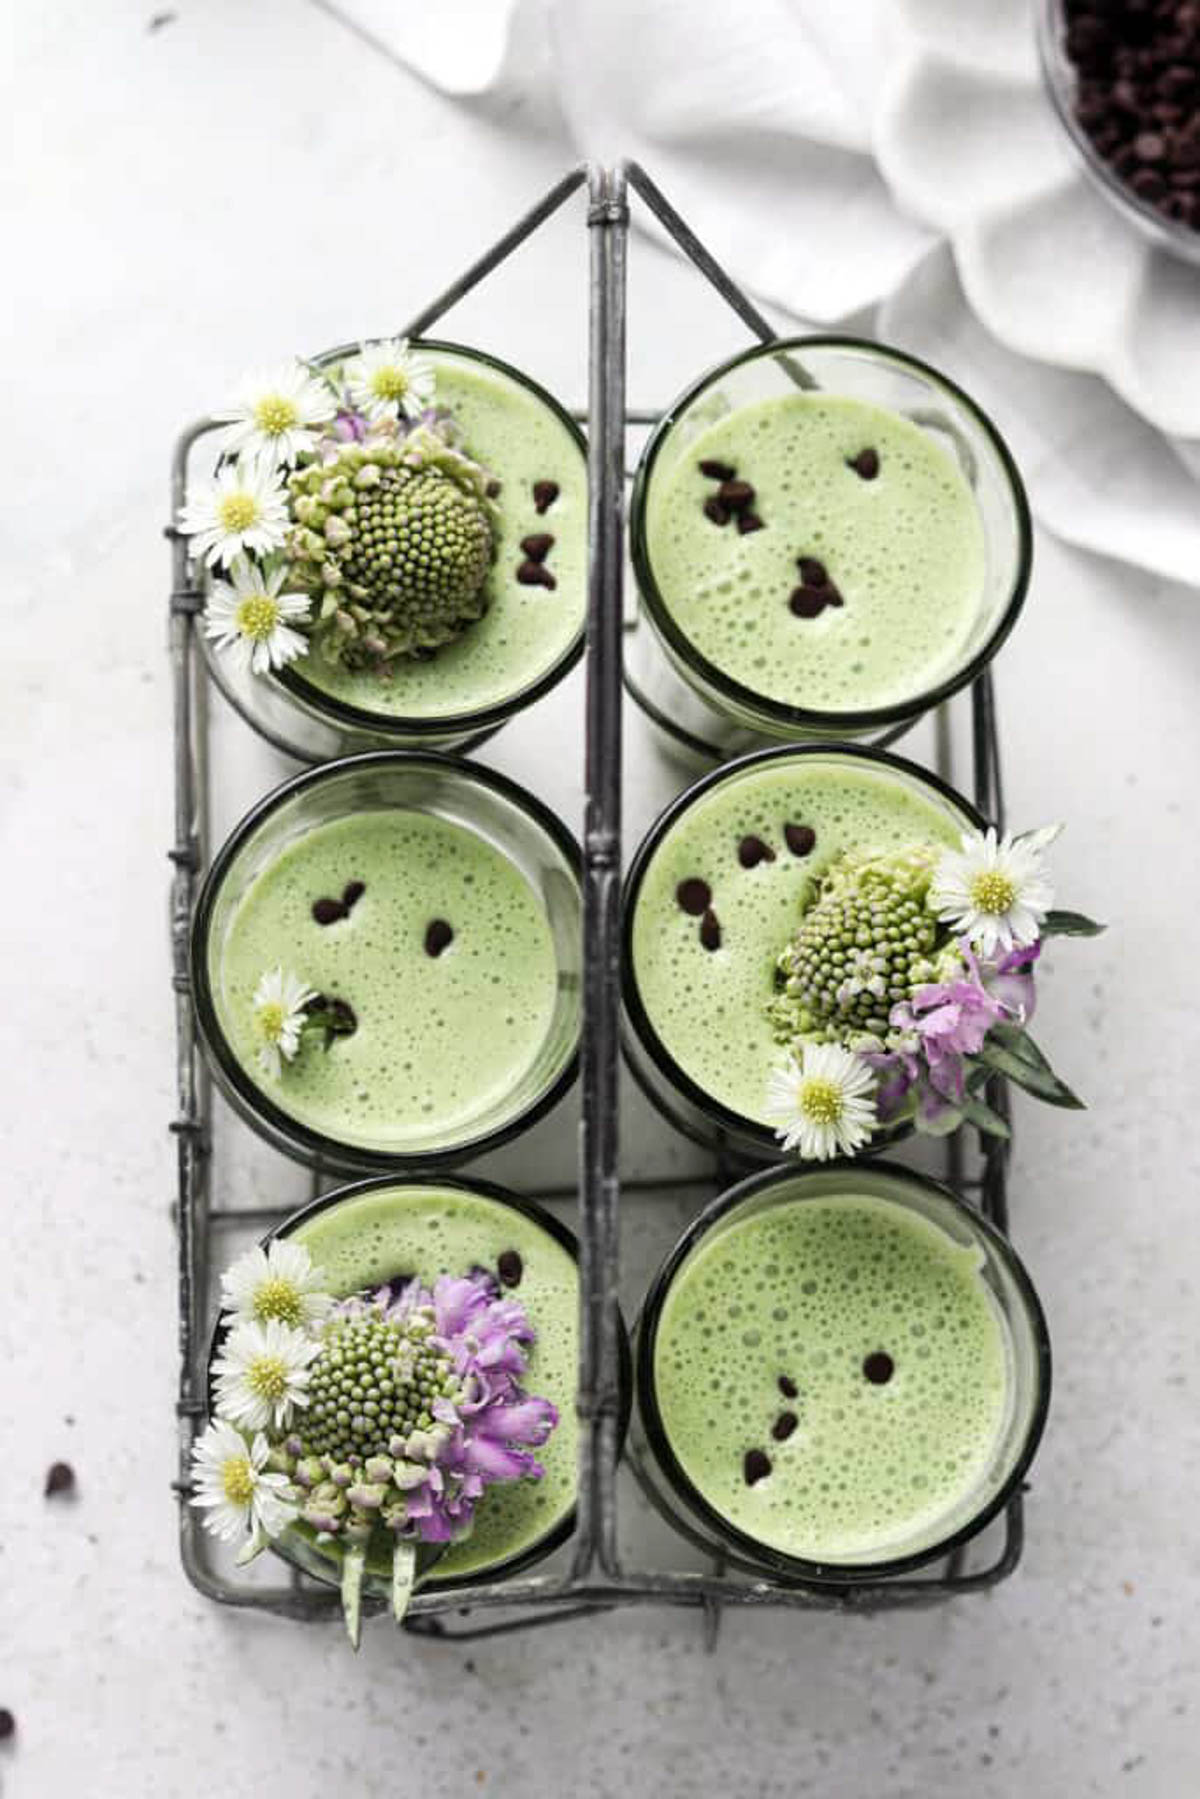
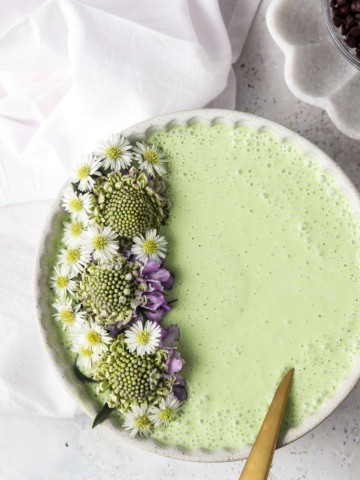
    This smoothie is a great after school snack or a quick breakfast for busy mornings and will remind you of the shamrock shake you grew up enjoying. Green smoothies are a great way to assist in getting additional daily value of nutrients with a beautiful green color. This is a great recipe to simply enjoy as a refreshing drink or you can turn this into a delicious smoothie bowl.

    Smoothies are a great way to get nutrients but also allows you to mask the flavors of vegetables so that kids will still enjoy them as well. Additional smoothie recipes I love are: Orange Creamsicle Smoothie, Broccoli Smoothie, Mango Strawberry Banana Smoothie, Strawberry Banana Smoothie Bowl, Banana Cream Smoothie, Pineapple and Mango Smoothie, Dairy Free Pumpkin Spice Smoothie, Homemade Elderberry Syrup, and Strawberry Blueberry Smoothie.

    If you are making this recipe for breakfast and want to pair it with another fun breakfast food, check out my Banana Chia Pudding. If you have leftover mint, you may love my Cantaloupe Mint Melon Salad.

    [feast_advanced_jump_to]

    Why You Will Love This Recipe

    • This easy mint smoothie recipe is delicious and easy to make with simple healthy ingredients. This recipe is my favorite way and easy way to get healthy nutrients into any age with great flavor.
    • Kids will love this recipe as well! It is a great recipe for a quick after school snack or easy breakfast recipe.
    • This recipe is naturally paleo, Whole30, AIP friendly, soy free, gluten free, dairy free, and refined sugar free.
    • If you enjoy this recipe, you would also like my Banana Peach Smoothie recipe as well!
    • For additional crunch, you could turn this easy mint smoothie recipe into a smoothie bowl and top with my Grain Free Granola for additional nutrients and crunch.
    • This recipe will be ready to enjoy in less than 5 minutes and will only have one dirty dish.

    Ingredients

    Mint smoothie ingredients in small glass bowls on a silver tray.
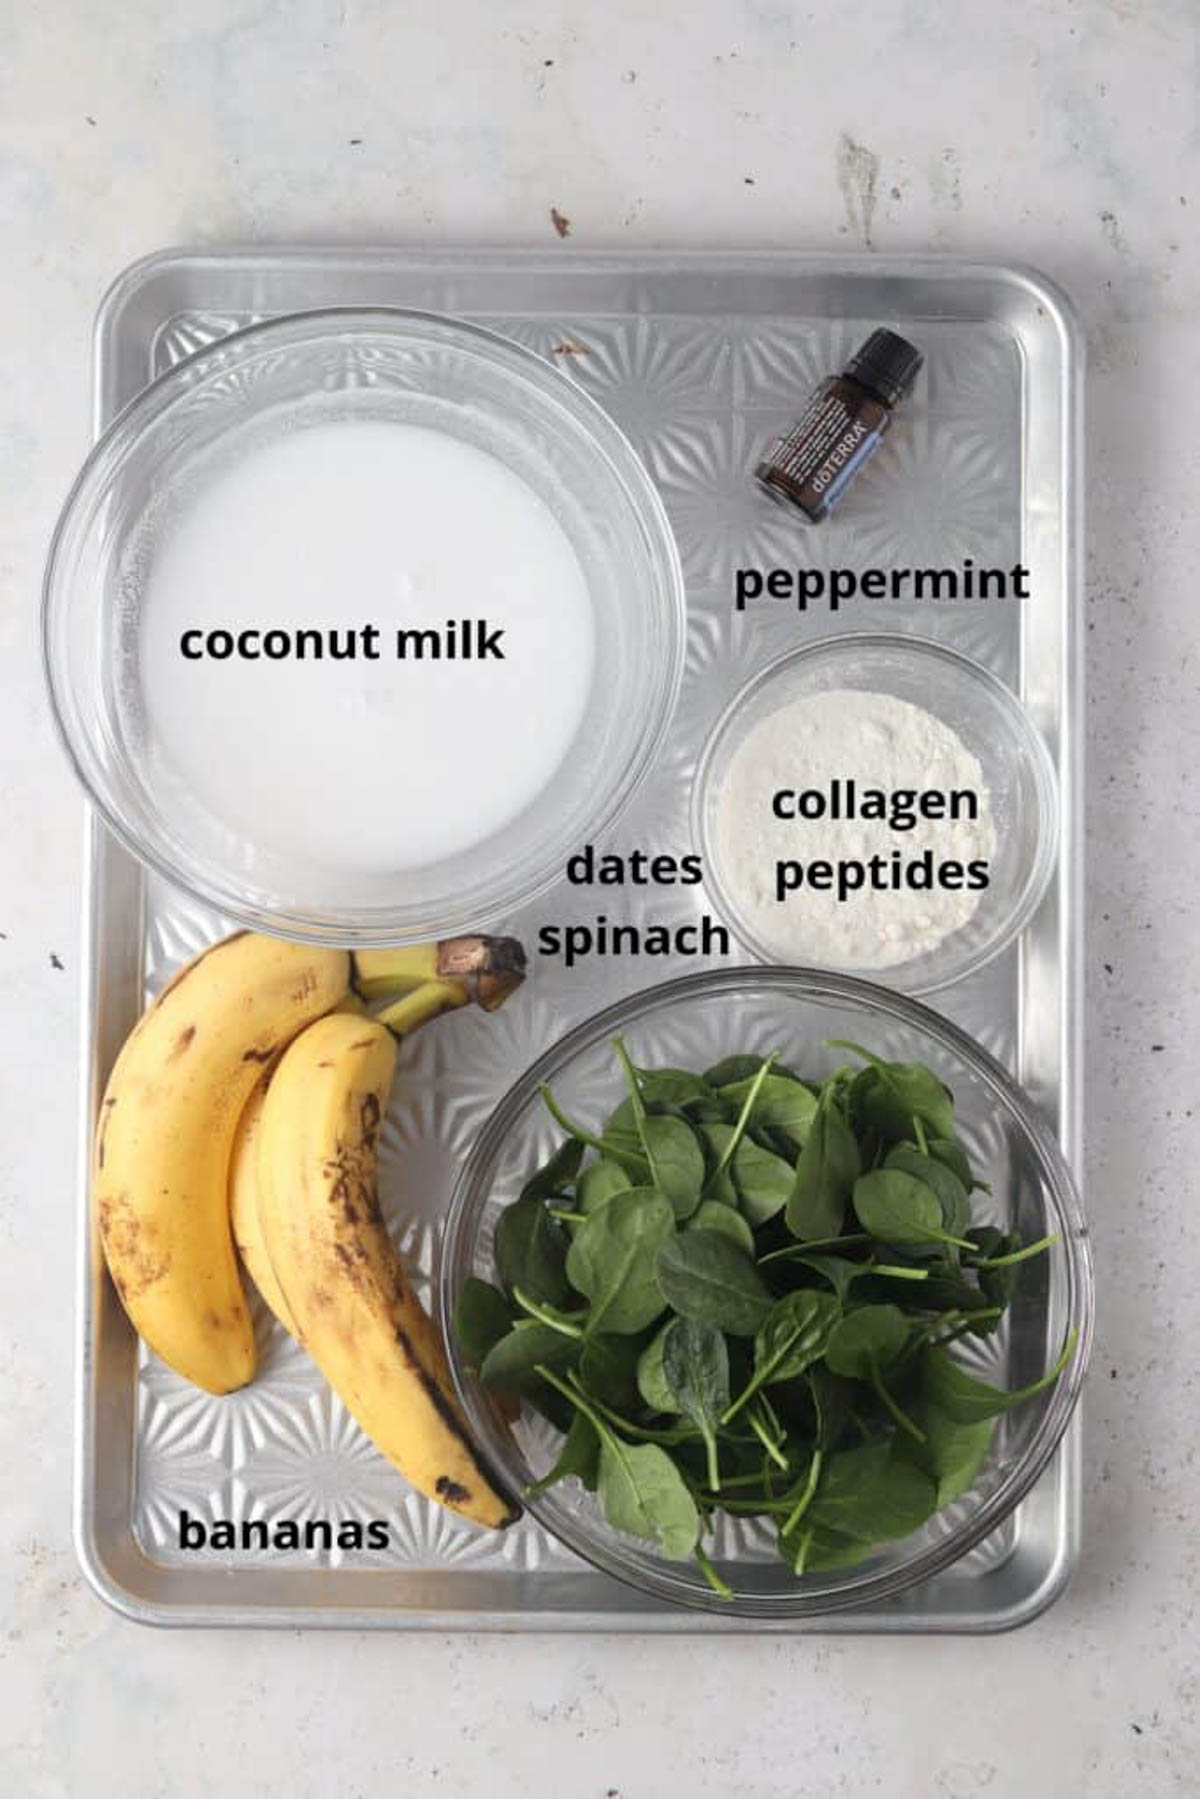
    • Fresh spinach-This is what makes this smoothie green! You can for sure use other greens but note that different kinds of greens may throw the flavor off, for example kale can be bitter so it may need more bananas and dates to mask the taste. 
    • Peppermint oil-I love baking and cooking with essential oil; however it is important to note that not all oils are created equally. I only use Doterra’s peppermint oils. DO NOT BUY RANDOM OILS OFF OF THE INTERNET, it is important the ones you purchase are approved for human consumption. 
    • Dates & Bananas-This is what sweetens this recipe. I love the combo of dates and bananas because it is oh so delicious. 
    • Coconut milk-Coconut milk is my go to milk for AIP and Whole30 baking and cooking. I like the Trader Joe’s brand because it is free of any additives and just pure coconut. You can use the dairy-free milk of your choice such as almond milk, soy milk, or oat milk.
    • Vital Proteins-I love adding collagen peptides. Collagen is great for the gut and joints. I ONLY use this brand. 

    Optional Mint Smoothie Add In’s:

    • Chocolate Chips– I like Enjoy Life, however if you are doing AIP check out this homemade “chocolate” chip recipe. 
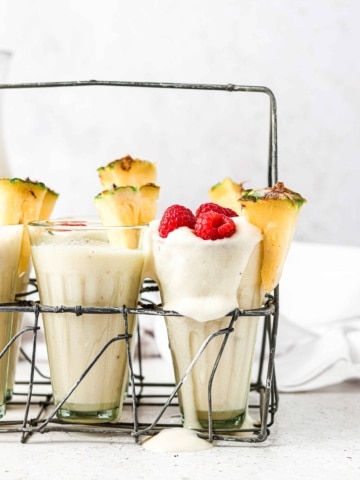
    • Fresh Fruit-I like fresh raspberries. 

    See the recipe card below for a full list of ingredients and measurements.

    Substitutions and Variations

    • If you want to add additional nutrients, you can add your favorite protein powder or greek yogurt to make this recipe more filling.
    • For additional toppings, you could add chia seeds, frozen cauliflower, cacao powder, cacao nibs, or fresh nuts to the smoothie.
    • If you use peppermint extract instead of peppermint oil, it will not be a one for one measurement swap.
    • You can add healthy fats to this recipe by adding avocado for additional nutrients.
    • Turn this recipe into a pineapple mint smoothie by adding frozen or fresh pineapple to the mixture.

    This recipe has not been tested with other substitutions and variations. If you replace or add any ingredients, please let us know how it turns out in the comments below!

    Step by Step Instructions

    Mint smoothie ingredients blended into smooth mixture in a smoothie base.

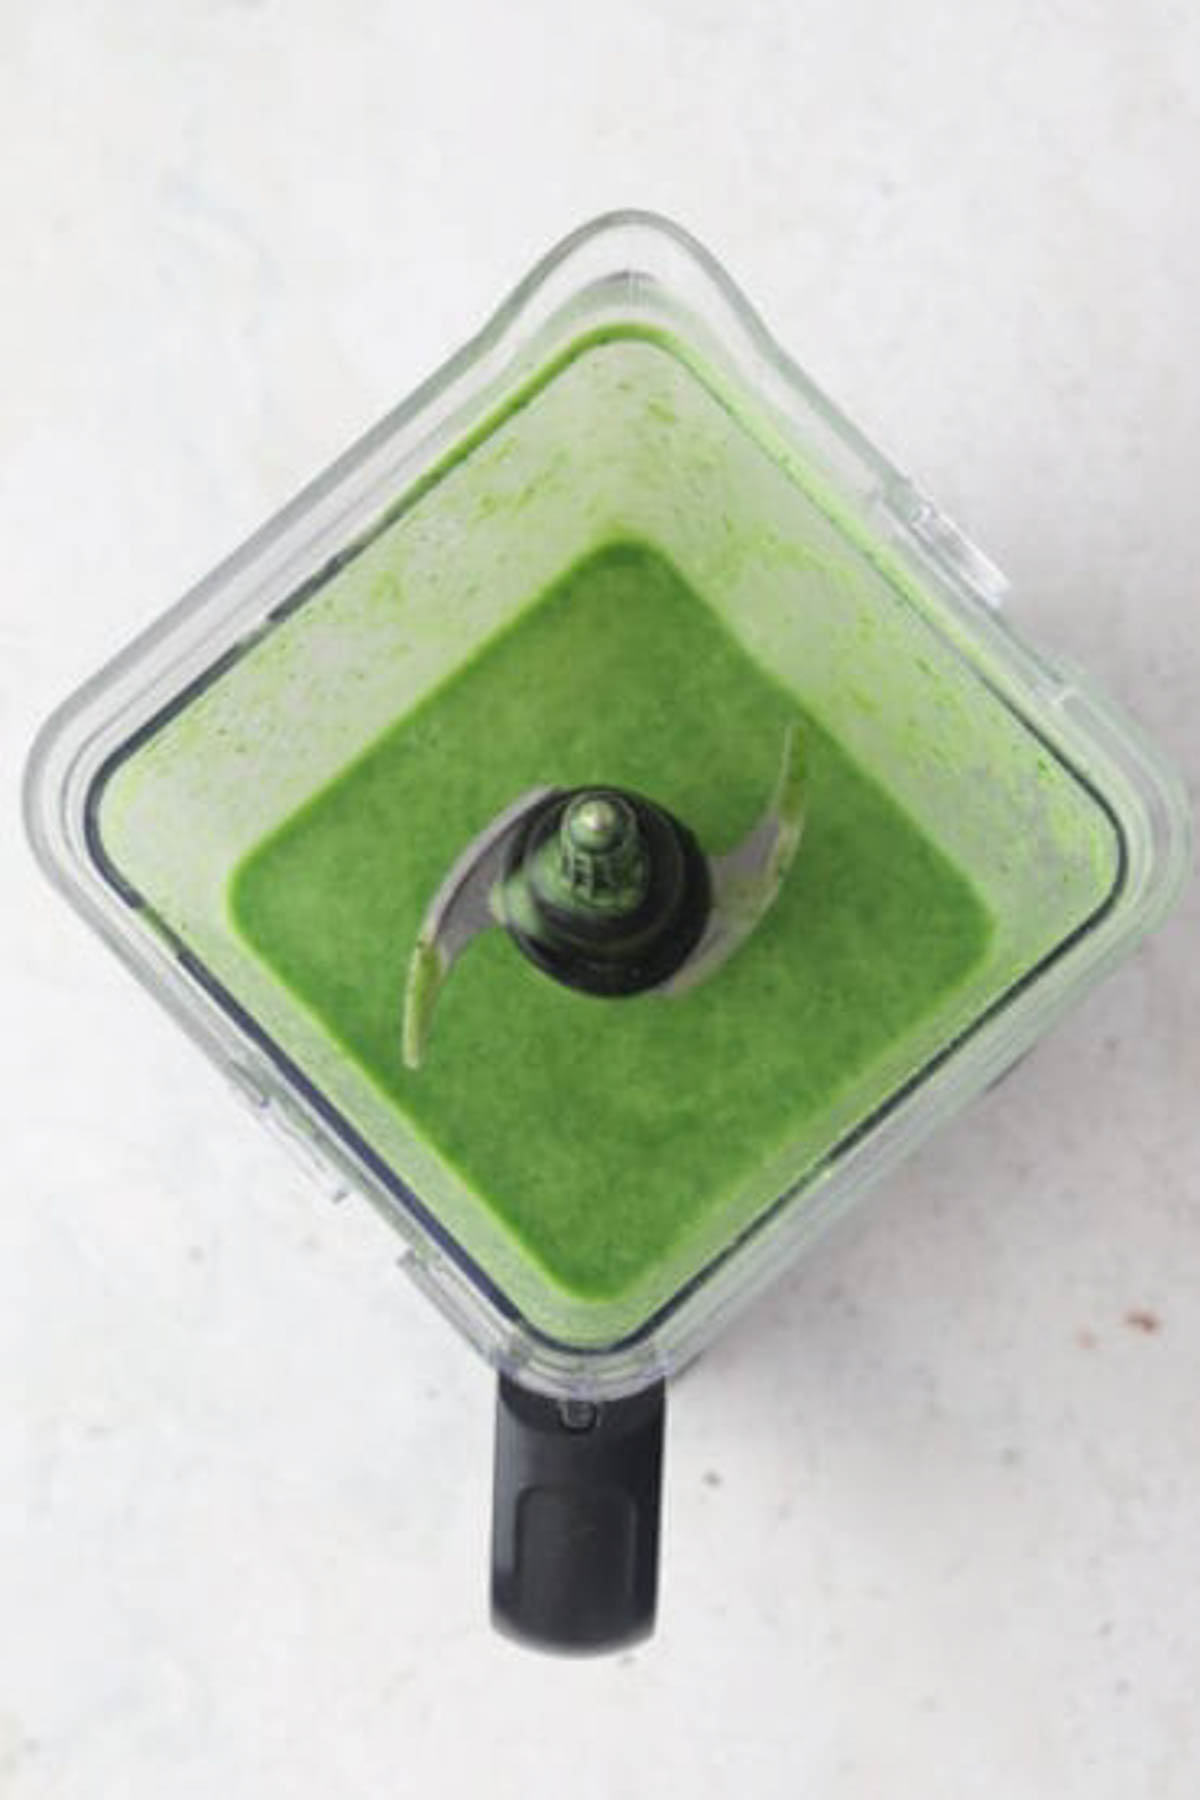
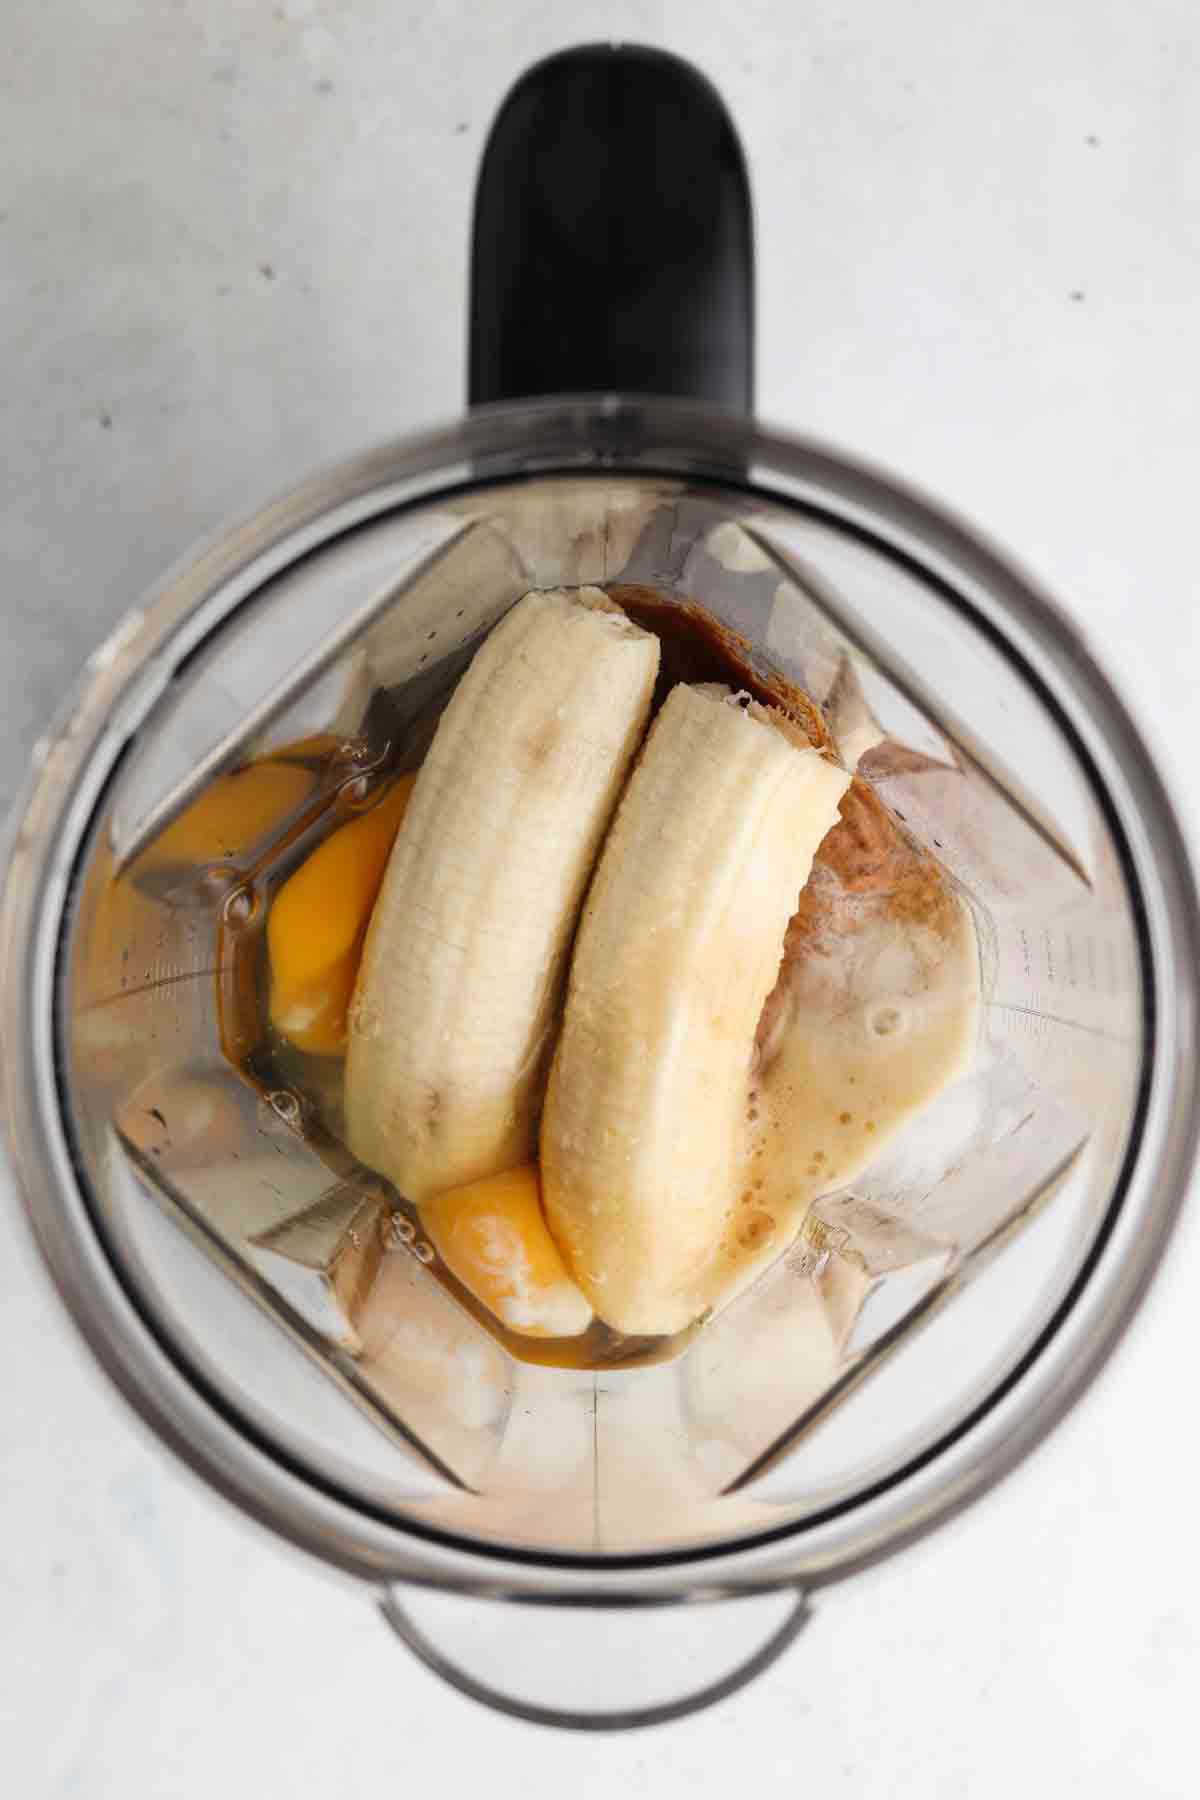
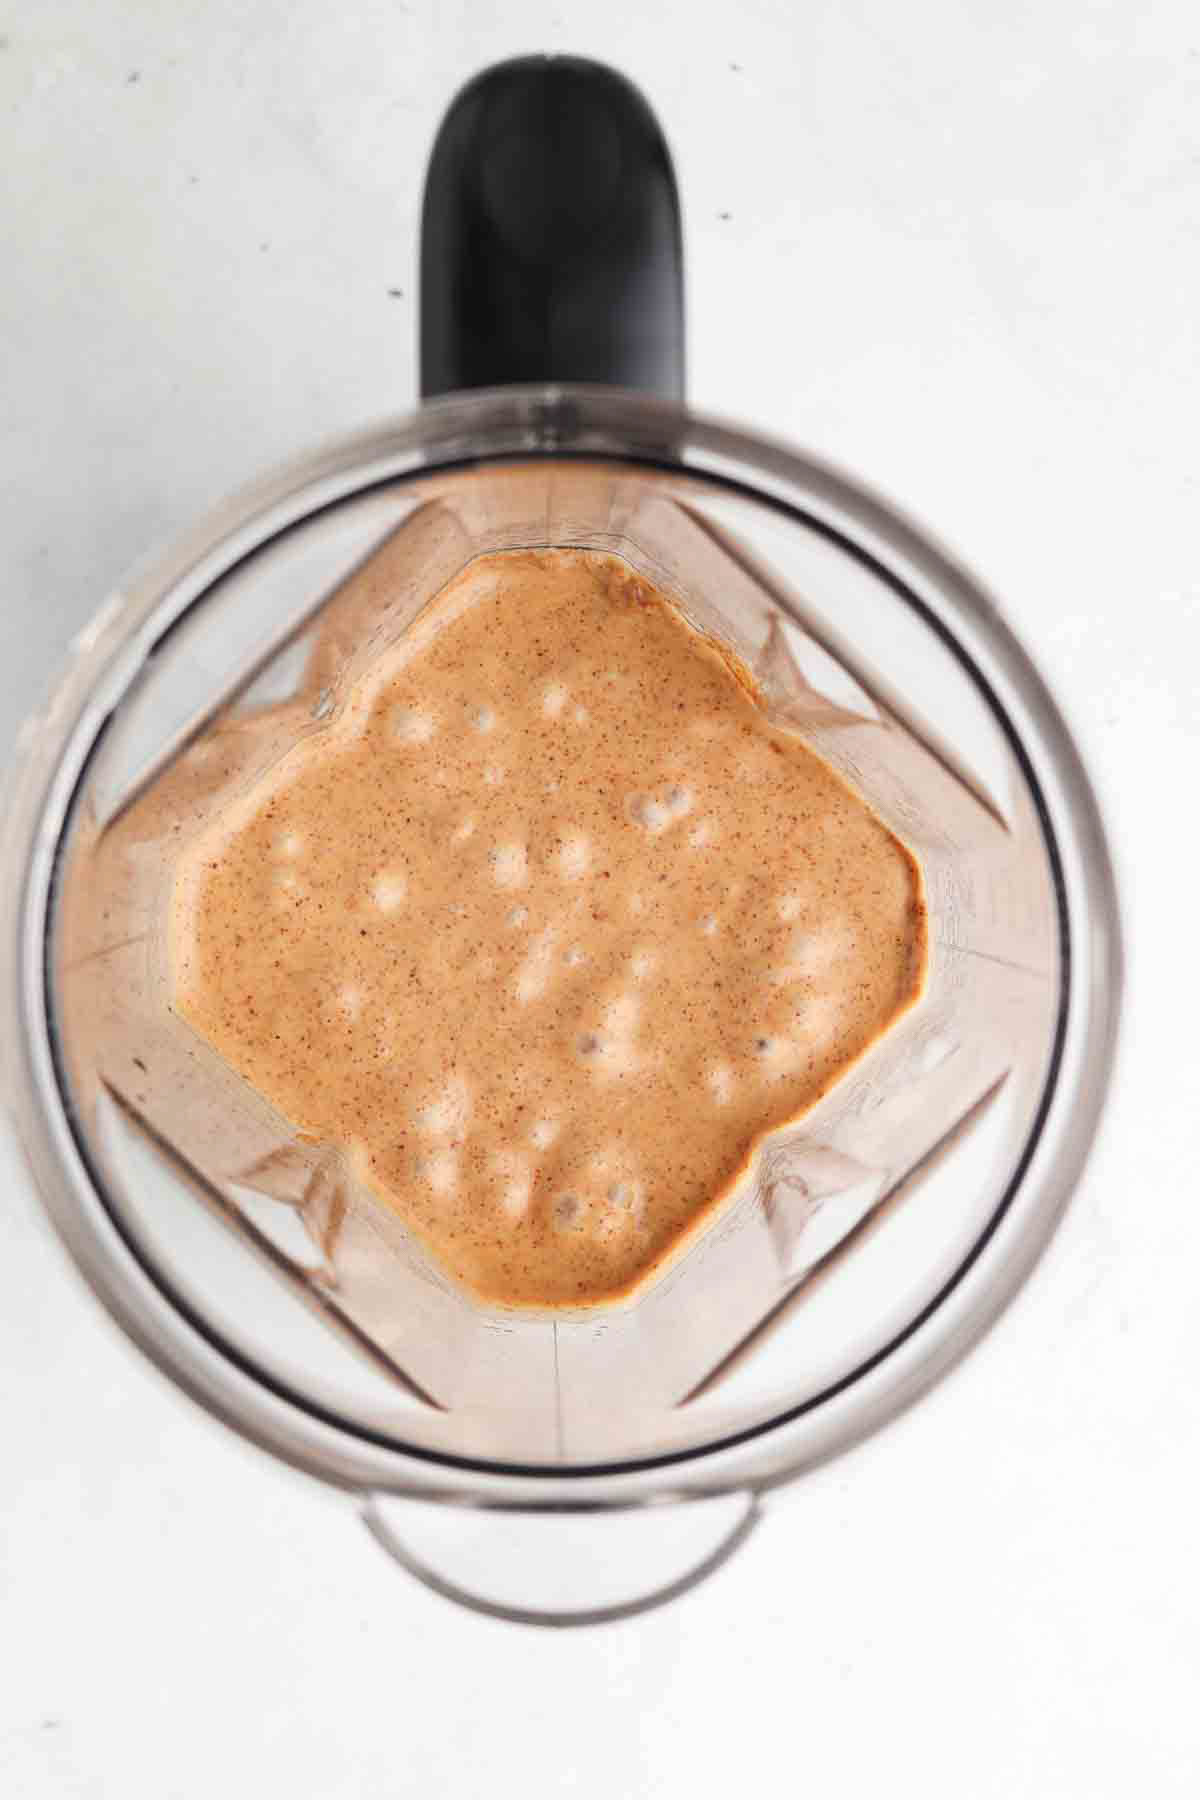
    Photo 1: Place all ingredients in a high-speed blender except the chocolate chips and blend. Add chocolate (or carob chips) on top.

    Expert Tips

    • Tip # 1: Once you start blending, you will want to scrape down the sides of the high speed blender and then pulse once more.
    • Tip # 2: To save additional time savings, you can pre measure the ingredients other than the coconut milk into small freezer bags. This way you can just dump the ingredients into the blender, add the milk, and blend. This will allow for even more time savings since you can bulk buy at your grocery store to stock up on the smoothie bags.
    • Tip # 3: If the smoothie is too thin, you can additional ice or frozen vegetables to help thicken to achieve a creamy texture. If the smoothie is too thick, you can add additional coconut milk. I like to use frozen banana in this recipe so that the smoothie consistency is thicker.

    Recipe FAQs

    Can I drink smoothies on the Whole30 and AIP diets?

    The short answer is that food in its original form is always preferred because the chewing process helps us better digest our food, however sometimes we need to change things up. When drinking smoothies, make sure you are chewing it too or taking digestive enzymes to assist in the digestion process. As far as drinking smoothies on the Whole30, it is important that the smoothie is just not fruit and has either collagen and/ or greens in it too. 

    What are the nutrients of spinach?

    Spinach is a great source of iron, vitamin C, vitamin E, potassium, and magnesium.

    Is there a high-powered blender you recommend?

    I love the Ninja blender. It is great quality and lasts a long time. I love all of the attachments so there are multiple uses.

    How can I store the leftovers of this easy mint smoothie?

    I suggest drinking this smoothie within 3-4 days to ensure freshness. Be sure to shake it up prior to eating. You will want to store this in an air tight container in the refrigerator.

    Mint smoothies in glass cups in a metal stand that are garnished with fresh flowers.

    Other Dairy Free Smoothie Recipes You Will Love

    • banana peach smoothie 1 scaled
      Banana Peach Smoothie Without Yogurt
    • dairy free pumpkin smoothie in a cup
      Dairy Free Pumpkin Spice Smoothie
    • paleo pina colada 3 1 scaled
      Healthy Pina Colada Smoothie
    • brown smoothie with a gingerbread cookie on top
      Gingerbread Smoothie (Dairy Free)

    Are you interested in a guide of my go to healthy alternatives?

    Download your FREE guide below

    download here
    mint smoothie 11 scaled

    Mint Chocolate Smoothie

    Course Breakfast, Snack
    Cuisine American
    Diet Gluten Free
    Prep Time 5 minutes minutes
    Total Time 5 minutes minutes
    Servings 4 people
    Author Allianna Moximchalk
    448kcal
    Cost $4
    Print Recipe Pin Recipe

    Equipment

    • high speed blender

    Ingredients

    • 3 pitted dates
    • 2 cups spinach
    • 3 ripe bananas
    • 1 can coconut milk Trader Joe's brand is the best.
    • 4 drops peppermint oil I like using Doterra. Not all oils are the same, see notes above about edible oils.
    • 4 scoops vital proteins collagen peptides omit for vegan

    OPTIONAL:

    • 1/4 cup chocolate chips Omit for Whole30 & Use carob chips for AIP. See notes above.
    • fresh raspberries to top off

    Instructions

    • Place all ingredients in a blender except the chocolate chips and blend. Add chocolate (or carob chips) on top.

    Notes

    Storage: This recipe can be stored in the refrigerator in an airtight container for up to 4 days. 
    Nutrition: The for this recipe is an estimate and the calorie count is not guaranteed.  It is based on 4 servings. 
    Servings: This recipe should yield 4 servings. 
    This quick and easy AIP & paleo smoothie is perfect for all of your breakfast and snacking needs.
    Serving: 1glass | Calories: 448kcal | Carbohydrates: 14g | Protein: 29g | Fat: 35g | Saturated Fat: 29g | Cholesterol: 50mg | Sodium: 61mg | Potassium: 515mg | Fiber: 3g | Sugar: 6g | Vitamin A: 1488IU | Vitamin C: 7mg | Calcium: 125mg | Iron: 5mg
    Tried this recipe?Tag me on instagram @alliannaskitchen!
    heart felt letter

    March 2, 2024 Blog

    My Vision for 2024 and Beyond

    Allianna standing in a kitchen with a dog.

    A heartfelt letter..

    Over the past year I have really felt a shift within myself personally and professionally. 2023 was a hard year for me. It was really difficult for me to talk about it as I was going through it. I can now finally say I am on the other side of it. I feel like me again!

    While 2023 was our biggest year yet for Allianna’s Kitchen, we also experienced a lot of growing pains. We finally moved into our new home after being in the process of building it for 2 years. While we love our home, the process was really overwhelming and draining for me. In the midst of this, my family experienced a lot of changes. My parents took in my 3 little cousins. The events leading up to this happening were honestly heartbreaking. As an empath, I feel the pain of others so deeply. There were a lot of days where I just felt paralyzed by the sadness of it all. As someone who takes pride in having an “I can figure anything out and fix anything attitude”, there was nothing for me to do to fix this. It just was what it was. 

    During this past year I was still taking really good care of myself, eating all of the foods that make me feel good, yet I didn’t feel my best. As a Holistic Health Coach I know the importance of looking at how everything in your life impacts you as a whole is so important. You can eat all the healthiest foods and take all of the supplements, but if you aren’t dealing with the other things going on in your life, you are not going to feel good. 

    Focusing on our primary foods is just as important as our secondary foods. Primary foods are the things you can’t find on your plate but really impact your health. It is your relationships, satisfaction within your career, doing the small things that bring you joy, your home life, and so much more. Your secondary foods are the foods on your plate. 

    I have really dialed into my primary foods in the past few months. Learning how to take care of a home, decorate, host and making this house a home has brought me so much joy. Although the experience with my family has been incredibly difficult, it has also taught me a lot about how to be a better member of my family. It taught me a lot about patience, compassion, forgiveness, and empathy. All of those things I am really grateful for. It also helped me realize how good I feel when I am involved in community outreach. In the past few months Allianna’s Kitchen has gotten to partner with a few really amazing non-profits. 

    So what does this mean for Allianna’s Kitchen?

    Providing ready to eat meals, recipes, and tips for living with an autoimmune disease will always be the priority and main focus on my blog and social media pages, however I will now be sharing more lifestyle content too. This is something I have started to share more of but honestly it felt a little out of place without explaining the why behind it. When people feel better overall with their life they tend to make better decisions about food. My goal is to inspire you to be the best version of you. When you feel better, you show up better for those around you. It creates a ripple effect and that’s how we make an impact in this world.

    Xoxo

    Allianna

    Arugula salad on a plate with pears, goat cheese, sunflower seeds and pomegranate.

    February 28, 2024 Allergy Friendly

    Arugula Pear Salad

    This easy Arugula Pear Salad is super simple to make and something that pairs well with just about anything. The peppery arugula combined with fresh red onions, parmesan cheese, and an array of fruits is so simple yet so delicious. This delicious salad only takes 10 minutes to make and can be prepped at the beginning of the week so you can eat it all week long. 

    Arugula salad on a plate with pears, goat cheese, sunflower seeds and pomegranate.

    I don’t know about you, but sometimes I get get tired of your typical mixed green salad. Spicing your traditional salad up with fresh arugula is a great way to eat something different. I like to prepare this salad at the beginning of the week and eat it as an appetizer before we eat our dinner. As someone with an autoimmune disease, getting a ton of greens in is essential for me to feel good and my body to function well. I made this homemade simple salad this past week when we had company with my Air Fryer Salmon Bites and my Chickpea Croutons. It was such a light yet delicious appetizer. While you can eat this salad all year round, it makes for the most perfect Fall salad!

    Why This Recipe Makes The Most Perfect Salad

    • This recipe is naturally gluten free, grain free, soy free and egg free. It can be made Whole30 friendly, dairy free and vegan by omitting the cheese. 
    • This recipe takes less than 10 minutes to prepare!
    • While I love using my homemade salad dressing in this recipe, you can also use a traditional balsamic vinegar, lemon juice, or a simple vinaigrette that you already have on hand. 
    • This recipe pairs well with just about anything, but my favorite thing to make it with is my Date Night Steak Dinner and Crispy Mini Potatoes with Garlic Aioli. You can also use this recipe for meal prep to make a light lunch! It has also become a staple at holiday dinners. I made it this year for Christmas dinner and Thanksgiving dinner. If you are going to make this recipe as a main dish, I suggest pairing it with my Easy Salmon recipe.
    • You can bulk make this dressing and use it for just about any salad on my blog. It would pair well with my Apple Grape Kale Salad, Whole30 Greek Salad, Cucumber and Apple Salad, and my Kale Blueberry Salad.
    • If you are local to Pittsburgh and are in need of meal prep, you can order this salad on my meal prep delivery menu. We deliver all over Pittsburgh.
    goat cheese

    Arugula Pear Salad Ingredients

    • Baby Arugula: Arugula has a peppery flavor and is bitter in comparison to other types of greens. When it is paired with something sweet like fruit it makes for the most perfect combination of flavor. 
    • Pears: In my opinion bosc pears are the best pears but any kind of sweet pears will work. Asian pears are also a favorite of mine. You just have to make sure you use ripe pears. 
    • Cheese: I love using parmesan cheese on this salad but you can also use creamy goat cheese, crumbled goat cheese, feta cheese or even crumbled blue cheese. Either will work! It simply depends on what kind of cheese you prefer. Any kind of salty cheese will work. 
    • Blackberries: This compliments the sweet pears oh so well, but any kind of fresh fruits will work too. 
    • Extra virgin olive oil: This is the base of the salad dressing.
    • Pinch of salt: For taste in the dressing.
    • Dijon mustard: This adds flavor to the dressing. 
    • Maple syrup: This adds a touch of sweetness to the salad dressing. 
    • Lemon juice: To give this dressing a little bit of an acidy kick.

    See the recipe card below for a full list of ingredients and measurements.

    Substitutions and Variations

    • Arugula: You can also use baby kale or baby spinach.
    • Nuts: Any kind of nut will add some crunch to this salad. I also love crunchy walnuts and crunchy pecans. 
    • Mustard: Whole grain mustard will also work for this recipe in place of dijon.
    • Vinegar: I sometimes use apple cider vinegar interchangeably with red wine vinegar. Both will give this simple dressing a nice kick. 
    • Croutons: I love adding my fresh Gluten Free Homemade Croutons on top of this salad. It adds some extra crunch and makes for a perfect salad.
    • Pomegranate seeds: This gives this recipe a pop of color and crunch.
    • Sunflower seeds: Gives this salad a nice crunch! 

    This recipe has not been tested with any other substitutions or variations. If you try something else out please let me know how it turns out in the comments below!

    Step By Step Instructions

    Arugula Pear Salad 4
    Step #1: Wash all produce. Slice the pairs longways. Assemble the salad and set aside. Now, place all dressing ingredients in a bowl and mix until well mixed throughout.

    Recipe FAQs

    Do I need to peel the pears for this salad?

    That is up to you. Bosc pears have a thicker skin, but it does not bother me.

    How do I know if a pear is ripe?

    Pears should be somewhat softer to touch when they are ripe. They should be juicy. A pear will also slightly change color from bright green to more of a yellow brown as it ripens.

    How should I cut pears for a salad?

    Pears should be washed first, then cut longways. Remove the core with a spoon, then cut each slice about 1/4 inch thick.

    Expert Tips

    • Tip #1: Slice the pears thin.
    • Tip #2: Make your dressing in advance. It makes life so much easier! You can also use this dressing for other salads too. If you make it in advance, make sure you mix the dressing up prior to using so it is well mixed all throughout.
    • Tip #3: Wash the pears before slicing.

    Storage Instructions

    • It is best to store this homemade salad without the salad dressing on it. Store in two separate air tight containers. You can store the salad for up to 5 days.

    Other Healthy Homemade Easy Salads On The Blog

    • strawberry poppyseed salad 1 scaled
      Panera Inspired Strawberry Poppyseed Salad
    • Arugula salad with squash, feta sheet, pine nuts and dates on a plate.
      Butternut Squash Feta Salad
    • paleo fig salad2
      Fall Salad With Fig Balsamic Salad Dressing
    • picture of an anti-inflammatory salad
      The Best Kale Salad With Tahini Dressing

    Are you interested in my go to anti-inflammatory swaps?

    are you interested in a list of my go to healthy alternatives?

    Download your FREE guide
    Arugula salad on a plate with pears, goat cheese, sunflower seeds and pomegranate.

    Arugula Pear Salad

    Course Appetizer, Salad, Side Dish
    Cuisine American
    Diet Gluten Free
    Prep Time 8 minutes minutes
    Total Time 10 minutes minutes
    Servings 6 people
    Author Allianna Moximchalk
    184kcal
    Cost $6
    Print Recipe Pin Recipe

    Equipment

    • Salad and dressing bowl
    • Small whisk To make the dressing

    Ingredients

    For the salad:

    • 6 cups baby Arugula
    • 2 whole pears Washed and sliced.
    • 1 cup cheese I am dairy free so I used dairy free goat cheese, but you can also use parmesan cheese. Obviously, it does not need to be dairy free!
    • 1 cup fresh blackberries washed

    For the dressing:

    • 2 tbsp maple syrup
    • 1 tbsp dijon mustard
    • 1 tsp garlic powder
    • 2 tbsp lemon juice
    • 1/4 cup olive oil
    • 1/4 tsp sea salt
    • 1/4 tsp black pepper

    Instructions

    For the salad:

    • Wash the pears and slice longways. Assemble the salad by adding the greens, blackberries, pears and cheese to the bowl.

    For the dressing:

    • Add all ingredients in a bowl and whisk together. If you are prepping the dressing in advance, wait to mix the salad with the dressing and store separately.

    Notes

    Nutriton: The nutriton in this recipe is just an estimate and cannot be guaranteed.
    Servings: This recipe yields approximately 6 servings.
    Storage: You can store this salad in the fridge for up to 5 days.  If you are prepping the dressing in advance, make sure to mix it up.
    This super simple Arugula Pear Salad goes well with just about anything. You can have it on the table in less than 10 minutes!
    Serving: 1serving | Calories: 184kcal | Carbohydrates: 6g | Protein: 5g | Fat: 16g | Saturated Fat: 5g | Polyunsaturated Fat: 1g | Monounsaturated Fat: 8g | Cholesterol: 19mg | Sodium: 254mg | Potassium: 117mg | Fiber: 1g | Sugar: 5g | Vitamin A: 666IU | Vitamin C: 3mg | Calcium: 175mg | Iron: 0.5mg
    Tried this recipe?Tag me on instagram @alliannaskitchen!
    Close up photo of strawberry gluten free muffins in a bowl.

    February 25, 2024 Breakfast

    Gluten Free Strawberry Muffins

    These blender flourless healthy Gluten Free Strawberry Muffins are super easy to make and only require 10 minutes of prep time! This gluten free muffin recipe is soft, fluffy and full of flavor. We love having a fresh batch of muffins filled with summer fruits and fresh berries in our house at all times and juicy strawberries are a top favorite. These gluten-free strawberry muffins are not only delicious, and super kid friendly too! We love having a fresh stash of muffins on hand at all times for to go snacks and breakfasts.

    Gluten free strawberry muffins on a plate and garnished with fresh banana and strawberries.

    These would be a perfect snack to keep on hand for after school afternoon snack for the kids. You can pair these as a healthy desert option as well to end any of your meals as well or are great breakfast recipes as well. Pair these with additional fresh fruit or even drizzle nut butter for additional nutrients.

    As a busy wife and business owner having a quick but healthy snack available is key. Add that all I have to do is dump all of the ingredients into a blender and go and I’m sold! If you like baking with fresh fruit, you should also check out my Vegan Peach Cobbler! Other easy recipes I love are: Gluten-Free Blackberry Muffins, Gluten Free Zucchini Bread, Gluten Free Lemon Poppyseed Muffins, Gluten Free Orange Cake, Gluten Free Pumpkin Muffins, Gluten Free Lemon Raspberry Muffins, Gluten Free Zucchini Muffins, Gluten Free Apple Muffins, Gluten Free Pumpkin Bread, and Strawberry Oatmeal Bars. If you have leftover strawberries on hand, check out my Strawberry Simple Syrup. I even have a dog treat recipe on my blog for your fur babies, check out my Liver Cake For Dogs Recipe on my blog. Dogs love this treat. I love making my dog a treat when I make us humans a treat too!

    [feast_advanced_jump_to]

    Why You Will Love These Gluten Free Strawberry Muffins

    • First off, they only take 10 minutes to prep!
    • These gluten-free muffins are naturally gluten free, dairy free, soy free, refined sugar free, flourless, grain free, and paleo and celiac friendly! 
    • These muffins are super kid friendly too, kids love them! The perfect recipe for all family member to enjoy.
    • You can freeze these muffins for up to a month in the freezer. 
    • I love making these flourless muffins on the weekend, with this recipe you can have fresh muffins on the table within 30 minutes. 
    • This recipe was inspired by my meal prep clients, they love seasonal muffins! You can check out my weekly meal prep menu if you are in the Pittsburgh area or you can even check out the other gluten free muffin recipes I have on my blog. 
    • This recipe is easy to clean up with the only dishes being your measuring cups, measuring spoons, muffin pan, and the blender!
    • I like to pair mine with dairy free greek yogurt for additional protein.

    Ingredients

    Gluten free strawberry muffin ingredients in small glass bowls.
    • Almond butter-This is the base of the recipe and what allows these muffins to be smooth! Be sure to get a smooth almond butter. 
    • Strawberries-Stems removed, washed, and diced!
    • Pure maple syrup-To sweeten the muffins, if you are looking for a lower carb option you can skip the sweetener.
    • Eggs-This binds the muffins together. Ensure these are at room temperature prior to mixing.
    • Apple cider vinegar-This helps the muffins rise with the baking soda. 
    • Baking soda-Pushes the muffins to expand. 

    See recipe card below for a full list of ingredients and measurements.

    Substitutions and Variations

    • You can substitute fresh strawberries with frozen strawberries but this will add additional moisture to the batter and change the consistency. I would recommend letting the frozen strawberries thaw completely prior to mixing so that you can better control the amount of additional moisture that would be going into the muffins.
    • If you prefer a different nut butter, you can swap that with the almond butter. You will just want to make sure the nut butter you choose is smooth so that the muffins consistency does not change.
    • If you do not like maple syrup, you could swap it out for a different sweetener such as coconut sugar or honey. You will just need to adjust the measurements to suit the sweetness of the muffins since one may be sweeter than another.
    • Adding some dairy free chocolate chips would be a wonderful additional as well for an added pop of sweetness.
    • You could also add vanilla extract, almond extract, or lemon zest for additional flavor as well.

    This recipe has not been tested with other substitutions or variations. If you replace or add any ingredients, please let us know how it turned out in the comments below!

    Step by Step Instructions

    Gluten free strawberry muffin ingredients in a blender base.

    Photo 1: First, preheat the oven to 375 degrees F. Then, place all ingredients into the blender.

    Strawberry muffin ingredients blended smooth in a blender base.

    Photo 2: Blend the ingredients until smooth on medium-high speed.

    Strawberry muffin batter in a silicone muffin pan.

    Photo 3: Spray your muffin pan with non-stick cooking spray oil to prevent from sticking. Pour your batter evenly between eight muffin cups.

    Strawberries on top of strawberry muffin batter in muffin pans.

    Photo 4: Then, drop the diced chopped strawberries on top of each muffin and mix in. Bake for 18 minutes or until you can stick a fork in the muffin and it comes out clear. Finally, allow the muffins to sit before removing.

    Equipment Needed

    • Blender: I absolutely love this blender! It gives you the most bang for your buck with all of the attachments that come with it. I have had mine for a few years now and I always highly recommend it to friends and family
    • Silicone cupcake pan: Can I just say GAME CHANGER?! Finding the silicone cupcake pans have changed baking for me. No more fussing with the paper liners and it also allows me to bulk make these muffins and freeze them without having to worry about the paper. It is an added bonus that it also allows for less waste by now having to throw out the paper liners.
    • Measuring cup and spoons: These are such a great deal! They are durable and give you many different sizes.

    Expert Tips

    • Tip # 1: If you want a small bite size snack version of these healthy strawberry muffins, you can also purchase a mini muffin tin. The small bite sizes would be great for kids and make these muffins even easier to eat on the go!
    • Tip # 2: If you are able to, invest in the silicone muffin liners! They are so much easier to clean and the muffins literally just pop right out. They have both regular size silicone muffin liners as well as mini! You can find them in local stores now as well as online.
    • Tip # 3: For the best results, be sure to allow your muffins to sit prior to moving to prevent them from falling apart. If you won’t have time for them to fully cool prior to moving, make sure to bake them in individual muffin cup liners so that you can transport them easier without as much risk of them breaking during transportation. You can allow these too cool on a cooling rack to ensure even air flow for cooling.
    • Tip # 4: Don’t throw out your ripe bananas! If they are too ripe to eat, place them in a storage bag in your freezer and use them in your smoothies and baking recipes such as these muffins! You will just want to make sure to allow the bananas to thaw prior to mixing your muffin batter.

    Recipe FAQs

    Can I substitute peanut butter for almond butter?

    Absolutely! However, peanut butter tastes a bit richer than almond butter so please note the taste will be a little different. You will also want to make sure that you use smooth nut butter. Another version such as chunky peanut butter will change the consistency of the muffins.

    What kind of almond butter should I choose?

    I suggest using a creamy and smooth almond butter (one without almond chunks). I love using the kirkland brand for this. They have the best almond butter made with just pure almonds – no fillers. I have found it is the best bang for your buck! The key with the almond butter is to make sure to read your ingredient list on the product to ensure there are no fillers or additives.

    Can I use frozen strawberries?

    Yes, however, I suggest allowing them to thaw out before baking with them as they will be holding on to some water. You will also want to make sure there are no fillers or additives to the frozen berries you purchase. To get rid of some of the liquid, you could allow the strawberries to thaw in a strainer that is sitting over a bowl so that the liquid drains into the bowl and away from the berries. I recommend using fresh strawberries during strawberry season for the best flavor.

    How will I know if they are done?

    I like to stink a toothpick or knife into the muffins to check. If it comes our clean your muffins are ready! You will want to remember to allow the muffins to cool prior to removing from the pan so they do not break apart. I also like for these delicious muffins to be golden brown when they come out. Just ensure that the bottom of the muffin is not burnt.

    Can I freeze these muffins?

    I don’t recommend freezing the muffins because they will change the texture. If you want to though, I would recommend freezing in a single layer with a piece of parchment paper separating the layers of muffins to prevent sticking when you thaw them. You will also want to make sure that you bake the muffins in a silicone muffin pan so that the paper muffin liners don’t effect the muffins when they thaw.

    Strawberry muffins garnished with banana slices and fresh strawberries.

    Storage Instructions

    • Refrigerator: This recipe can be stored in an airtight container in the refrigerator for up to 5 days!
    • Freezer: This recipe can be stored in the freezer in a single layer with a piece of parchment paper separating the layers of muffins for up to one month.

    Other Gluten Free Recipes You Will Love

    • poppyseed muffins on a plate with lemons
      Gluten Free Lemon Poppyseed Muffins
    • raspberry muffins stacked on a plate
      Gluten Free Raspberry Lemon Muffins
    • close up photo of zucchini muffins on a plate with chocolate chips
      Gluten Free Zucchini Muffins
    • banana muffins with walnuts in them
      Gluten Free Banana Walnut Muffins (Flourless)

    Are you interested in getting a list of my go to healthy alternatives?

    download your FREE guide below

    download your free guide
    Close up photo of strawberry gluten free muffins in a bowl.

    Gluten Free Strawberry Muffins

    Course Dessert, Snack
    Cuisine American
    Diet Gluten Free
    Prep Time 10 minutes minutes
    Cook Time 18 minutes minutes
    Total Time 28 minutes minutes
    Servings 8 muffins
    Author Allianna Moximchalk
    245kcal
    Cost $3
    Print Recipe Pin Recipe

    Equipment

    • muffin pan
    • blender

    Ingredients

    • 1 cup creamy almond butter
    • 2 eggs
    • 1/4 cup maple syrup
    • 1 cup strawberries washed, stems removed and diced
    • 1 tsp apple cider vinegar
    • 1 tsp baking soda
    • 1 banana

    Instructions

    • Preheat the oven to 375 degrees F. Place all ingredients in a blender except the strawberries and blend until smooth.
    • Once the batter is blended, either use a silicone muffin pan or a muffin pan and add muffin cups or spray it with oil to prevent sticking. Divide up the batter between 8 muffin cups and then drop in the chopped strawberries. Mix the batter with the strawberries with a spoon. Bake for 18 minutes or until you can stick a fork in the muffin and it comes out clear. Allow the muffins to sit before removing.

    Notes

    Storage: This recipe can be stored in an airtight container in the refrigerator for up to 5 days. 
     
    Nutrition: The nutrition for this recipe is an estimate and the calorie count is not guaranteed.  It is based off of 8 servings. 
     
    Servings: This recipe should yield 8 servings. 
     
    These flourless gluten free strawberry muffins are super easy to make and so delicious!
    Serving: 1muffin | Calories: 245kcal | Carbohydrates: 15g | Protein: 8g | Fat: 18g | Saturated Fat: 2g | Polyunsaturated Fat: 4g | Monounsaturated Fat: 11g | Trans Fat: 1g | Cholesterol: 41mg | Sodium: 156mg | Potassium: 337mg | Fiber: 4g | Sugar: 8g | Vitamin A: 71IU | Vitamin C: 8mg | Calcium: 125mg | Iron: 1mg
    Tried this recipe?Tag me on instagram @alliannaskitchen!
    poppyseed muffins on a plate with lemons

    February 20, 2024 Breakfast

    Gluten Free Lemon Poppyseed Muffins

    These Gluten Free Lemon Poppyseed Muffins are so simple to make and so delicious! This easy recipe only takes 10 minutes to prepare and less than 20 minutes to bake. This light and fluffy batter combined with the fresh lemon juice and zest is to die for and perfect for Spring and Summer that your whole family will enjoy. 

    Lemon poppyseed muffins on a plate garnished with fresh lemon.

    These fluffy muffins are a great item for after school snacks or a healthy snack on the go as well. You can add additional nutrients by adding your nut butter of choice spread or drizzled on top. With the light flavors of these healthy lemon poppyseed muffins, the pairing options are endless! If you like to bake with fresh fruit, you should also check out my Vegan Peach Cobbler recipe.

    This recipe would be a great addition to your next brunch, bridal shower, baby shower, Mother’s Day brunch, or luncheon! Any dish that I can place the ingredients in a blender and go is a hit in my books! It is a quick and easy snack or dessert recipe that won’t feel heavy but is filling and will help satisfy your sweet tooth. Additional gluten free muffin recipes I love are: Gluten-Free Blackberry Muffins, Gluten Free Pumpkin Muffins, Healthy Gluten Free Strawberry Muffins, Gluten Free Raspberry Lemon Muffins, Gluten Free Zucchini Muffins, Gluten Free Zucchini Bread, Gluten Free Pumpkin Bread, and Gluten Free Apple Muffins. I even have a dog treat recipe on my blog for your fur babies, check out my Liver Cake For Dogs Recipe on my blog. Dogs love this treat. I love making my dog a treat when I make us humans a treat too!

    [feast_advanced_jump_to]

    Why You Will Love This Recipe

    • First off, these paleo lemon poppy seed muffins are so easy to make and include simple ingredients. You can literally just throw the ingredients in the blender and blend! Since these are flourless muffins there is no need to mix wet ingredients and dry ingredients separately first.
    • Secondly, this recipe is naturally dairy free, gluten free, grain free, flourless, soy free, paleo and refined sugar free. 
    • The creamy almond butter combined with the fresh lemon juice and zest is so good, the poppyseed crunch is the icing on the cake.
    • These tender muffins just scream Summer and Spring just like my Lemon Raspberry Flourless Muffins. 
    • This moist muffin recipe only requires 10 minutes of hands-on time which means it’s a great recipe to make when you want something from scratch but do not have much time. 
    • This recipe is completely from scratch, no processed healthy ingredients here!
    • These homemade muffins freeze super well which means you can easily batch bake them. 
    • These flourless muffins are super kid friendly too. 

    Ingredients

    Healthy lemon poppyseed muffin ingredients in small glass bowls.
    • Almond butter-Make sure it is creamy. I love the almond butter from Costco. The only two ingredients are almonds and salt. I have also found it is the most economical brand in terms of what you get for your money! Make sure whatever brand you buy is clean-no additives. 
    • Eggs-This helps bind everything together. Ensure your eggs are at room temperature to help the batter is well combined.
    • Banana-This adds some sweetness and also holds things together too. A great tip is to freeze your ripe bananas that you won’t eat fresh so that you have them for the next time you bake.
    • Poppy Seeds – A must!
    • Fresh Lemons-Make sure you both juice and zest your lemons, this is what will give these muffins so much flavor. 
    • Maple syrup-To sweeten the muffins. If you are looking for a lower card option you can skip the sweetener.
    • Apple cider vinegar – This helps the muffins rise with the baking soda.
    • Baking soda – Pushes the muffins to expand.

    See the recipe card below for a full list of ingredients and measurements.

    Substitutions and Variations

    • I love the taste of poppyseeds in recipes, but if after trying this recipe you feel like the flavor is too strong, you can always decrease the poppyseed measurement the next time.
    • If you do not have fresh lemon juice you can use lemon extract. You will want to adjust the measurement though since it will have a much more potent taste but maintain the bright lemon flavor either way. Fresh lemon zest would also be a delicious addition to enhance the lemon flavor.
    • If you prefer a different nut butter, you can swap that with the almond butter. You will just want to make sure that you still use a creamy nut butter so that the consistency of the muffins does not change.
    • If you do not like maple syrup, you could swap it out for a different sweetener such as honey or coconut sugar. You will just need to adjust the recipe to accommodate the different sweetener since they won’t match 1:1.
    • For additional flavor, you can incorporate vanilla extract into the batter.

    This recipe has not been tested with other substitutions or variations. If you replace or add any ingredients, please let us know how it turned out in the comments below!

    Step by Step Instructions

    All of the ingredients for lemon poppyseed muffins in the blender base.

    Photo 1: First, preheat the oven to 375 degrees F. Then place all of the ingredients in a blender except for the poppyseeds.

    All of the lemon poppyseed ingredients blended together.

    Photo 2: Next, blend until smooth. Then, for the best results add in the poppyseeds and fold in with a spatula.

    Lemon poppyseed muffin batter in a cupcake pan.

    Photo 3: Line a muffin tin with paper liners or use a silicone muffin pan. Divide up the muffin batter between 12 muffin cups.

    Lemon poppyseed muffins in muffin pan.

    Photo 4: Bake for 18-20 minutes or until you can stick a fork in and it comes out clean. Allow the muffins to cool for 10 minutes prior to serving.

    Equipment Needed

    • Blender – I absolutely am obsessed with how many attachments come with this blender! I have had mine for years and it is still in great shape.
    • Silicone muffin pan – These muffin pans have been a game changer for me! I use them for everything from egg muffins to baking cupcakes. These are also perfect for bulk baking because you don’t have to spend the time peeling the paper liners off of the muffins before freezing them.

    Expert Tips

    • Tip # 1: Be sure to fold in your poppyseeds rather than put them in the food processor, the food processor will break them down. You will want to make sure you fold completely from the bottom of the bowl so they are well incorporated.
    • Tip # 2: Do not forget to let your gluten-free muffins set and sit for 10 minutes prior to serving. This will prevent them from falling apart. If you are going to freeze the muffins, you will want to let them completely cool before placing them in single layers in freezer bags.
    • Tip # 3: If you are using frozen banana, make sure to thaw completely prior to blending. Blending frozen will change the consistency of the batter. I love to freeze bananas that are to ripe instead of throwing them out! I just put them into a freezer bag and then they are ready for any time I want a smoothie or need them for a baking recipe.

    Recipe FAQ

    What kind of muffin pan do you use?

    I like using either a regular muffin pan with muffin liners OR a silicone muffin pan. The silicone ones are so simple to clean and pop right out. The silicone muffin pan is my go to whenever bulk baking so that I don’t have to worry about removing the liners before freezing.

    Can I freeze these muffins?

    Absolutely, however be sure you use the silicone muffin pan instead of a regular pan. The paper liners will get broken down in the freezer. The best way to freeze you will want to place the muffins in single layers and separate layers with parchment paper. This way they won’t stick together or break when you thaw them.

    Can I make these into mini muffins?

    Absolutely! I love this little mini silicone muffin pan. These would be a great option for kids snacks and make the muffins even easier to enjoy on the go! They remind my of the classic mini muffins from my childhood.

    Can I use lemon extract instead of fresh lemon juice?

    Lemon extract will have a more powerful aroma and taste with less but it also won’t have the same refreshing effect as fresh juice. I recommend using fresh lemon juice because it will allow the muffins to have a better taste than an extract.

    Lemon poppyseed muffin on a plate and garnished with fresh lemon.

    Storage Instructions

    • This recipe can be stored in the refrigerator in an airtight container for up to 5 days.
    • You can also store these muffins in the freezer for up to 1 month in an airtight container. You will just want to remember to use a silicone muffin pan to bake or to remove the paper liners so they don’t break down in the freezer.

    Other Muffin Recipes You Will Love

    • paleo pumpkin muffins on a plate
      Gluten Free Pumpkin Muffins
    • close up photo of an apple muffin with cinnamon
      Gluten Free Apple Muffins
    • paleo blueberry muffins 6 scaled
      Paleo Blueberry Muffins
    • gluten free banana chocolate chip muffins 1
      Gluten Free Banana Chocolate Chip Muffins

    Are you interested in getting a list of my healthy go to alternatives?

    download your FREE guide below

    download your own free guide
    close up photo of poppyseed muffins on a plate

    Healthy Lemon Poppyseed Muffins

    Course Breakfast, Dessert, Snack
    Cuisine American
    Diet Gluten Free
    Prep Time 10 minutes minutes
    Cook Time 18 minutes minutes
    Total Time 28 minutes minutes
    Servings 12 muffins
    Author Allianna Moximchalk
    174kcal
    Cost $3
    Print Recipe Pin Recipe

    Equipment

    • high speed blender
    • Silicone muffin pan

    Ingredients

    • 1 cup creamy almond butter
    • 3 lemons juiced & zested
    • 2 eggs
    • 3 tbsp maple syrup
    • 1 tsp baking soda
    • 1 tsp apple cider vinegar
    • 1 banana ripe
    • 2 tbsp poppyseeds

    Instructions

    • Preheat the oven to 375 degrees F. Place all ingredients in a blender EXCEPT the poppyseeds and blend until smooth. Then, add in the poppyseeds and fold in with a spatula. Line a muffin pan with paper liners or use a silicone muffin pan.
    • Divide up the batter between 12 muffin cups. Bake for 18-20 minutes or until you can stick a fork in and it comes out clean. Allow the muffins to cool for 10 minutes prior to serving.

    Notes

    Storage: This recipe can be stored in the refrigerator in an air tight container for up to 5 days. 
     
    Nutrition: The nutrition for this recipe is an estimate and the calorie count is not guaranteed.  It is based on 12 servings. 
     
    Servings: This recipe should yield 12 servings. 
    Quick, easy, and delicious flourless lemon poppyseed muffins. These muffins are perfect for Summer!
    Serving: 1muffin | Calories: 174kcal | Carbohydrates: 12g | Protein: 6g | Fat: 13g | Saturated Fat: 1g | Polyunsaturated Fat: 3g | Monounsaturated Fat: 7g | Trans Fat: 1g | Cholesterol: 27mg | Sodium: 104mg | Potassium: 248mg | Fiber: 3g | Sugar: 6g | Vitamin A: 50IU | Vitamin C: 10mg | Calcium: 109mg | Iron: 1mg
    Tried this recipe?Tag me on instagram @alliannaskitchen!
    Close up photo of a piece of cake on a plate with blackberries and lemons on top.

    February 19, 2024 Dairy free

    Dairy Free Gluten Free Lemon Pound Cake

    This Easy Gluten Free Lemon Cake is perfect for Spring and something everyone will love especially lemon lovers! This Starbucks copycat is a healthier alternative and let me tell you, it is so easy to make. This lemon cake is bursting with lemon flavors yet it is oh so sweet.

    A piece of gluten free lemon cake on a plate with blackberries and lemons on top.

    This recipe is my go to in the Summer or Springtime when we have company. It is light, fluffy, sweet and full of flavor! My husband loves it so much that this is his number one requested dessert recipe for his birthday.

    I love to bake with fresh lemon and citrus especially during the summer. Some of my favorite recipes are: Dairy Free Sugar Cakes, Gluten Free Lemon Bars, Gluten Free Lemon Poppyseed Muffins, Gluten Free Raspberry Lemon Muffins, Healthy Gluten Free Strawberry Muffins, Gluten Free Zucchini Bread, Gluten Free Orange Cake, my Gluten and Dairy Free Cake, and Cherry Lime Cheesecake. I even have a dog treat recipe on my blog for your fur babies, check out my Liver Cake For Dogs Recipe on my blog. Dogs love this treat. I love making my dog a treat when I make us humans a treat too!

    [feast_advanced_jump_to]

    Why I Love This Recipe

    • This gluten free pound cake recipe is kid proof. Meaning, kids can easily help with it!
    • There is just something about lemon filled desserts during the warmer weather months. My lemon cake recipe just screams Spring & Summer!
    • This is one of my go to desserts on Easter, I always serve this with my Flourless Raspberry Muffins and Healthy Lemonade.
    • If you are not a big baker, but want to try this recipe, you can even order it from my meal delivery service, we will deliver a slice right to your door!
    • This cake freezes well. You can get approximately 12-14 servings from this cake. If your house is anything like my house, this cake will disappear fast. However, if you have some leftover, you can freeze it! It will taste just as good.
    • Unlike most gluten free cake recipes, this recipe is nice and moist with a tender crumb.
    • This recipe is naturally dairy free, gluten free, soy free, grain free, refined sugar free and paleo friendly.

    Ingredients

    Cake ingredients:

    • Almond flour-This is the base of the recipe and one of my go to flours with gluten free and grain free baking.
    • Arrowroot flour/ powder-This is my go to binder in grain free baking. It can act a lot like corn starch, which is typically avoided in anti-inflammatory eating. I talk all about arrowroot in my go to anti-inflammatory eating guide. I get my gluten free flours from Thrive Market. They offer healthier alternatives at a fraction of the price. If you use my link you can get a discount when you sign up!
    • Baking soda-This helps the cake rise.
    • Sea salt-To balance out the sweetness.
    • Honey-For sweetener. I love using honey because it adds the perfect amount of sweetness, but it is not too sweet.
    • Olive oil-This keeps the cake nice and moist.
    • Eggs-To bind everything together. Make sure to bring to room temperature before mixing.
    • Vanilla extract-For flavor.
    • Fresh lemon zest & fresh lemon juice-To give the cake it’s lemon flavor!

    Frosting ingredients:

    • Palm oil shortening-This is the base of the frosting!
    • Honey-To sweeten the frosting.
    • Vanilla extract-This adds a little bit of flavor to the frosting.
    • Arrowroot-This helps thicken the frosting so it does not run too thin.
    • Coconut oil-To smooth out the frosting.

    See recipe card below for a full list of ingredients and measurements.

    Substitutions And Variations

    • Olive oil-You can substitute the olive oil for coconut oil but it is important to note that coconut oil in higher amounts can upset some peoples stomachs. This is why in this recipe we use coconut oil in the frosting only because it requires a smaller amount. The cake requires a good bit of oil which is why we suggest olive oil.
    • Arrowroot flour-You can also use tapioca flour in this recipe.
    • If you are not gluten free, you can use all purpose flour instead of almond flour.
    • If you are not dairy free, you could make a cream cheese frosting instead of the palm oil shortening icing listed above.

    This recipe has not been tested with other substitutions or variations. If you replace or add any ingredients, please let us know how it turned out in the comments below!

    Recipe Instructions

    Almond flour, arrowroot powder, baking soda and salt in a clear glass bowl.

    Photo #1: Preheat the oven to 350 degrees F. Then, add all of the dry cake ingredients to a large bowl and mix well throughout.

    Honey, olive oil, lemon juice, eggs and lemon zest in a glass bowl whisked together.

    Photo #2: Mix the wet cake ingredients in a separate large bowl until well mixed throughout.

    Wet and dry cake mixture mixed together.

    Photo #3: Mix the wet and dry cake mixture together.

    Cake mixture in a red silicone bundt pan.

    Photo #4: Spray the silicone bundt cake pan with cooking spray oil and pour batter by filling halfway with the cake batter. Bake for 45-50 minutes or until you can stick a fork in and it can come out clean.

    Baked lemon cake in a red silicone pan.

    Photo #5: Remove the bundt pan from the oven and allow for the cake cool for 30 minutes prior to frosting the cake.

    Frosting ingredients in a clear bowl.

    Photo #6: Add the frosting ingredients to a clear bowl.

    Whipped frosting in a bowl.

    Photo #7: Whip the frosting in a bowl until smooth.

    Pink spatula frosting the cake.

    Photo #8: Frost the cake with a silicone spatula.

    Lemon zest on top of the cake.

    Photo #9: Sprinkle optional additional lemon zest on top for extra flavor.

    Equipment Needed

    • Bundt pan-I suggest using a silicone one. Silicone pans are much easier to clean and the cake just pops right out!
    • Mixing bowls-I am obsessed with glass nesting mixing bowls. They store so well by stacking on top of each other and have a clean look.
    • Hand mixer or kitchen mixer-For the frosting. This will make your life so much easier and get the frosting soft and fluffy.

    Money Saving Tip

    • I love ordering a bunch of my healthy staples from Thrive Market. They have them available at a fraction of the cost and your ingredients get delivered right to your door!

    Expert Tips

    • Tip #1: Do not over fill the bundt pan! For the best results this pan should only be half way filled. If you over fill it you run the risk of the cake cooking unevenly. If the cake is too dense, it will burn around the outsides and be soft and uncooked towards the middle of the cake.
    • Tip #2: Cover the cake with foil while baking it. This prevents the outer skirts of the cake from burning.
    • Tip #3: For the best results, allow the cake to sit for 10-20 minutes prior to removing the cake from the the pan. If you remove the cake from the pan too quickly it will fall apart.
    • Tip #4: If you frost the cake while it is hot, the frosting will get runny and appear to melt.
    • Tip #5: Make sure that you ensure that your dry ingredients and wet ingredients are well mixed so that the cake flavor and appearance are consistent throughout.

    Recipe FAQs

    Do I have to make this recipe with almond flour?

    Yes! You cannot substitute out the flour in this recipe 1:1. Not all gluten free flours are created equally so no other flour will work quite as well.

    How do I keep this gluten free cake moist?

    Be sure to store the cake covered in an air tight container in the fridge! This will help to maintain the moist crumb.

    Can I make this recipe into muffins?

    Yes! You can make muffins or cupcakes with this recipe. You will just need to bake them for 20-25 minutes or until you can poke a fork in and it comes out clear.

    How do you recommend frosting this cake without making a mess on the cake stand?

    I like to either frost the bundt cake on a wire rack or cooling rack prior to moving to my cake stand or I will place small amounts of wax paper or parchment paper around the outsides of the cake so that I can easily remove any mess.

    What do you prefer to garnish this cake with?

    I like to garnish this with fresh lemon spirals and fresh berries! It would also be pretty garnished with fresh mint leaves as well.

    Pound cake with white frosting and blackberries and lemon rinds on top with a pink napkin next to it.

    Storage Instructions

    • Refrigerator: You can enjoy this cake for up to 5 days after you make it. This recipe stores best in an airtight container in the fridge. If you allow it to sit out for too long it will get dry.
    • Freezer: If you chose to freeze this recipe, I suggest slicing it first into thick slices and wrapping each individual piece in clear plastic wrap. Then, place it in an airtight container for up to 1 month.

    Other Gluten Free Summer Dessert Recipes

    • raspberry muffins stacked on a plate
      Gluten Free Raspberry Lemon Muffins
    • lemon bars on a sheet pan
      Gluten Free Lemon Bars
    • Apple and blueberry crumble on a plate with whipped cream and apple slices on top.
      Healthy Apple and Blueberry Crumble
    • peach cobbler in two bowls
      Vegan Peach Cobbler

    Are you interested in a guide of my go to healthy alternatives? 

    If you loved this recipe, be sure to check out my FREE go to anti-inflammatory swap guide where I share all of my favorite go to healthy swaps.

    download your FREE guide
    Close up photo of a piece of cake on a plate with blackberries and lemons on top.

    Dairy Free Gluten Free Lemon Pound Cake

    Course Dessert, easy
    Cuisine American
    Diet Gluten Free
    Prep Time 20 minutes minutes
    Cook Time 50 minutes minutes
    Total Time 1 hour hour 10 minutes minutes
    Servings 16 people
    Author Allianna Moximchalk
    465kcal
    Cost $12
    Print Recipe Pin Recipe

    Equipment

    • bundt pan
    • whisk
    • juicer
    • measuring cups & spoons

    Ingredients

    Cake

    • 3 cups almond flour
    • 1 cup arrowroot
    • ¾ tsp baking soda
    • ½ tsp salt
    • 1 cup honey
    • ½ cup EVOO
    • ½ cup lemon juice
    • 4 eggs
    • 1 ½ tsp vanilla extract
    • 1 ½ tbsp lemon zest

    Frosting

    • 1 cup palm oil shortening
    • ½ cup honey
    • 1 tbsp vanilla extract
    • ½ cup arrowroot
    • 1 tbsp coconut oil

    Instructions

    • Preheat oven to 350 degrees F. Combine dry cake ingredients. Combine wet cake ingredients in separate bowl, then combine the two bowls.
    • Stir until they are well combined. Add batter to greased bundt pan. 
    • Bake for 45-50 minutes, or until toothpick comes out clean. 
    • To make the frosting, combine all ingredients and beat together using mixer
    • Once cake is cooled, spread a smooth, thin layer of icing over the cake. 

    Notes

    Storage: I suggest storing this recipe in the fridge in an airtight container for up to 5 days. Be sure it is sealed so it does not dry out!
    Nutrition: The nutrition listed below is just an estimate and cannot be guaranteed.  It is based on 16 servings. 
    Servings: This recipe will make approximately 12-16 slices of cake. 
    Substitutions: You can substitute the honey for maple syrup, however it may make the frosting a little darker. 
    The best lemony treat!
    Serving: 1slice | Calories: 465kcal | Carbohydrates: 42g | Protein: 6g | Fat: 33g | Saturated Fat: 9g | Polyunsaturated Fat: 2g | Monounsaturated Fat: 10g | Trans Fat: 0.004g | Cholesterol: 41mg | Sodium: 141mg | Potassium: 44mg | Fiber: 3g | Sugar: 27g | Vitamin A: 60IU | Vitamin C: 4mg | Calcium: 58mg | Iron: 1mg
    Tried this recipe?Tag me on instagram @alliannaskitchen!
    close up photo of turkey soup in a bowl

    February 18, 2024 Allergy Friendly

    Instant Pot Turkey Soup

    This Instant Pot Turkey Soup is my favorite way to use leftover Thanksgiving turkey. Packed with veggies, turkey, and cauliflower rice, this is such a comforting fall soup while using your holiday leftovers. Instant Pot soups are the best – dump all the ingredients into the pot, and you’re set! Try this soup next time you have leftover turkey. It is guaranteed to be a hit in your house. 

    Instant pot turkey soup in a white bowl with fresh rosemary and a spoon.

    This delicious soup is a great way to not only use up your Thanksgiving leftovers but is also an easy way to fill your freezer with homemade soup for anytime you are wanting something cozy. The leftover turkey meat will soak up all of the flavor and moisture from the bone broth as well as infuse all of the turkey flavor into the soup.

    Soups are a great way to enjoy a warm and cozy meal while also getting additional nutrients. I have developed numerous soup recipes over the years. Some of my favorite soup recipes are: Pumpkin Soup with Chicken, Carrot and Butternut Squash Soup, Gluten Free Tomato Soup, cauliflower leek soup, butternut squash curry, thai shrimp soup, thai creamy chicken soup, and dairy free lobster bisque.

    [feast_advanced_jump_to]

    Why You Will Love This Recipe

    • This is a great way to use up leftover turkey from Thanksgiving!
    • Instant Pot soups are SO easy – dump in all your ingredients and that’s IT. 
    • This soup is packed with the best flavors – veggies, turkey, rice, and seasoned so well. 
    • This recipe is naturally gluten free, grain free, dairy free, flourless, keto, low carb, autoimmune protocol, AIP, vegan, paleo, soy free, and refined sugar free. 
    • If you love soups in the cold Fall time check out my other great fall soup. This Slow Cooker Pumpkin Soup is one of my favorites. 
    • I love to serve this warm and cozy soup with my AIP Bread Rolls on the side.
    • If you are in the Pittsburgh area and would prefer to get this soup delivered right to your doorstep, check out my paleo weekly meal prep menu. 

    Ingredients

    Instant pot turkey soup ingredients in small glass bowls.
    • Cooked turkey meat- You can use white and/or dark meat! This is a perfect way to use up any leftover turkey from Thanksgiving, if you find yourself with an abundance. While any kind of turkey meat will work, my go to Boneless Turkey Breast recipe is my favorite. 
    • Ghee– Or your favorite cooking oil. You will use this to saute the veggies. 
    • Red onion, celery, carrots– The perfect combination of veggies for this Instant Pot Turkey Soup. Each vegetable can be chopped to preference. If you prefer larger chunks of carrot in your soup, cut them into coins.  
    • Garlic & parsley- These seasonings create a wonderful flavor. I used dried parsley, but feel free to use fresh parsley. If you do use fresh, double the amount. Dried ingredients have a stronger flavor. 
    • Bone broth– My favorite brand is Kettle & Fire. I use it for everything! This makes a great soup base. Use code ALLIANNASKITCHEN for 20% off.
    • Lemon– Only the juice will be used in this recipe. This brightens and balances out all the delicious flavors. 
    • Sea salt & black pepper– As desired. 
    • Cauliflower rice (optional)- To make your soup more hearty! A little bit of rice in each bite of soup is so yummy. I love using Trader Joe’s cauliflower rice.

    See the recipe card below for a full list of ingredients and measurements.

    Substitutions and Variations

    • A great variation would be to add gluten free pasta to make it more of a turkey noodle soup. If you are not gluten free, you can also use egg noodles.
    • You can substitute bone broth for turkey broth to enhance even more turkey flavor or if you don’t have that available you could use chicken broth.
    • You could also add brown rice, wild rice, or white rice to this recipe as well to make it more filling.

    This recipe has not been tested with other substitutions or variations. If you replace or add any ingredients, please let us know how it turned out in the comments below!

    Step by Step Instructions

    Uncooked instant pot turkey soup ingredients in a pressure cooker base.

    Photo 1: Remove any bones from the turkey meat and dice the meat. Next, turn on your Instant Pot to Sauté and add the ghee. Once hot, add the carrot, onion, and celery. Stir for 5 minutes until vegetables are softened. Then, add garlic and parsley and stir for 1 minute. Finally, Turn off the Instant Pot and add the turkey, bone broth, rice, salt, and pepper. Stir and lock the lid. Cook on high pressure for 10 minutes.

    Instant pot turkey soup in a bowl with fresh rosemary.

    Photo 2: Naturally release for 10 minutes. Then, vent the remaining pressure. Add lemon juice to the pot and stir. Taste and add any extra salt and pepper if desired.

    Expert Tip

    • Tip # 1: Make sure to allow the pressure to release naturally for AT LEAST 10 minutes. This allows the soup to settle. Releasing pressure gradually is gentler than an instant, quick release. 
    • Tip # 2: If you are the sautéed onions, carrots, and celery start to stick to the instant pot while sautéing you can add additional ghee to the pot or you could substitute for olive oil.
    • Tip # 3: If you are new to pressure cooking, when you release the pressure you will want to make sure that your hand is not over top or near the valve. The steam that will be released can burn you if it is near the steam.

    Recipe FAQs

    What electric pressure cooker or instant pot do you use?

    I have a Ninja Foodi. It’s the BEST and has 11 different functions, but only takes up 1 spot on the counter. 

    Can I use white onion instead of red?

    Sure! The flavor profiles of each onion are a bit different, so just note, it may alter the taste. For reference, red onions are subtly sweet and mild. White onions are strong and sharp. Yellow onions have the deepest flavor. 

    What can I serve with this dish?

    This makes a great lunch, dinner, or side dish. There are so many possibilities for this Instant Pot Turkey Soup. If you are eating this as a main dish, I suggest serving The Best Vegan Garlic Bread with it! 

    Can I make this dish on the stove top instead of in an Instant Pot?

    Yes! Absolutely. Follow all of the same steps except using a soup pot. You will also want to cook this soup on the stove top over medium heat and cooking time could vary depending on your stove.

    What kind of turkey should I use?

    Any kind will work. This recipe is intended to be made with Thanksgiving Day leftovers. I also love using my Boneless Turkey Breast Recipe for this recipe too!

    How do you garnish this dish?

    I like to add minced fresh herbs on top for extra flavor.

    Bowl of instant pot turkey soup in a white bowl with a fresh spring of rosemary.

    Storage Instructions

    • The leftover soup can be stored in the refrigerator for up to 5 days in an airtight container.
    • The leftovers can be stored in the freezer for up to 3 months in an airtight contianer.

    Other Soup Recipes You Will Love

    • overhead shot of pumpkin soup in bowls
      Pumpkin Slow Cooker Soup
    • Pumpkin carrot soup in a scalloped bowl with parsley and pomegranate on the side.
      Chicken Carrot Pumpkin Soup
    • cauliflower and leek soup in a bowl with fresh herbs on top
      Cauliflower Leek Soup
    • overhead shot of red soup in a bowl
      Gluten Free Tomato Soup

    Are you interested in a guide of my go to healthy alternatives?

    Download your FREE guide below

    download here
    close up photo of turkey soup in a bowl

    Instant Pot Turkey Soup

    Course Dinner, easy, Main Course, Side Dish, Soup
    Cuisine American
    Diet Gluten Free
    Prep Time 10 minutes minutes
    Cook Time 10 minutes minutes
    Pressurizing & Depressurizing 20 minutes minutes
    Total Time 40 minutes minutes
    Servings 4 people
    Author Allianna Moximchalk
    111kcal
    Cost $10
    Print Recipe Pin Recipe

    Equipment

    • Instant Pot

    Ingredients

    • 2 cups cooked turkey meat white and/or dark
    • 1 tbsp ghee
    • 1 red onion diced
    • 2 carrots chopped
    • 2 celery stalks chopped
    • 4 garlic cloves minced
    • 1/2 tsp parsley
    • 5 cups bone broth
    • 1/2 tsp sea salt
    • 1/4 tsp black pepper
    • 1/2 lemon juiced
    • 1/2 cup cauliflower rice optional

    Instructions

    • Remove any bones from the turkey meat. Dice the meat.
    • Turn on your Instant Pot to Saute and add the ghee. Once hot, add the carrot, onion, and celery. Stir for 5 minutes, until veggies are softened.
    • Add garlic and parsley. Stir for 1 minute.
    • Turn off the Instant Pot. Add turkey, bone broth, rice, salt, and pepper. Stir and lock the lid. Cook on High Pressure for 10 minutes.
    • Release pressure naturally for 10 minutes. Then, vent the remaining pressure.
    • Add lemon juice to the pot and stir. Taste and add any extra salt & pepper, if desired.

    Notes

    Storage: This recipe can be stored in the refrigerator for up to 5 days in an airtight container. 
    Freezer: This recipe can be stored in the freezer for up to 3 month sin an airtight container. 
    Nutrition: The nutrition for this recipe is an estimate and the calorie count is not guaranteed.  It is based on 4 servings. 
    Servings: This recipe should yield 4 servings. 
    Paleo & Whole30 Friendly leftover turkey soup in the Instant Pot
    Serving: 1bowl | Calories: 111kcal | Carbohydrates: 9g | Protein: 12g | Fat: 4g | Saturated Fat: 2g | Polyunsaturated Fat: 0.2g | Monounsaturated Fat: 1g | Cholesterol: 10mg | Sodium: 433mg | Potassium: 235mg | Fiber: 2g | Sugar: 3g | Vitamin A: 5110IU | Vitamin C: 22mg | Calcium: 31mg | Iron: 0.4mg
    Tried this recipe?Tag me on instagram @alliannaskitchen!
    chicken tenders in a basket with ketchup

    February 12, 2024 Air Fryer

    Keto Chicken Tenders

    These gluten free crispy Keto Chicken Tenders are so easy and simple to make. Requiring less than 10 minutes of hands-on time and only ingredients that you likely have in your fridge, this recipe is a no-brainer for busy weeknights. This recipe is so versatile you can eat these chicken tenders as is (kids love them) or even toss them on top of a salad.

    Homemade keto chicken tender being dipped in sauce.

    This chicken remains so juicy even throughout cooking and you won’t notice it is part of a keto diet with all of the flavor! I love the versatility that breaded chicken brings to meal planning. It can be paired with any side or be added to your favorite salad as well so that it is something that the whole family can enjoy.

    Chicken is such a versatile protein to cook with which is why I have developed so many different recipes using it. Some of my favorite chicken dishes are: pepperoni pizza chicken, paleo cashew chicken sheet pan style, sheet pan chicken fajitas, paleo chicken parmesan, Gluten Free Fried Chicken, Dairy Free Crab Dip, and paleo chicken piccata. We also love to use this recipe as a fun appetizer with my Gluten Free Pigs in a Blanket and Gluten Free Crab Cakes recipe.

    [feast_advanced_jump_to]

    Why You will Love This Recipe

    • These chicken tenders are SO easy to prepare. They are great for the nights when you do not have much time to cook but still want something delicious and homemade.
      These Paleo Chicken Tenders are so juicy. Chicken is one of the easiest things to overcook and in this recipe, the chicken is cooked perfectly. 
    • You likely already have on hand everything you need for this recipe-chicken breasts and spices. 
    • This recipe is egg free. No egg wash or egg mixture is required here!
    • You can make this recipe two different ways-in the oven or in the air fryer. The air fryer is my personal favorite, that way you do not have to wait for the oven to preheat.
    • This recipe was inspired by my favorite Crispy Crack Chicken, if you are big fan of juicy chicken-check it out! This recipe pairs well with my Crockpot Gluten Free Mac and Cheese. 
    • I love dipping these homemade chicken fingers with my Lemon Dill Aioli.
    • This recipe is naturally ketogenic diet friendly, dairy free, gluten free, paleo, low carb, Whole30 friendly, and autoimmune protocol (AIP) friendly. 
    • Check out my weekly meal prep menu, if you are in the Pittsburgh area. We have all kinds of chicken meals that are delivered right to your door!

    Simple Ingredients Required

    Keto chicken tender ingredients in small glass bowls.
    • Chicken breast– You can also use chicken tenderloins. If you are using chicken breasts make sure you cut the breasts into two longer pieces. If you are using tenderloins be sure that the tendon is removed. If you do not remove it, it will be hard to bite into. I love to get all of my chicken breasts and tenderloins from Butcher Box. They sell the best quality stuff and they ship it right to your door. If you use my Butcher Box link, you can save on your order every month!
    • Garlic powder & sea salt- The seasoning! The air fryer makes this coating so crispy and delicious. If you like your meals spicy you can add a little bit of paprika or black pepper.
    • Cooking oil spray- This holds the seasoning onto the chicken. I love to get my olive oil spray from Costco or Trader Joe’s. I refer to it as the pam of paleo cooking. I use it nearly on everything! Avocado oil cooking spray would also work well as an alternative.

    See the recipe card below for a full list of ingredients and measurements.

    Substitutions and Variations

    • This recipe is so versatile! You can change the flavor profile by adding different seasonings such as paprika, onion powder, black peppers, or dried herbs for additional seasonings.
    • If you prefer to eat chicken thighs, you can substitute and use that cut of chicken instead of chicken breast.
    • If you are not diary free or following a keto diet, this recipe would be great with parmesan cheese added to the breading.

    This recipe has not been tested with other substitutions or variations. If you replace or add any ingredients, please let us know how it turns out in the comments below!

    Step by Step Ingredients

    Empty air fryer basket without chicken tenders in it yet.

    Photo 1: Preheat your air fryer or oven to 360 degrees F. For the air fryer-Add the pop up stainless steel grate to the air fryer so that the chicken can cook evenly. See the pictures above. If your air fryer has trays, do not worry about this step. For the oven-place a metal cooling rack on a baking sheet. Spray either the baking sheet or air fryer grate with the oil. Take the chicken out of the package and place on a cutting board or plate and pat dry with a paper towel. If you are using tenderloins remove the tendons, if you are using chicken breasts slice the breasts long ways in half.

    Raw keto chicken tenders in the base of an air fryer uncooked.

    Photo 2: Generously coat the side facing up with the olive oil spray or spray of choice. Now, mix up the garlic and the sea salt in a shallow bowl. Take a spoon and generously coat the chicken in the seasoning mix (don’t use it all, we will have to do this 3 times.) Lay the seasoned chicken face down on the stainless steel grate in the air fryer or baking sheet. Sometimes I like to line the cooking tray with parchment paper under the stainless grate to make for easier clean up. Now, evenly coat the top of the chicken with the EVOO and mixed seasonings (leave some seasoning because you are going to have to do this again.). Cook for 6 minutes, flip the chicken over and spray with additional cooking spray, and cook for an additional 6 minutes.

    Expert Tip

    • Tip # 1: These air fryer chicken tenders should be crispy! When the final 6 minutes is up, if they are not crispy enough, put them in for another 4 minutes. Ensure that you keep spraying with more cooking liquid to ensure a golden brown crust.
    • Tip # 2: If your chicken breasts are large, you can slice into smaller tenders. Cooking time will depend on thickness and size of the tenders. The best way to ensure the chicken is cooked through is to look for an internal cooking temperature of 165 degrees F with a meat thermometer.
    • Tip # 3: Cooking time will vary depending on the size of the chicken finger slices. The thinner the slice the lower the cooking time.
    • Tip # 4: Keep in mind that some of the sodium and garlic powder will blow off in the air fryer, so the sodium values may not be accurate. 
    • Tip # 5: If you do not have an air fryer you can use a cooling rack over a baking sheet from the oven. Just be sure there is not a coating on top of it. It should be a metal wire rack. 

    Recipe FAQs

    What is the best way to make this recipe?

    If you have been following along on instagram for awhile you have seen by now that I am obsessed with my air fryer. I am so obsessed that I recently just bought a new one that is double in size so I can air fry more at once. The insert to prop up the chicken so it evenly fries on both sides is the key to the perfect crispy chicken tenders.

    What can I serve with gluten free chicken tenders?

    I would recommend Frozen Broccoli in the Air Fryer, Lemon Garlic Asparagus, or Air Fried Green Beans! My Whole30 Ranch Dressing also makes a great dip for Gluten Free Chicken Tenders. I love dipping these homemade keto chicken strips into honey mustard, hot sauce, bbq sauce, or even buffalo sauce.  The ranch is by far my favorite dipping sauce. I love mixing it with the bbq sauce. 

    What else can I do with this recipe?

    This crispy chicken can serve as a great base in my Paleo Chicken Salad or Whole30 Chicken salad.

    What is the perk of using chicken breasts over tenderloins?

    Tenderloins can be a bit chewy whereas chicken breasts are a lot more tender.

    Pile of keto chicken tenders of a plate next to a bowl of dipping sauce.

    Storage Instructions

    • This recipe can be stored in the refrigerator for up to 5 days in an airtight container.
    • You can bulk make this recipe and freeze the cooled tenders in a single layer in an airtight container for up to two months.

    Other Chicken Recipes You Will Love

    • cajun chicken over pasta in a bowl
      Dairy Free Creamy Cajun Chicken Pasta
    • cooked chicken thighs on a sheet pan
      Honey Garlic Sheet Pan Chicken Thighs Meal
    • paleo chili lime chicken wings on a platter
      Chili Lime Chicken Wings
    • whole30 chicken salad 19 scaled
      Whole30 Chicken Salad

    Are you interested in a guide of my go to healthy alternatives?

    Download your FREE guide below

    download here
    chicken on plate 1

    Crispy Keto Chicken Tenders

    Course Appetizer, Dinner, Snack
    Cuisine American
    Diet Gluten Free
    Prep Time 5 minutes minutes
    Cook Time 12 minutes minutes
    Total Time 17 minutes minutes
    Servings 3 people
    Author Allianna Moximchalk
    238kcal
    Cost $7
    Print Recipe Pin Recipe

    Equipment

    • Air fryer If you do not have an air fryer you can use a cookie rack in the oven over a sheetpan

    Ingredients

    • 1 pound chicken breasts Or tenderloins. Be sure to remove the tendon if you use the tenderloins. For the breasts be sure to slice them longways in half or thirds depending on the size.
    • 1/4 cup garlic powder this seems like a lot, but trust me it will make your chicken come out tasting so delicious!
    • 1/2 tsp sea salt
    • oil spray of choice I like Trader Joe's olive oil spray.

    Instructions

    • Preheat your air fryer or oven to 360 degrees F. For the air fryer-Add the pop up stainless steel grate to the air fryer so that the chicken can cook evenly. See the pictures above. If your air fryer has trays, do not worry about this step. For the oven-place a metal cooling rack on a baking sheet. Spray either the baking sheet or air fryer grate with the oil. Take the chicken out of the package and place on a cutting board or plate and pat dry. If you are using tenderloins remove the tendons, if you are using chicken breasts slice the breasts long ways in half.
    • Generously coat the side facing up with the olive oil spray or spray of choice. Now, mix up the garlic and the sea salt in a bowl. Take a spoon and generously coat the chicken in the seasoning mix (don't use it all, we will have to do this 3 times.) Lay the seasoned chicken face down on the stainless steel grate in the air fryer or baking sheet Now, evenly coat the top of the chicken with the EVOO and mixed seasonings (leave some seasoning because you are going to have to do this again.)
    • Cook for 6 minutes. Once the 6 minutes is up, flip the chicken and spray the other side again with a tiny bit of goal and distribute the remaining seasoning. Cook for an additional 6 minutes. The chicken should reach 165 degrees F when it is done. The best way to tell it is done is with a meat thermometer.

    Notes

    Storage: This recipe can be stored in the refrigerator for up to 5 days in an airtight container.
    Freezing: This recipe can be stored in a single layer once cooled in the freezer for up to two months. 
    Nutrition: The nutrition for this recipe is an estimate and the calorie count is not guaranteed.  It is based on 3 servings. 
    Servings: This recipe should yield 3 servings. 
     
    These quick and easy chicken tenders will become your new go to chicken recipe..
    Serving: 1serving | Calories: 238kcal | Carbohydrates: 14g | Protein: 35g | Fat: 4g | Saturated Fat: 1g | Polyunsaturated Fat: 1g | Monounsaturated Fat: 1g | Trans Fat: 1g | Cholesterol: 97mg | Sodium: 575mg | Potassium: 795mg | Fiber: 2g | Sugar: 1g | Vitamin A: 45IU | Vitamin C: 2mg | Calcium: 23mg | Iron: 2mg
    Tried this recipe?Tag me on instagram @alliannaskitchen!
    cauliflower and leek soup in a bowl with fresh herbs on top

    February 11, 2024 Autoimmune Protocol

    Cauliflower Leek Soup

    This Cauliflower Leek Soup is loaded with vegetables, super simple to make and quite delicious. This homemade dairy free soup only requires 15 minutes of hands-on time and freezes so well, which means it is a great winter soup to batch cook.  

    Cauliflower leek soup in a bowl and garnished with fresh green herbs and red pepper flakes.

    As soon as the cooler weather of Pittsburgh hits I love making this soup.  It screams fall to me but isn’t laking flavor at all.  Sitting on the cough with my husband, dog Douglas, a bowl of this soup, and a Gluten Free Biscuit is the perfect fall day!  I always pair my meals with extra vegetables.  This would go well paired with my Kale Blueberry Salad with Pecan Cheese or my favorite Kale Salad with Tahini Dressing.  This helps give you the balance of the warm creamy soup but the fresh crunch of the salad.  For additional fall flavors, you could also pair this with my Acorn Squash Grape Apple Salad to complete the fall flavor experience. If you love soup like me, check out my Gluten Free Italian Wedding Soup recipe too!

    [feast_advanced_jump_to]

    Why You Will Love This Dish

    • This soup is naturally dairy free, gluten free, soy free, vegan, low carb, keto, Whole30 and AIP (autoimmune protocol) friendly. 
    • My creamy cauliflower soup only requires 15 minutes of hands on time which means it makes a great night dinner option. 
    • My creamy cauliflower leek soup is a great option for batch cooking which means I love to make it in bulk and freeze it so I can have this homemade soup on demand.
    • Another recipe I love to bulk and freeze, is my AIP Bone Broth.  This homemade broth is a good base for just about any soup. I love using it in my Carrot and Butternut Squash Soup.
    • If you like creamy homemade soups, you will love my Paleo Thai Chicken Soup. 
    • This homemade soup goes great with just about anything, too! It is truly the perfect soup.

    Ingredients

    Cauliflower leek soup ingredients in small glass bowls.
    • Head of cauliflower-You can also buy pre cut florets, whichever is easiest for you! Just be sure to cut off the green part. 
    • Leeks-If you are not familiar with leeks, they are part of the onion family. They can add so much flavor to a dish. When you are prepping them, be sure to cut off the ends and slice them real thin like you would with an onion. 
    • Paprika, garlic powder & black pepper-To give this creamy soup a nice kick. 
    • Sea salt-To taste. 
    • Avocado oil-To roast the vegetables in. Any kind of oil will work but avocado oil is my favorite oil for roasting. 
    • Apple cider vinegar & lemon-This will enhance the flavor even more. Without the acid in this soup it would taste way too bland. Do not skip!
    • Bone broth-This is the liquid base in this soup, if you are vegan you can use vegetable broth in place of bone broth. I love bone broth because I think it adds so much flavor to the soup.  You can also use chicken stock, vegetable stock, or chicken broth if you already have that on hand.
    • Yellow onion-For flavor. 

    See the recipe card below for a full list of ingredients and measurements.

    Substitutions and Variations

    • You could also use frozen cauliflower florets for this recipe instead of fresh.
    • I love a kick to my soup but you can adjust the amount of paprika to match your spice preference.
    • Potato leek soup would also be a great variation of this creamy cauliflower leek soup recipe, just add some potatoes to make this a potato soup!
    • If you are not dairy free, you can substitute the coconut cream for heavy cream.  Cheddar cheese would also be a great addition to this creamy cauliflower leek soup either mixed in or as a topping.
    • I love a fun garnish on top. Fresh thyme, lemon zest, chopped parsley, bacon/ vegan bacon, nutritional yeast, or parmesan cheese all make for a great garnish. 
    • Bacon fat-If you plan on using bacon to garnish, I suggest considering using the bacon fat from it to roast the vegetables. 

    This recipe has not been tested with other substitutions and variations. If you replace or add any ingredients, please let us know how it turned out in the comments below!

    Step by Step Instructions

    Roasted cauliflower, leeks, and onion on a sheet pan.

    Photo 1: First, preheat the oven to 400 degrees F. Then, you will chop the onions, leeks, and cauliflower and spread them out evenly on the sheet pan and season with EVOO, sea salt, garlic powder, and black pepper. Make sure to run the mixture all over. Roast the vegetables for 30 minutes.

    Cauliflower leek soup ingredients all in a stock pot with a ladle.

    Photo 2: Once the vegetables are done, remove the baking sheet and place them in a stock pot or large pot with the remaining ingredients. Bring to a simmer on medium heat to medium low heat and occasionally mix for 20 minutes. Use an immersion blender to break apart the vegetables. Serve with fresh herbs and optional red pepper flakes.

    Expert Tips

    • Tip #1: If you choose to use frozen cauliflower florets instead of fresh, you will want to allow the cauliflower to thaw completely before roasting.  The additional liquid from the frozen vegetable will also change the amount of roast that can be accomplished. 
    • Tip #2: You will want to make sure to clean out your leek before roasting.  Leeks are grown underground and therefore can have dirt and debris trapped between the leaves.
    • Tip #3: You can either eat the soup chunky with the vegetables in tact or you can blend the soup up to make it nice and smooth.

    Recipe FAQs

    How long does this soup last?

    I suggest eating this soup within 5 days. I like to store mine in an air tight container in the refrigerator.

    Can I freeze this soup?

    Yes! First, allow the soup to cool, then place it in a glass container in the freezer. You can thaw it to heat it up or you can heat it up on low on the stovetop while it is frozen.

    Can I make this soup with coconut milk?

    Absolutely! If you use coconut milk in this recipe be sure to cut back on the bone broth. For example, if you use a cup of coconut milk, subtract a cup of bone broth. This will prevent the soup from getting too thin.

    What should I eat with this soup?

    I love this soup as is, but I also love it with homemade Vegan Garlic Bread! It is also great to do a simple topping of a drizzle of olive oil or green onions on top for additional flavor.

    Do I have to use an immersion blender?

    No! If you do not have an immersion blender, you can use a regular blender or food processor. You will just want to blend in batches so that the hot liquid does not spill over and burn you.

    What immersion blender do you recommend?

    I have this immersion blender and I love it! It’s easy to use and comes with additional attachments. If you do not have one, you can use a regular blender for this recipe.

    What part of the leek do you use?

    Most recipes call for the white and light green parts of the leeks. The dark green leaves can be made to use homemade broth.

    Chunky cauliflower leek soup in a bowl with golden spoon and garnished with fresh green herbs and red pepper flakes.

    If you like this recipe, you will LOVE:

    • Thai Creamy Coconut Chicken Soup2
      Thai Creamy Chicken Soup
    • thai shrimp soup 1 scaled
      Thai Shrimp Soup
    • Creamy Curry Chicken Gnocchi Instant Pot Soup2
      Creamy Curry Chicken Gnocchi Whole30 Instant Pot Soup
    • dairy free lobster bisque in a bowl with a gold spoon and garnished with lemon, fresh green herbs, and red pepper flakes.
      Dairy Free Lobster Bisque

    Are you interested in a guide of my go to healthy alternatives?

    Download your FREE guide below

    download here
    cauliflower and leek soup in a bowl with fresh herbs on top

    Cauliflower Leek Soup

    Course Soup
    Cuisine American
    Diet Gluten Free
    Prep Time 10 minutes minutes
    Cook Time 1 hour hour
    Total Time 1 hour hour 20 minutes minutes
    Servings 3 servings
    Author Allianna Moximchalk
    348kcal
    Cost $6
    Print Recipe Pin Recipe

    Equipment

    • Sheet pan
    • soup pot
    • cutting board
    • knife
    • Immersion blender

    Ingredients

    • 1 head cauliflower broken into florets
    • 1 yellow onion sliced
    • 2 leeks chopped, chop off bottom part and use the green part
    • 1 tsp paprika omit for AIP
    • 1/2 tsp sea salt
    • 1 tbsp garlic powder
    • 1/4 cup avocado oil
    • 1 tbsp apple cider vinegar
    • 1 lemon juiced
    • 1 tsp sea salt
    • 1 tsp black pepper omit for AIP
    • 6 cups bone broth veggie broth is good for vegan

    Instructions

    • Preheat the oven to 400 degrees F. Chop the onions, leeks and cauliflower and spread them out on the baking sheet with the oil, salt, pepper, and paprika. Make sure to rub the mixture all over. Roast the vegetables for 30 minutes. Once the vegetables are done place them in the stock pot with the remaining ingredients. Bring to a simmer and mix occasionally for 20 minutes. Use an immersion blender to break apart the veggies. Serve with fresh herbs and optional red pepper flakes.

    Notes

    Storage: This recipe can be stored in an air tight container for up to 5 days in the refrigerator.  It can also be stored in an air tight container for up to one month.
    Nutrition: The nutrition for this recipe is an estimate and calorie count is not guaranteed.  It is based on 3 servings.
    Servings: This recipe should yield 3 servings.
    Quick, easy, veggie loaded coconut cream soup!
    Serving: 1bowl | Calories: 348kcal | Carbohydrates: 27g | Protein: 23g | Fat: 19g | Saturated Fat: 2g | Polyunsaturated Fat: 3g | Monounsaturated Fat: 13g | Sodium: 1415mg | Potassium: 831mg | Fiber: 7g | Sugar: 9g | Vitamin A: 1053IU | Vitamin C: 123mg | Calcium: 101mg | Iron: 3mg
    Tried this recipe?Tag me on instagram @alliannaskitchen!
    pan seared sea bass on a plate with greens and lemon

    February 11, 2024 Allergy Friendly

    Pan Seared Chilean Sea Bass In Lemon Caper Sauce

    This Pan Seared Chilean Sea Bass makes for the most perfect in house date night meal. It is super quick, easy and flavorful. The buttery flavor of this sea bass combined with the caper ghee shallot sauce is so delicious and it only takes 15 minutes to make. This recipe is by far one of my favorite fish recipes.

    Pan seared chilean sea bass with lemon caper sauce on a bed of greens with a garnish of fresh lemon.

    This recipe is decadent and full of flavor. Sea bass is a luxurious cut of fish and will melt in your mouth if cooked properly. These sea bass fillets are quick cooking, flaky, and paired with this sauce it makes for the perfect combination.

    Seafood is a routine part of my meal planning especially with the benefit of low cook times. Some of my favorite seafood recipes are: dairy free tuna noodle casserole, easy frozen salmon in the air fryer, easy frozen cod in the air fryer, pan seared sea bass with tropical pico de gallo, Gluten Free Salmon Cakes, Gluten Free Fish and Chips, and dairy free lobster bisque. This recipe also really pairs well with my simple Blanched Broccoli recipe on my blog.

    [feast_advanced_jump_to]

    Why You Will Love This Recipe

    • It is so simple! This recipe has only 6 ingredients but brings this flaky fish so much flavor!
    • In less than 15 minutes, you can have a delicious meal that is sure to impress whomever gets to enjoy it.
    • This recipe is naturally gluten free, dairy free, paleo, soy free, nut free, and refined sugar free.
    • This pan seared chilean sea bass would pair perfect with my lemon garlic asparagus.
    • Kids can enjoy this recipe as well since sea bass does not have an overly fishy taste.
    • Even though this dish is simple, the sea bass still makes this luxurious enough for a date night treat.

    Pan Seared Chilean Sea Bass Ingredients

    Pan seared chilean sea bass ingredients in small glass bowls.
    • Sea bass-Roughly 6 ounces each. Keep in mind that sea bass contains a lot of bones, especially if you are buying it in the filet form. With that said, I have found that I can usually get 1-1.5 servings from a filet that has the bones in it. If you need help removing the bones, I found this video to be extremely helpful. 
    • Capers-You can totally skip this if you are not a caper fan, but in my opinion this is the best part! 
    • Lemon juice-Sea bass and lemon is one of my favorite combos.
    • Ghee-Ghee is a great alternative for butter. I love ghee! It is naturally dairy free too because all of the milk proteins are removed. You can buy it in the store or make your own with this recipe HERE. 
    • Shallots-Shallots are a member of the onion family. They can really spice a dish up.
    • Fresh chives-To garnish.

    See the recipe card below for a full list of ingredients and measurements.

    Substitutions and Variations

    • This recipe pairs well with any fresh herbs. If you don’t have fresh chives, fresh parsley would make a great substitution.
    • If you would like additional flavor, a small amount of fresh minced garlic would be a great addition to this sauce.
    • This dish would work well with garnishes of fresh herbs, lemon zest, lemon slices, and more.

    This recipe has not been tested with other substitutions or variations. If you replace or add any ingredients, please let us know how it turns out in the comments below!

    Step by Step Instructions

    Fresh scallions cooking in a pan with melted ghee.

    Photo 1: First, start by patting dry your sea bass with a paper towel. Add your ghee to a non stick skillet over medium heat to medium high heat, depending on pan type, then add the shallots and sauté for 2 minutes.

    Pan seared chilean sea bass in a skillet with lemon caper sauce.

    Photo 2: Once the 2 minutes is completed, add the sea bass to your pan and cook on the first side for 5 minutes. Once those 5 minutes are up, flip the sea bass and add the capers and lemon juice to your skillet. You will then cook for an additional 5 minutes. Once cooked, remove the sea bass from the skillet and pour your sauce from the bottom of the pan over top and garnish with fresh chives and lemon slices.

    Expert Tips

    • Tip # 1: I like to make sure to purchase sea bass at my grocery store that has the skin and bones removed and pre portioned. This will make cooking and preparation easier.
    • Tip # 2: Make sure not to frequently flip or move your sea bass once you place it in your pan. This will ensure that you get a nice sear and crust on each side of the sea bass.
    • Tip # 3: Capers are kept in fluid in their jars. I prefer to drain the liquid before measuring so the salty liquid does not get added to the sauce mixture. You can season with a small amount of black pepper on each side before placing into your large skillet.

    Recipe FAQs

    How do I reheat this dish?

    You can. Preheat the oven to 300 and bake for 5-10 minutes until warm throughout. 

    What should I serve with this dish?

    I like serving this chilean sea bass recipe with sautéed spinach in ghee and garlic. You can also serve it with: whole30 mashed potatoes, mini garlic potatoes, Roasted Leeks, or lemon garlic asparagus.

    How should I store the leftovers?

    I recommend storing any leftovers in an airtight container in the refrigerator for up to 3 days.

    Should I season the fish before cooking?

    The capers will give the sauce a saltiness. Since you will already be getting salt from the sauce, I do not recommend seasoning the sea bass with any sea salt or kosher salt prior to cooking.

    What kind of pan do you recommend?

    You can use any pan you prefer. I like to use my Always Pan or a cast iron skillet so the sea bass can get a nice sear.

    Is the cooking time in the instructions consistent?

    No, cooking time can vary depending on the thickness of the sea bass filet. The thicker fillet will take more time to reach the proper internal cooking temperature. The most important note is that sea bass should be cooked to an internal temperature of 140 degrees F.

    Pan seared chilean sea bass with lemon caper sauce on a bed of greens and garnished with chopped fresh green chives and lemon slices.

    Other Seafood Recipes You Will Love

    • thai shrimp soup 1 scaled
      Thai Shrimp Soup
    • whole30 salmon cakes 3 scaled
      Gluten Free Salmon Cakes
    • Buffalo marinated shrimp on tortilla shells with slaw and limes on top.
      Buffalo Shrimp Tacos
    • halibut fish tacos on a pale blue plate
      Halibut Fish Tacos

    Are you interested in a guide of my go to healthy alternatives?

    Download your FREE guide below

    download here
    sea bass on a plate overhead shot

    Pan Seared Chilean Sea Bass In Lemon Caper Sauce

    Course Main Course, Meals
    Cuisine American
    Diet Gluten Free
    Prep Time 5 minutes minutes
    Cook Time 10 minutes minutes
    Total Time 15 minutes minutes
    Servings 2 servings
    Author Allianna Moximchalk
    306kcal
    Cost $30
    Print Recipe Pin Recipe

    Equipment

    • Non stick, non toxic pan.

    Ingredients

    • 2 portions sea bass I like to buy mine pre-portioned. Keep in mind sea bass has a lot of bones in it, so if you buy a pound filet you may only get 8 or so ounces from it.
    • 1/4 cup shallots diced
    • 1 lemon juiced
    • 4 tbsp ghee
    • 1 tbsp fresh chives
    • 1/4 cup capers

    Instructions

    • Pat dry the sea bass with a paper towel. Add the ghee to the pan on medium heat, then add the shallots and sauté for 2 minutes. Once the two minutes is up, add the sea bass to the pan for 5 minutes. Once the 5 minutes is up, add the capers and lemon and flip the sea bass to cook for an additional 5 more minutes. Once the total of 10 minutes is up, remove the sea bass from the pan and pour the ghee sauce in the bottom of the pan over top. Top off with fresh chives.

    Notes

    Storage: This recipe can be stored in the refrigerator for up to 3 days in an airtight container.
    Nutrition: The nutrition for this recipe is an estimate and the calories count is not guaranteed.  It is based on 2 servings. 
    Servings: This recipe should yield 2 servings. 
    Quick and easy date night recipe that you can have on the table in less than 15 minutes.
    Serving: 1serving | Calories: 306kcal | Carbohydrates: 11g | Protein: 2g | Fat: 30g | Saturated Fat: 19g | Polyunsaturated Fat: 1g | Monounsaturated Fat: 9g | Cholesterol: 78mg | Sodium: 612mg | Potassium: 189mg | Fiber: 3g | Sugar: 4g | Vitamin A: 109IU | Vitamin C: 33mg | Calcium: 35mg | Iron: 1mg
    Tried this recipe?Tag me on instagram @alliannaskitchen!
    Roasted leeks on a ruffled edge plate on the counter top.

    February 9, 2024 Allergy Friendly

    Roasted Leeks

    This Roasted Leeks recipe is super easy to make and goes well with just about anything. This recipe requires a few staple simple ingredients that you likely will already have on hand. Roasted leeks go great with just about anything, from eating them alone to adding them to pasta, eggs, and just about any main dish. The best thing is this recipe only requires 10 minutes of hands on time and it can literally elevate any dish. 

    Roasted leeks on a ruffled edge plate on the counter top.

    My fascination with leeks grew when I was doing the Autoimmune protocol back in 2019 when I made this Roasted Cauliflower Leek Soup with extra cauliflower I had on hand. I added simple roasted leeks to many recipes to help elevate the flavor. Leeks are part of the allium family aka the onion family. Leeks are larger than green onions yet have a milder taste while still having an oniony flavor. While they are two very different kind of vegetables, one may try to substitute one for another. While leeks are larger, they have a milder flavor which means you will likely need more leeks to get a similar affect. 

    If you love easy vegetable recipes like I do, be sure to check out one of my other favorites on my blog, Dairy Free Green Bean Casserole, Blanched Broccoli, and Roasted Bok Choy.

    Why I Love This Recipe

    • This recipe only requires 10 minutes of hands on time and can elevate any dish. 
    • I love topping off homemade soups with roasted leeks. A few of my favorite soups to serve with leeks are my Thai Chicken Soup, Pumpkin Slow Cooker Soup, Instant Pot Turkey Soup, and Gluten Free Tomato Soup.
    • This recipe is naturally Gluten Free, Dairy Free, Soy free, Whole30 friendly, Autoimmune Protocol friendly, Soy Free and Nut Free. 
    • This roasted vegetable also makes for a perfect side dish with a few of my favorite main dishes like my Date Night Steak or it can be topped off on my Chicken Piccata. 

    Simple Roasted Leeks Recipe Ingredients

    Raw leeks, lemon, olive oil, garlic powder, salt and pepper laid on on the counter.
    • Leeks:If you have never bought leeks before, you can find them in the produce department at the grocery store. They look like giant green onions. 
    • Cooking oil: I like to use olive oil, clarified butter or avocado oil. While clarified butter is my favorite, it can be expensive to buy in the grocery store. This is why I love my make my own. I have a Homemade Clarified Butter recipe on my blog. It is just like butter, except the milk portions are removed. 
    • Sea salt or kosher salt: To taste. 
    • Black pepper: To taste.
    • Fresh garlic: For flavor.
    • Lemon zest snd lemon juice: For flavor.

    Recipe Variations and Substitutions

    • Cheese: If you like a little parmesan cheese, you can sprinkle it on top!

    Recipe Instructions

    Leeks on a cutting board with the white ends cut off.
    Step #1: Wash the leeks and chop off the bottom last inch with a cutting board and knife.
    Chopped leeks on a cutting board.
    Step #2: Chop the leeks into small slices about 1/4 inch thick. Toss with olive oil, salt, pepper, and garlic powder. Toss on a baking sheet or air fryer with the temp at 425 degrees F and bake for 15-20 minutes or until leeks are slightly golden.

    Recipe Tips and Tricks

    • Tip #1: Wash your leeks prior to chopping them. They are a lot easier to clean when they are whole. 
    • Tip #2: When shopping in the grocery store for leeks, buy ones that are tall, straight, and sturdy. Stay away from ones where the leaves at the top are wilted. This would mean they are bad. 

    Recipe FAQs

    What is an easy way to clean leeks? 

    Leeks are like green onions in the sense that dirt can easily hide in them. You have to wash the whole leek carefully, especially the dark green parts at the top which can host a lot of dirt. I like to wet them, then wipe any access dirt with a paper towel.

    Which part of the leek am I supposed to use?

    The bottom white stems with the hairy ends part of the leeks and light green parts are the parts that you will eat and cook. The dark green portion of the leeks is waste. If you like to limit waste, you can add it to freshly squeezed juice. I sometimes do this if I have a lot of extra produce on hand that will go to waste if it is not being used. Check out my favorite Freshly Squeezed Juice recipe on my blog. 

    What are your favorite ways to eat leeks?

    I like to eat mine golden brown with a little bit of a crunch. The little crunch makes them great as a salad topper. I love adding them on top of my favorite salads on my blog like my Kale Blueberry Salad, Panera Inspired Strawberry Poppyseed Salad, and Sweet Potato Fig Salad. Leeks also go great with any sort of sheet pan meal like my Honey Garlic Sheet Pan Meal. Recently I even roasted them with sweet potatoes in my Sweet Potato Bacon Sheet Pan breakfast meal.

    ​Can you eat raw leeks?

    Yes, you can eat raw leeks, however, I do not recommend it as they taste a little funny raw. 

    Should I use a sheet pan or air fryer?

    We love using our air fryer in my house. It is a lot easier to clean up and you do not have to turn your oven on. I love my 11 in 1 Ninja air fryer. It has multiple other functions aside from the air fryer. You can also make this recipe on a sheet pan.

    Are leeks low FODMAP?

    Leeks can be low FODMAP depending on which part of the leek you use. The green part at the top is low fodmap, but the white part towards the bottom is not.

    Green leeks chopped up in the air fryer with olive oil and seasoning on top.

    Storage Instructions

    This recipe lasts in the fridge for up to 5 days in an air tight glass container.

    Other Easy Vegetable Recipes

    • air fried potato wedges on a plate with sauces
      Ninja Air Fryer Potato Wedges
    • beets and carrots on a plate
      Roasted Beets and Carrots
    • coconut rice in a pretty bowl
      Instant Pot Coconut Rice
    • crispy potatoes on a plate
      Air Fryer Home Fries

    are you interested in a list of my go to healthy alternatives?

    Download your FREE guide below

    download your free guide
    Roasted leeks on a ruffled edge plate on the counter top.

    Roasted Leeks

    Course Side Dish
    Cuisine American
    Diet Gluten Free, Vegan
    Prep Time 10 minutes minutes
    Cook Time 20 minutes minutes
    Total Time 29 minutes minutes
    Servings 4 servings
    Author Allianna Moximchalk
    87kcal
    Print Recipe Pin Recipe

    Equipment

    • Sheet pan or air fryer

    Ingredients

    • 4 large raw leeks
    • 1 tbsp cooking fat I like olive oil or ghee
    • 1/4 tsp sea salt
    • 1/4 tsp black pepper
    • 1/2 tsp garlic powder
    • 1 whole lemon juiced

    Instructions

    • Preheat the oven or air fryer to 425 degrees F. Wash the leeks with water and a paper towel. Chop off the bottom inch of the leeks with a knife and dispose of them.
    • Slice the leeks into 1/4 inch pieces up until you get to the leafy part. You will want to remove that part. Toss the leeks with the remaining ingredients in a bowl and roasted on a sheet pan or in the air fryer for 15-20 minutes until golden brown.

    Notes

    Storage: Store in an air tight container for up to 5 days. 
    Nutrition: The nutrition on this recipe is just an estimate and cannot be guaranteed. 
    Servings: This recipe yields approximately 4-6 servings. 
    Simple roasted leek recipe that requires less than 10 minutes of hands on time.
    Serving: 1serving | Calories: 87kcal | Carbohydrates: 13g | Protein: 1g | Fat: 4g | Saturated Fat: 1g | Polyunsaturated Fat: 1g | Monounsaturated Fat: 3g | Sodium: 163mg | Potassium: 167mg | Fiber: 2g | Sugar: 3g | Vitamin A: 1484IU | Vitamin C: 11mg | Calcium: 54mg | Iron: 2mg
    Tried this recipe?Tag me on instagram @alliannaskitchen!
    Allianna Moximchalk making tea.

    February 4, 2024 Blog

    My Go To Teas

    My favorite teas

    If you follow along on instagram you know how much I enjoy drinking tea. I started drinking tea in college. As I started on my healing journey, I quickly realized that alcohol did not agree with my body. I turned to tea because I wanted something fun to drink aside from water. It became a fun thing I looked forward to every night after work and class.

    The naturopathic doctor I first saw was really big on herbs , teas, and using them as medicine. This was quite a foreign concept for me considering I was studying Emergency Medicine in college and working as a paramedic practicing Western Medicine on the weekends. I knew I needed to be open to trying something new because all of the medications were failing my body and I was only getting sicker.

    Allianna Moximchalk drinking tea.

    While the concept of using food and herbs was so foreign, I knew at this point I had nothing to lose. I used to go to the local co-op for hours and read all about the herbs and teas they sold. I put together a list below of all of my favorites and what I love to use them for. Having a glass of tea everyday has become such a ritual in my life. I look forward to it daily. While sometimes I just drink it out of a coffee mug, other times I love to make it a fancy “treat” and drink it out of a wine glass as a mocktail. I keep my cute tea kettle out on the stovetop which reminds me I have a fun drink waiting for me daily. Traditional Medicinals is my go to brand for tea. Thrive Market carries the brand at a fraction of the cost from a traditional grocery store. Thrive Market is an online grocery store that carries a ton of my favorite wellness brands at a fraction of the cost. If you use my Thrive Market link, you can save 40% on your first order. Keep in mind, this is not medical advice. I am simply sharing what just worked for me.

    xo Allianna

    My Favorite Teas

    • Licorice root-This is by far my favorite tea. Shockingly, I am not a big licorice fan but I love the flavor of licorice root tea. I drink this tea over ice almost every night. It is sweet and satisfies my sweet tooth. The body gets used to certain smells and tastes and associates them with things. My body now has this tea associated with night time. I like the Traditional Medicinal brand, 
    • Dandelion root tea-In most other cultures, they believe all healing begins in the gut. With all the               advances in technology and society here in the US, we really have gotten away from this. One of the first things the naturopath told me we needed to do was heal my gut. The first thing that she suggested adding in was more bitter foods and teas. Bitter foods help stimulate digestive enzymes which helps us further break down our food. Giving our body what it needs to break down our food is essential for optimal digestion. I know personally my stomach was really damaged from years of being on antacids. It took awhile for my body to be able to produce the necessary digestive enzymes it needs to break down food properly again. I love the Traditional Medicinal brand of this tea. 
    • Nettles tea-Stinging nettles are a plant that can be known for its anti-inflammatory effects.I was introduced to nettles when I was trying to come off of Zyrtec. Believe it or not, out of all of the medication I was taking for so many years, Zyrtec was by far the hardest thing to come off of. I think this was because I literally took it everyday for nearly 2 decades. While I definitely learned a variety of things that were triggering an allergy response in my body, like dairy, gluten, soy, artificial fragrances, alcohol, certain additives, ect. My body tends to be on the side of having an overactive immune system which is common in people with allergies. My naturopath I was working with put me on nettles to help me come off of Zyrtec. I now drink nettle leaf tea when I notice my immune system is on overdrive. I prefer drinking this tea over ice and I like the Traditional Medicinals brand. 
    • Raspberry leaf tea-Raspberry leaf tea is my go to tea during the time of the month. I prefer drinking this tea over ice too. I like the Traditional Medicinals brand. 
    • Green tea-I have never been a big coffee drinker but I do like caffeine. I like green tea over any other caffeinated tea because it is a slower release of the caffeine. I do not get the jitters when I drink it. Plus, green tea is also a bitter tea which means it can be helpful for digestion. I make myself a big pot of this at the beginning of the week in my ceramic pitcher and I drink it all week long. I like to store it in the fridge and drink it over ice.     
    • « Go to Previous Page
    • Page 1
    • Interim pages omitted …
    • Page 5
    • Page 6
    • Page 7
    • Page 8
    • Page 9
    • Interim pages omitted …
    • Page 38
    • Go to Next Page »

    Primary Sidebar

    Allianna Headshots

    Hi, I'm Allianna! Allianna's Kitchen started by accident after battling an undiagnosed autoimmune disease for nearly my whole life.

    More about me →

    GLUTEN FREE DINNER RECIPES

    • steak date night dinner 1
      Steak Date Night Dinner with Garlic Aioli
    • gluten free fried shrimp 3 scaled
      Gluten Free Fried Shrimp
    • cooked frozen pork chops with chives on top on a white plate with a gold fork
      Easy Frozen Pork Chops In The Air Fryer
    • halibut fish tacos on a pale blue plate
      Halibut Fish Tacos

    EASY WHOLE30 RECIPES

    • Beetroot dip on a plate with crackers and fresh parsley on top.
      Simple Beetroot Dip Recipe
    • close up photo of ginger apple pork in a bowl
      Apple Ginger Pulled Pork
    • dairy free lobster bisque in a bowl with a gold spoon and garnished with lemon, fresh green herbs, and red pepper flakes.
      Dairy Free Lobster Bisque
    • juicy filet mignon on a plate
      Air Fryer Filet Mignon

    GLUTEN FREE APPETIZERS

    • peanut butter and jelly chicken wings on a plate with limes
      Peanut Butter And Jelly Wings
    • Stuffed mushrooms on a brown and white plate with fresh parsley on top.
      Gluten-Free Stuffed Mushrooms
    • Gluten free pigs in a blanket in a pile on a plate.
      Gluten Free Pigs In A Blanket
    • Pretty french onion dip in a silver bowl with potato chips and chives on top.
      Vegan French Onion Dip Recipe

    EASY MOCKTAIL RECIPES

    • honey simple syrup 2
      Honey Simple Syrup
    • orange lime cranberry mocktail 4
      Cranberry Mocktail Recipe
    • Clear glass with a brown drink and a cinnamon stick in it.
      Pear Cocktail Recipe
    • Grapefruit mocktail in a glass with jalapeño slice and grapefruit slice.
      Easy Grapefruit Mocktail Recipe

    Footer

    • Recipes
    • My Courses
    • Meal Prep Services
    • Accessibility Policy
    • Contact
    • About Me
    • Blog
    • Privacy Policy
    • Pinterest
    • Instagram
    • Facebook
    • Twitter

    Allianna’s Kitchen 2025 - All Rights Reserved

    Rate This Recipe

    Your vote:


    A rating is required
    A name is required
    An email is required