• Skip to primary navigation
  • Skip to main content
  • Skip to primary sidebar
  • Spring Recipes
  • Recipes
  • Order Meal Prep
  • Healthy Gut Baby Food Course
  • About

Allianna's Kitchen

menu icon
go to homepage
  • Spring Recipes
  • Recipes
  • Order Meal Prep
  • Healthy Gut Baby Food Course
  • About
    • Facebook
    • Instagram
    • Pinterest
    • Twitter
  • search icon
    Homepage link
    • Spring Recipes
    • Recipes
    • Order Meal Prep
    • Healthy Gut Baby Food Course
    • About
    • Facebook
    • Instagram
    • Pinterest
    • Twitter
  • ×
    Allianna's Kitchen » Recipes

    Blog

    Spinach Mushroom Frittata 2 scaled

    May 17, 2021 Allergy Friendly

    Spinach Mushroom Frittata

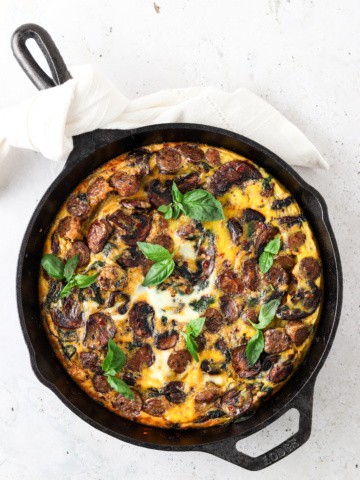
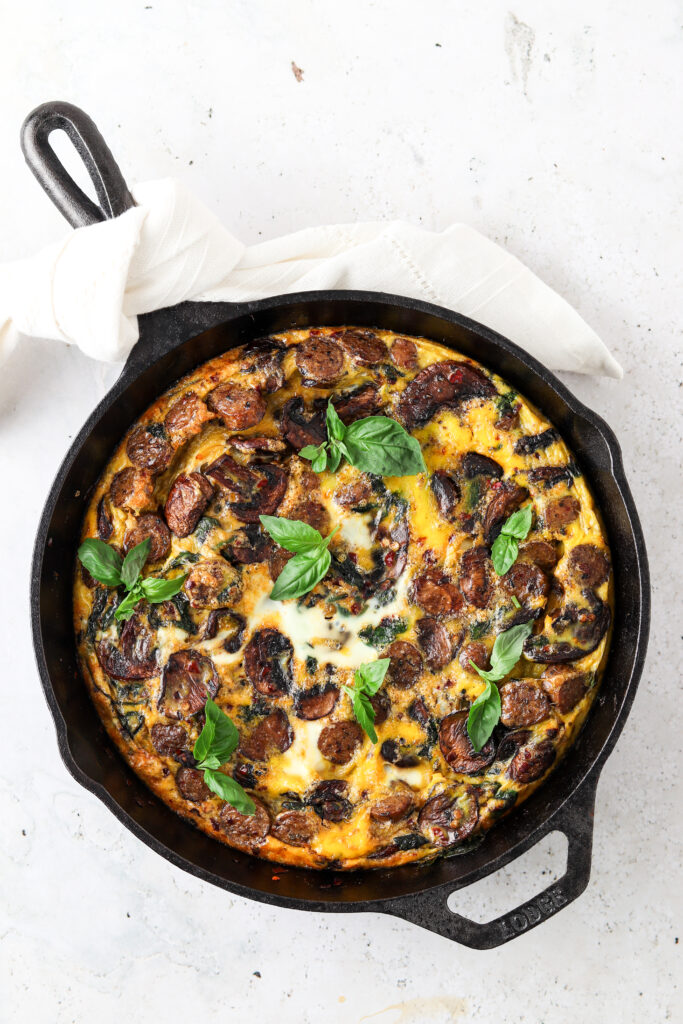
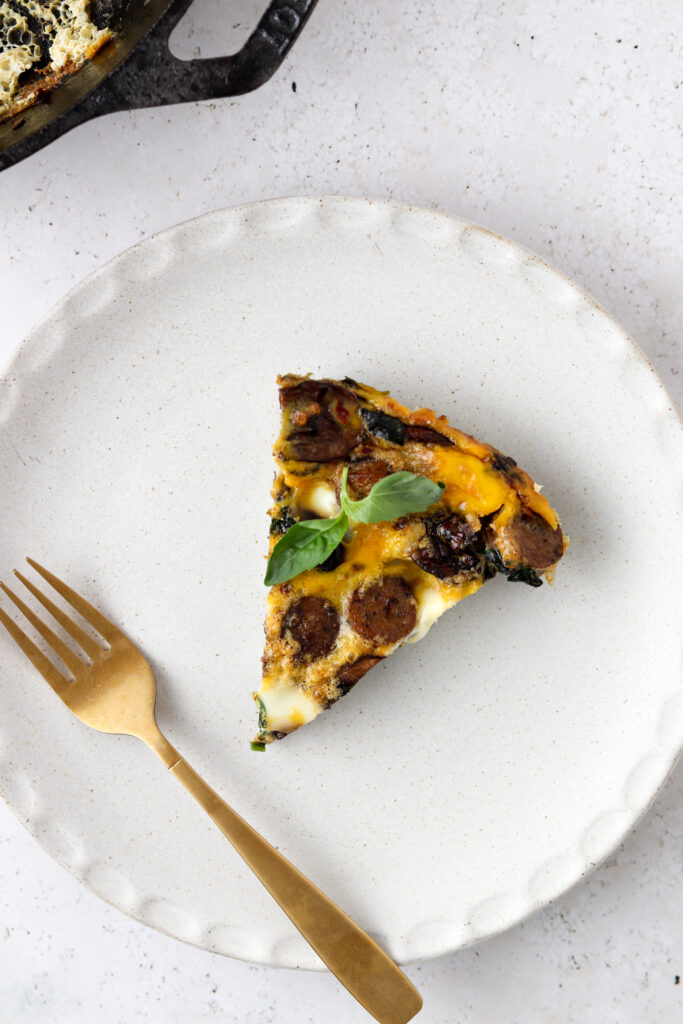
    This quick and easy Spinach Mushroom Frittata is perfect for all of your breakfast needs. We like to make it for our weekly meal prep as well as all of our family breakfasts. It only requires 10 minutes of prep time. You can have breakfast on the table within 30 minutes!

    spinach mushroom frittata in a cast iron pan with basil on top

    This recipe is naturally paleo, keto, and Whole30 friendly. If you love breakfast food like I do, be sure to check out my Banana Chia Pudding and AIP Pancakes too!
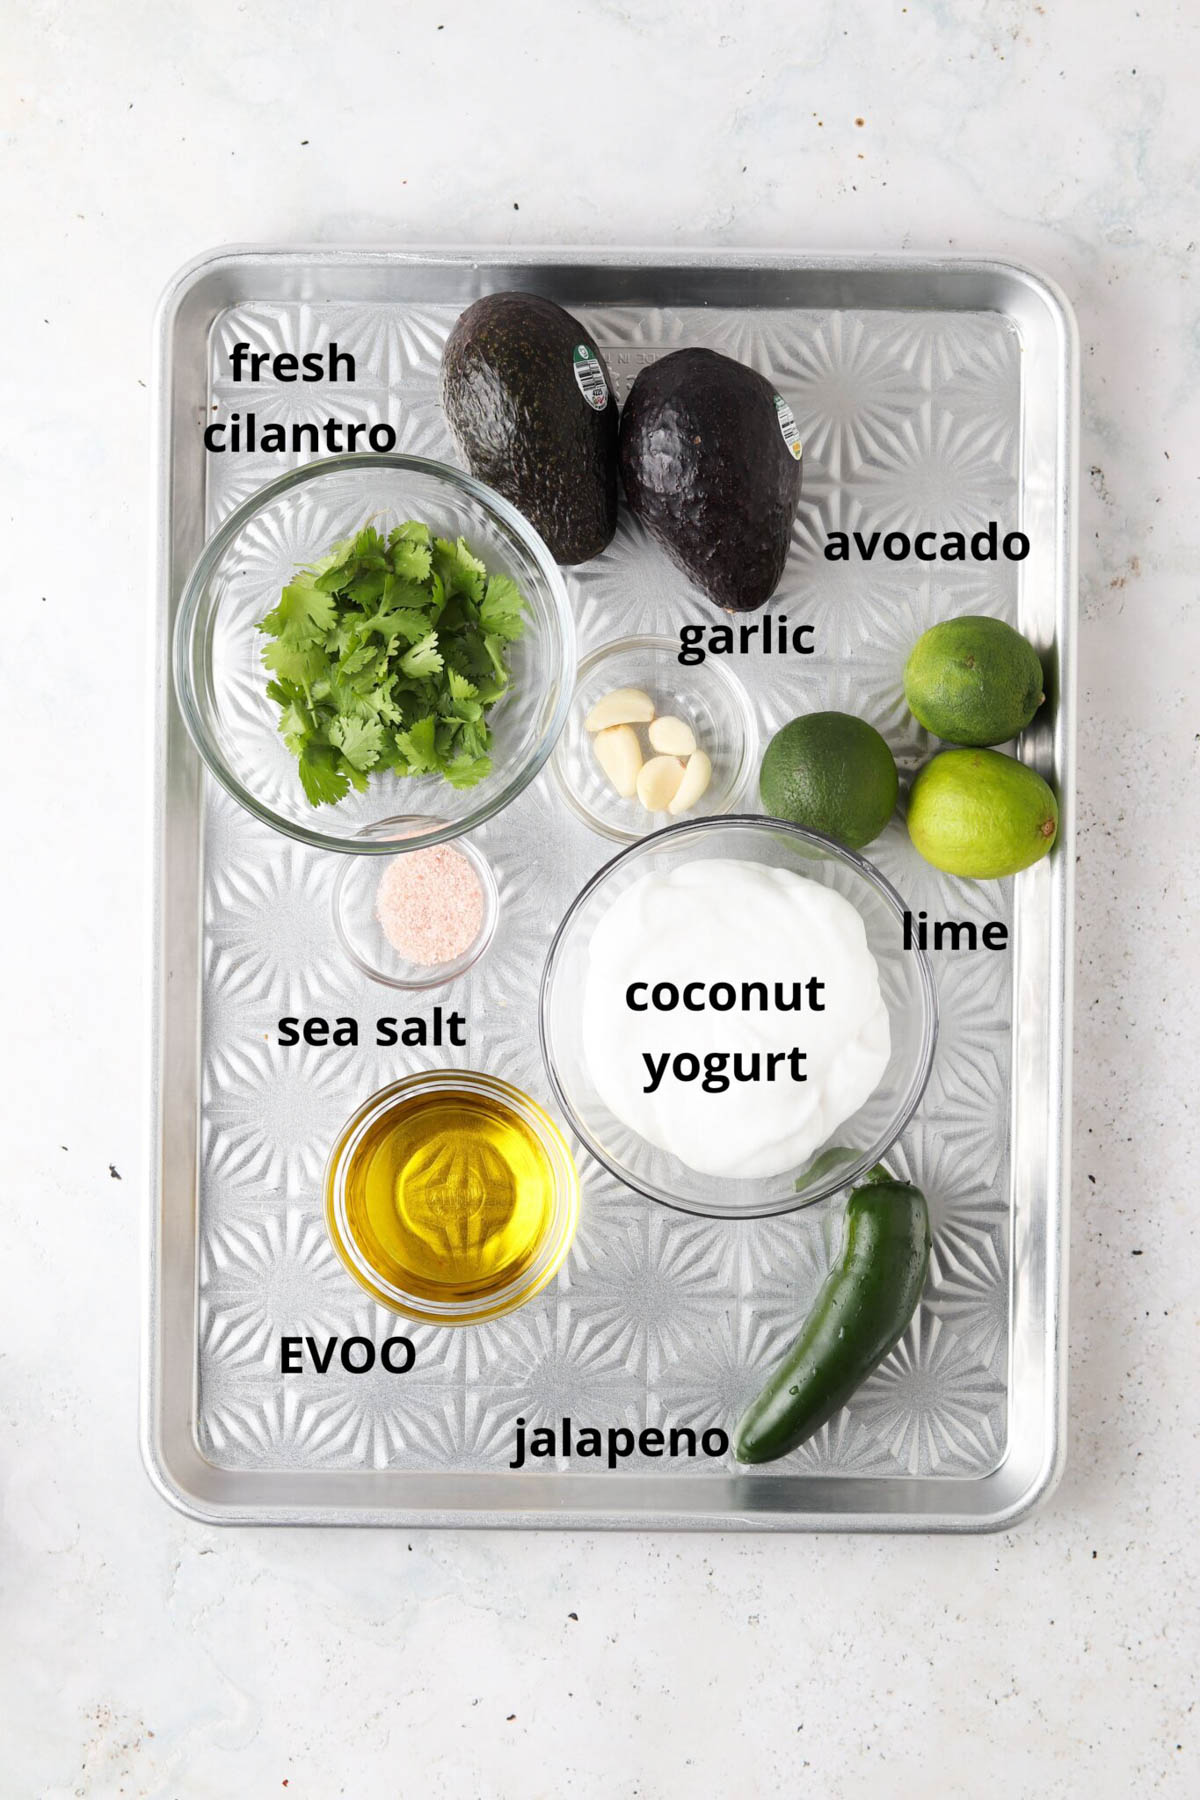
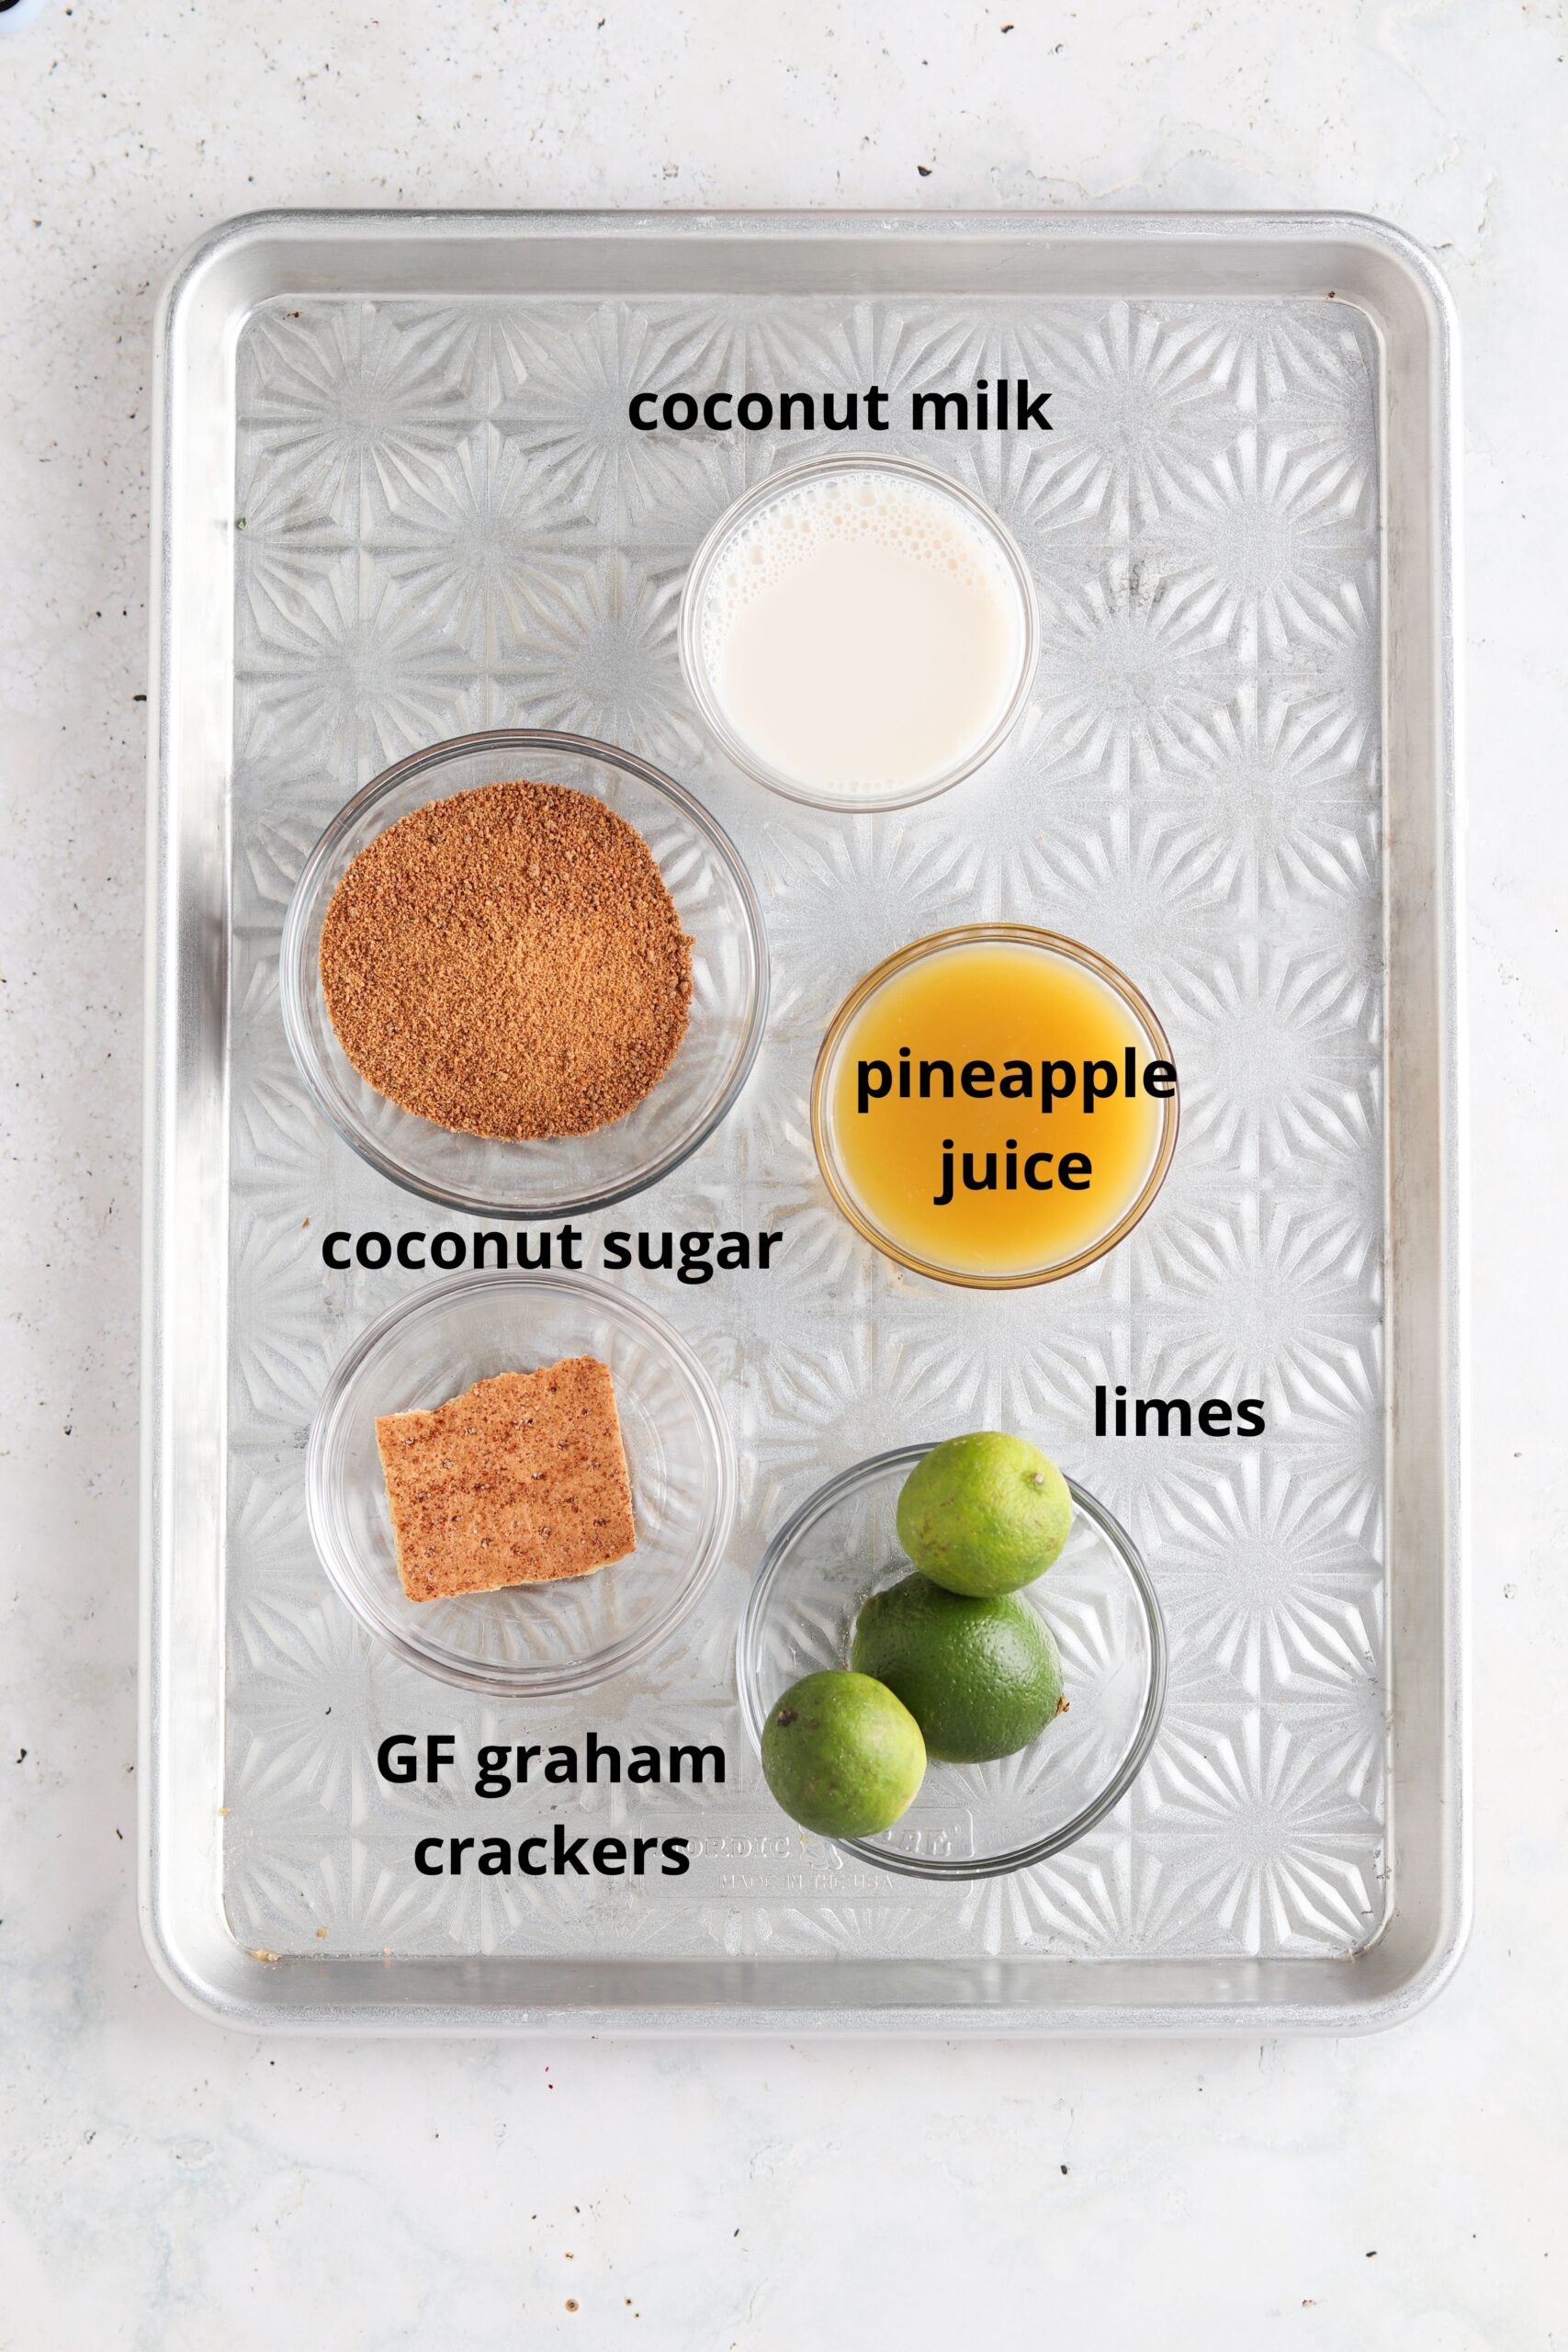
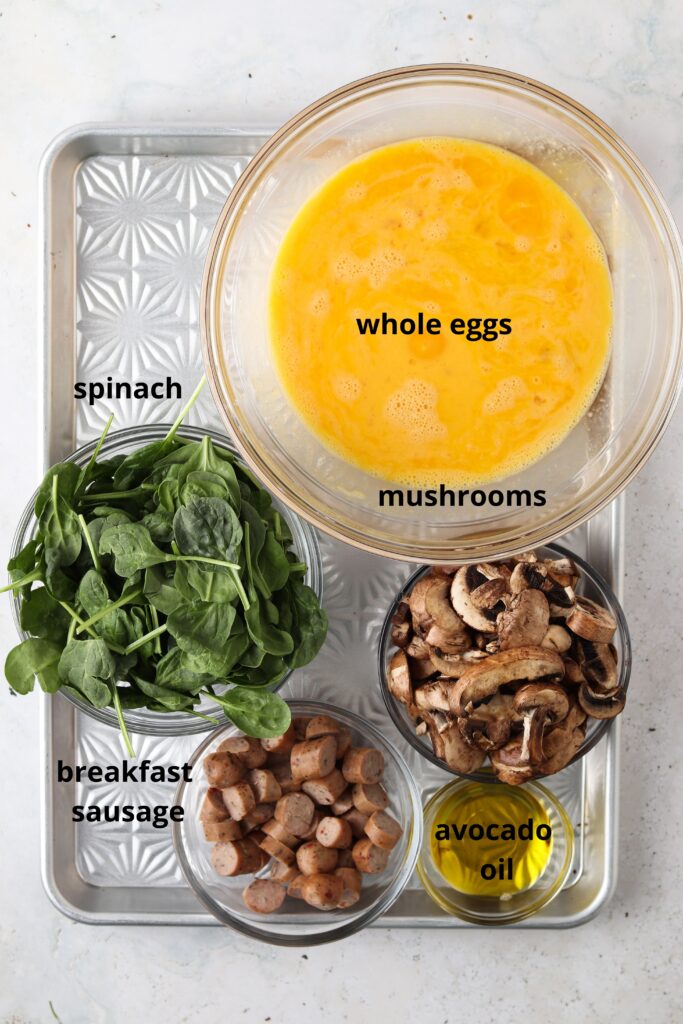
    Ingredients-

    • Eggs-Obviously! I love getting my eggs locally. I always try to go for cage free, pasture raised.
    • Mushrooms-Any kind of mushroom will work, but I like cremini mushrooms best. Be sure to wash them well. I even sometimes use a paper towel to get off excess dirt. I like to slice mine vs. cutting them. Note, that you do not have to exclude the stems! The stems have nutrients too.
    • Spinach-This recipe allows you to sneak in the greens! Any greens will work, but I like spinach the best for this recipe.
    • Avocado oil-To sautée the mushrooms, spinach and optional spinach and red pepper flakes.

    Optional add ins-

    • Red pepper flakes-My partner loves a nice kick!
    • Breakfast sausage-I like the paleo breakfast sausage links from Costco. I like to dice them up real small and add them in. 
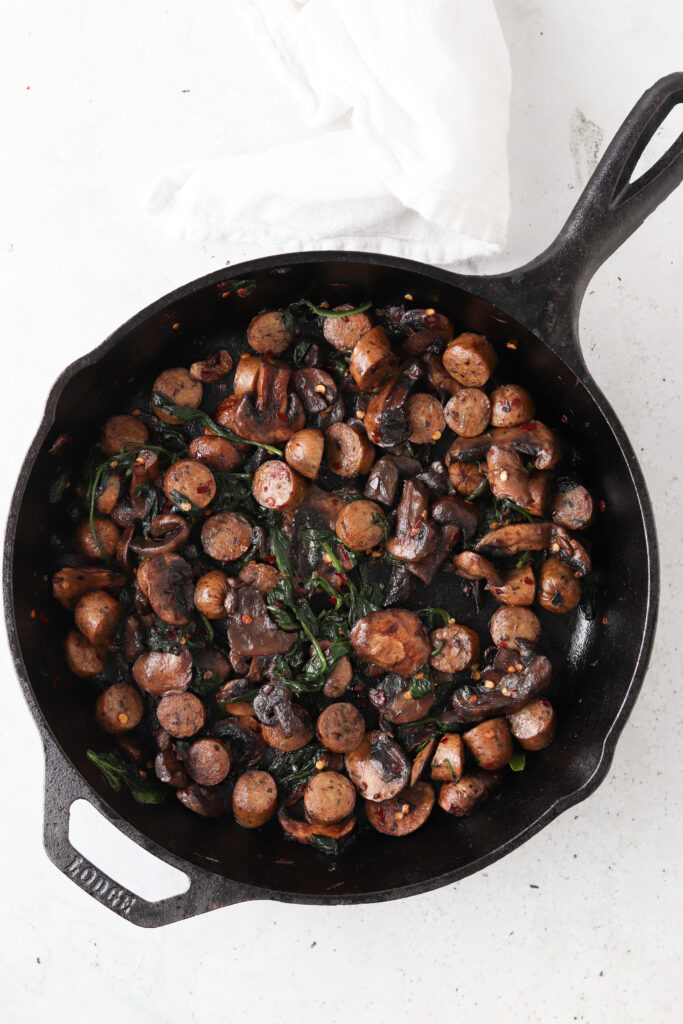
    spinach mushroom frittata ingredients on a metal tray in bowls

    How to make-

    • First, sautée the mushrooms, spinach and any optional add ins in the avocado oil for 3-5 minutes on medium heat. Preheat the oven to 400.
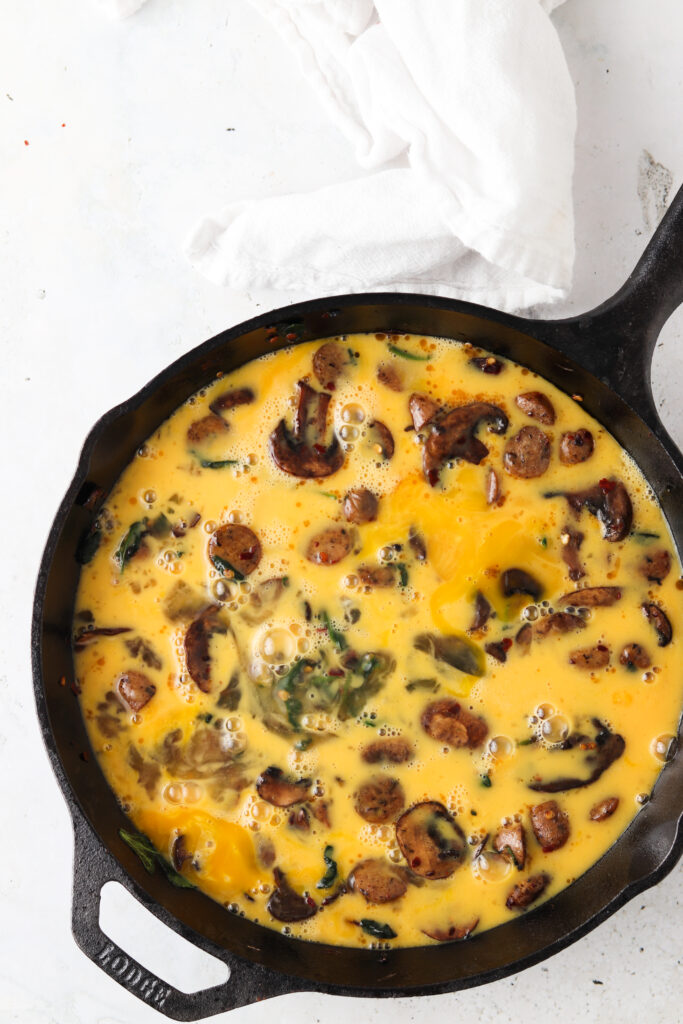
    • Next, whisk the eggs and pour in the pan. 
    • Bake for 20 minutes or until the eggs are cooked throughout.
    vegetables sautéed in a pan

    Is this spinach mushroom frittata baked?

    • Yes! I like to saute the mushrooms and spinach to start. This helps enhance the flavors. Then, I like to make it. 

    What is the best pan for a frittata? 

    • Always an oven safe one! This will allow you to be able to transfer the sauteed vegetables and optional add-ins into the oven. I like using a cast iron pan. 
    eggs in a cast iron pan

    What is the difference between a frittata and a quiche? 

    • A quiche has a crust, a frittata is all egg.

    What can you serve with a frittata?

    • We love to serve fresh fruit and pancakes! I have two pancake recipes that I love. 

    How do you stop a frittata from sinking?

    • The air and heat will cause the frittata to rise and expand. Taking the dish out of the oven will naturally cause it to sink a little. 
    slice of a spinach mushroom frittata

    If you like this spinach and mushroom frittata, you will LOVE:

    • Bacon Apple Butternut Squash
    • Blueberry Maple Turkey Breakfast Sausage
    • Pumpkin Muffins
    • Whole30 Chocolate Banana Bread
    • AIP Breakfast Muffins with Bacon and Apples

    Hey-you’ve made it this far! If you make this recipe, I would love for you to give it a star ★ rating and review below. Make sure you are following me on Instagram, Pinterest, and Facebook too!

    Spinach Mushroom Frittata 2 scaled

    Spinach Mushroom Frittata

    Course Breakfast
    Prep Time 10 minutes minutes
    Cook Time 20 minutes minutes
    Total Time 30 minutes minutes
    Servings 6 slices
    Author Allianna Moximchalk
    32kcal
    Cost $5
    Print Recipe Pin Recipe

    Equipment

    • Cast iron pan or non stick pan

    Ingredients

    • 8 whole eggs whisked
    • 2 cups spinach
    • 2 cups mushrooms chopped
    • 1 tbsp avocado oil

    Optional add ins-

    • paleo breakfast sausage links
    • red pepper flakes

    Instructions

    • Preheat the oven to 400. Saute the spinach and mushrooms (add in sausage and peppers if desired) in a non-stick oven safe pan in avocado oil for 3-5 minutes on medium heat. Pour the whisked egg mixture over the vegetables. Bake in the oven for 20 minutes.

    Notes

    Hey-you’ve made it this far! If you make this recipe, I would love for you to give it a star ★ rating and review below. Make sure you are following me on Instagram, Pinterest, and Facebook too!
    This spinach mushroom frittata makes for the most perfect breakfast!
    Serving: 1slice | Calories: 32kcal | Carbohydrates: 1g | Protein: 1g | Fat: 3g | Saturated Fat: 1g | Cholesterol: 5mg | Sodium: 11mg | Potassium: 159mg | Fiber: 1g | Sugar: 1g | Vitamin A: 945IU | Vitamin C: 3mg | Calcium: 12mg | Iron: 1mg
    Tried this recipe?Tag me on instagram @alliannaskitchen!
    Sweet Potato Brussels Sprout Bacon Breakfast Sheet Pan3

    May 14, 2021 Dairy free

    Week 13 Paleo Meal Plan

    This is the paleo week 13 meal plan. I have received a lot of great feedback so I am going to continue to create them. All of this weeks recipes are paleo and gluten free friendly. If they are AIP and keto friendly it will say in the description. Feel free to use previous week’s meal plans that can be found here.  If you would like to get the complete shopping list be sure to sign up for my newsletter below and I will send you your grocery list weekly. All you have to do is shop!

    brussel sprout hash

    How The Meal Plan Works:

    If meal prepping your food in advance is your thing I highly suggest getting meal prep containers or containers like these so your meals are ready to eat.

    Included in this post are 8 meals, 7 dinners and 1 breakfast. When making the meals for dinner I suggest making an extra portion so you can eat it for lunch. Keep in mind these are an inspiration, so feel free to swap things out. Each recipe contains the meal only, feel free to add a side. We love roasting veggies to go with our meals. If you would like the full complete shopping list that goes with my meal plan, be sure to subscribe to my email list. If you have questions or need assistance please comment below. If you make one of my recipes I would so grateful if  you left a comment and a star rating review on the recipe in my blog or took a picture and tagged me in it on instagram @alliannaskitchen

    I hope this is helpful as you begin to plan out your week. -Allianna

    For Breakfast: 

    Sweet Potato, Brussel Sprout, Bacon Breakfast Sheet Pan

    This Whole30 and Paleo fall harvest sweet potato, brussels sprout, bacon sheet pan breakfast is the perfect sweet yet savory breakfast to tide you over until lunch! The  added bacon gives this nutrient dense breakfast even more flavor!

    brussel sprout hash

    For Lunch & Dinner: 

    Paleo Sheet Pan Shrimp Tacos (Whole30, Keto Option)

    These paleo sheet pan shrimp tacos are exactly what you need on the nights where you do not have much time to cook and want to make something the whole family can eat! This recipe is super simple and only requires 10 minutes of hands on time. 

    paleo sheet pan shrimp tacos on a tray

    Pan Seared Sea Bass with Tropical Pico De Gallo

    This pan seared sea bass with ghee and pineapple pico de gallo melts in your mouth. The pan seared cooking method makes nice crispy edges with an inside that melts. This recipe only takes minutes to make meaning you can have dinner on the table within 15 minutes! 

    pan seared sea bass on a plate

    Paleo Mexican Lasagna with Chicken (Grain Free)

    Looking for an easy weeknight dinner that’s full of flavor and only takes minutes to prep? This paleo Mexican chicken lasagna is dairy free, gluten free, and always a crowd pleaser! You can even add all your favorite toppings like guacamole, cilantro, and more. With this lasagna only taking 15 minutes to prep and 4 ingredients total, it’s a delicious and healthy option that’s perfect for even the busiest weeknights.

    mexican lasagna

    Honey Sriracha Salmon (Paleo, Gluten Free)

    This sriracha honey salmon is oh so delicious and the most perfect weeknight meal. This dish is something the whole family can enjoy. The combination of honey and sriracha is quite the winning combo. When you make this recipe you can have dinner on the table in less than 30 minutes!

    honey sriracha salmon

    Chicken Teriyaki Meatballs (Paleo, Whole30)

    Are you looking for a fun appetizer or an easy dish that will please everyone? These whole30 teriyaki chicken meatballs are exactly what you need!  The salty umami sticky sauce has the perfect kick from the fresh ginger and is loaded with flavor. With this recipe only taking 15 minutes to prep, it is a no brainer for all of your meal prep and hosting needs.

    Buffalo Shrimp Tacos (Paleo, Whole30, Keto Option)

    These buffalo shrimp tacos make for the most perfect summer dinner! The crispy homemade cassava tortillas combined with the  creamy coleslaw and homemade ranch dressing makes these tacos oh so delicious.

    far out shot of the buffalo shrimp tacos

    Pan Seared Filet Mignon with Creamy Mushrooms (AIP, Whole30) 

    This pan seared filet mignon with a creamy mushroom sauce is everything you need for date night. The filet mignon in this recipe is crispy on the outside and oh so juicy on the inside. The creamy white sauce combined with the mushrooms makes this recipe oh so delicious. This recipe is quick and easy, you can have dinner on the table in 30 minutes. This recipe is naturally paleo, Whole30, and keto friendly. It can be made AIP friendly with one simple modification.

    pan seared filet mignon on a grey plate

    pineapple margarita mocktail 3 scaled

    May 12, 2021 Allergy Friendly

    Pineapple Margarita Mocktails

    These Pineapple Margarita Mocktails make for the most refreshing drink! This recipe is super simple, only requiring just 5 minutes. We love to make these margaritas all summer long, especially for Taco Tuesday! Plus, with my sweet mocktail version you don’t have to worry about that hang over the day after. 

    Pineapple margarita on a metal plate with a jalapeno and mint on top.

    These healthy margaritas have been my favorite ever since I gave up alcohol back in 2019! I wrote a whole blog post on how Giving Up Alcohol has been such a game changer. It really has made a world of a difference for me. If you love this recipe, you will love my other summer favorite mocktail recipes, my Watermelon Mocktail, Cherry Mocktail, Fig Mocktail, and my Peach Mocktail! We have been loving making this recipe during mexican night with our Dairy Free Enchiladas recipe too!

    [feast_advanced_jump_to]

    Why This Recipe Works

    • This recipe takes less than 5 minutes to make!
    • With this recipe you can still enjoy a fun drink minus the hangover.
    • This recipe is naturally dairy free, gluten free, soy free, paleo, vegan, and refined sugar free.
    • Just like the other mocktail recipes on my website, this drink will leave you feeling refreshed in the morning!
    • This drink makes for a great alcohol free alternative.

    Ingredients:

    For the mocktail:

    • Frozen pineapple chunks-I like the frozen chunks for Costco. They sell the chunks in a big bag and I find that it is the best bang for your buck. You do not have to use frozen, but if you want your margarita to be frozen, it is best.
    • Lime-Fresh lime to complement the sweet pineapple! 

    To garnish:

    • Jalapeños slices-cut real fine.
    • Mint-Fresh mint leaves. The best way to get the most out of your mint, is by patting it before using it in a dish prior to eating/ drinking.
    • Red pepper flakes and sea salt rim-To add an extra kick.

    Substitutions & Variations

    • If you like things fruity (like I do) try adding a few strawberries or a banana to the blender.
    • If you only have fresh pineapple on hand, you will need to add some ice to the blender to keep it nice and cold.

    Instructions

    Sea salt and red pepper flakes combined in a Mexican bowls.

    Equipment Needed

    • High speed blender.

    Expert Tips

    • Tip #1: This drink tastes best cold! I like to make it to serve.
    • Tip #2: I like to drink my mocktails in a fun cocktail glass, it really spices it up!

    Recipe FAQs

    What should I serve this recipe with?

    I love making margaritas for taco night! I have so many taco recipe on my blog: Buffalo Shrimp Tacos, Halibut Tacos, and my Sheet Pan Shrimp Tacos.

    Can I add alcohol?

    You can, but I personally feel like this drink does not need it! If I were to add alcohol I would add tequila.

    Can I use fresh pineapple?

    Yes! However, you will need to add a little bit of ice to keep it cold.

    How do I make a salt rim?

    Cut a lime and wipe it around the rim. Add some salt to a plate and brush the rim of the cup over the the rim. You can even add red pepper flakes if you would like to spice it up!

    Two pineapple margarita mocktails on a platter with ice and jalapenos on top.

    Storage Instructions

    • I suggest making this drink to serve. While you can store it in the fridge in an air tight container, it will likely be watery.

    Other Mocktail Recipes You Will Love

    • Overhead shot of a blood orange mojito in a glass with a dehydrated blood orange on the edge.
      Blood Orange Mojito Mocktail
    • key lime pie mocktail 5 scaled
      Key Lime Pie Mocktail
    • Blackberry mint mocktail7
      Blackberry Mojito Mocktail
    • strawberry mint mocktail6
      Easy Strawberry Mocktail

    Are you interested in a guide of my go to healthy alternatives?

    Download your FREE guide below

    download here

    pineapple margarita mocktail 3 scaled

    Pineapple Margarita Mocktails

    Course Drinks
    Cuisine Mexican
    Prep Time 5 minutes minutes
    Total Time 5 minutes minutes
    Servings 2 servings
    Author Allianna Moximchalk
    83kcal
    Cost $3
    Print Recipe Pin Recipe

    Equipment

    • high speed blender

    Ingredients

    For the mocktail:

    • 2 cups frozen pineapple chunks
    • 1 cup ice
    • 4 whole limes juiced

    For the granish: (optional)

    • mint leaves
    • jalapeño slices
    • sea salt and red pepper flakes for the rim

    Instructions

    For the drink:

    • Place the lime juice, pineapple, and ice in a blender and blend until smooth. Throughout you will need to scape down the sides with a plastic spatula. This should take about 2 minutes or so.

    To serve: (OPTIONAL)

    • Take the remaining piece from the lime and wipe it around the top of the drinking glass. Then combine the red pepper flakes and sea salt in a bowl. Dip the glass rim into the bowl. Then, pour the drink in and garnish with the mint and jalapeños.

    Notes

    Storage: This recipe tastes best when it is made ready to serve.
    Nutrition: The nutrition for this recipe is based off of an estimate and is not a guarantee. It is based off of 2 servings. 
    Servings: This recipe makes approx 2 servings. 
    Quick and easy margarita mocktail recipe.
    Serving: 1glass | Calories: 83kcal | Carbohydrates: 22g | Protein: 1g | Fat: 1g | Saturated Fat: 1g | Sodium: 8mg | Potassium: 182mg | Fiber: 2g | Sugar: 16g | Vitamin A: 97IU | Vitamin C: 79mg | Calcium: 26mg | Iron: 1mg
    Tried this recipe?Tag me on instagram @alliannaskitchen!
    dairy free avocado crema 3 scaled

    May 8, 2021 Allergy Friendly

    Crema Avocado Recipe

    This quick, easy and delicious Crema Avocado recipe goes great with just about anything! It makes for a perfect topping. This versatile sauce can be used for so many things from salad dressing to your favorite dipping sauce for tortilla chips or burrito bowls, this recipe will not disappoint! This creamy sauce has the best creamy flavor and only takes minutes to make. It has become a staple in our house for taco night.

    Crema avocado in a small glass jar with a spoon in it.

    I love this recipe because of how versatile it is. This versatile condiment goes great on salads like my Vegan Taco Salad or my Steak Taco Salad. I even like it on top of my tacos like my Halibut Fish Tacos, Dairy Free Enchiladas, Buffalo Shrimp Tacos, or even my Sheet Pan Fajita Tacos.

    [feast_advanced_jump_to]

    Why I Love This Recipe

    • The creamy texture in this recipe will have you thinking you are eating traditional mexican crema. It goes great with just about any of your favorite mexican dishes. 
    • This creamy avocado crema sauce has the vest flavor! You can also turn this into a vegan avocado crema recipe.
    • This recipe can be made dairy free and vegan. It is naturally gluten free, grain free, soy free and nut free. 
    • If you have extras avocado and are a big fan of guacamole, be sure to check out my favorite guacamole recipe with Guacamole with Pork Belly. 
    • This recipe can be made in less than 10 minutes! 

    Fresh Ingredients

    Crema avocado ingredients in small glass bowls on a silver pan.
    • Yogurt-You can use another dairy free yogurt alternative. However, if you are doing AIP be sure to make sure the coconut yogurt is AIP friendly.
    • Fresh lime juice-This adds a nice kick!
    • Sea salt-For flavor.
    • Fresh avocados-duh! Make sure your avocados are ripe.
    • Fresh cilantro-This compliments the lime oh so nicely. 

    See the recipe card below with a full list of ingredients and measurements.

    Best Substitutions and Variations

    • Jalapeno-The optional jalapeño gives this avocado lime crema recipe a nice kick!
    • To garnish-If you are hosting an event while serving this, I love adding fresh limes on the side and lime zest.
    • If you want a thinner crema, you can add sour cream, plain greek yogurt or heavy cream for a thinner consistency. 

    This recipe has not been tested with any other substitutions or variations. If you try something else out please let me know how it turns out in the comments below!

    How To Make

    Crema avocado ingredients in food processor base unblended.

    Step #1: Place all ingredients int the food processor and blend until smooth. This creamy avocado sauce is supposed to be smooth so don’t be afraid to run it through the blender for a few cycles.

    Recipe FAQ

    How can I make dairy free avocado crema?

    I love using Cocoyo dairy free yogurt. It is strictly AIP, paleo, and Whole30 friendly. No additives too which is hard to come by! I get it from Whole Food’s.

    How do I know if avocados are ripe?

    Avocados should be soft when they are ripe. One of the best ways to speed up the ripening process is by letting them sit out. I even sometimes place them in a brown paper bag and let them sit out. This also helps speed up the ripening process. Contrary to that, keeping them in the refrigerator postpones the ripping process. If you want your avocados to last to the end of the week, keep them in the fridge. However, I always like to let mine get ripe then put them in the fridge so they are good to go!

    How long does this recipe last?

    This should last in the fridge for up to 3 days. Be sure to store it in an airtight container or cover in plastic wrap to prevent it from turning brown. 

    What goes well with this recipe?

    We love this recipe with just about anything but it goes especially with Mexican Cuisine.

    Chefs Tips

    • Tip #1: f you want to make this recipe ahead of time, be sure to mix it up prior to serving. The top will appear a little brown but it is just from the avocados oxidizing.
    • Tip #2: Roll our your limes before you juice them to get the maximum amount of juice out of them.
    Dairy free avocado crema in a bowl with limes.

    Other Easy Sauces You Will Love

    • Red chimichurri 1 scaled
      Red Chimichurri Sauce Recipe
    • Nut free bright green pesto in a bowl.
      Nut Free Pesto
    • Orange sauce in a wooden bowl with red pepper flakes and fresh chives on top.
      Breakfast Burrito Sauce
    • fresh pesto in a jar
      Dairy Free Pesto

    Are you trying to heat healthier?

    Looking for healthy swaps? Be sure to check out my FREE go to anti-inflammatory swap guide!

    Download the free guide.
    dairy free avocado crema 3 scaled

    Crema Avocado Recipe

    Course Condiment
    Cuisine Mexican
    Diet Gluten Free
    Prep Time 5 minutes minutes
    Total Time 5 minutes minutes
    Servings 4 servings
    Author Allianna Moximchalk
    26kcal
    Cost $5
    Print Recipe Pin Recipe

    Equipment

    • high speed blender

    Ingredients

    • 2 ripe avocados see notes above about finding ripe avocados
    • 1/4 cup lime juiced
    • 1/4 cup fresh cilantro
    • 1/2 cup yogurt I use coconut yogurt because I am dairy free but any kind of unsweetened yogurt will work.
    • 1 pinch sea salt
    • 3 cloves garlic minced
    • 1/2 tsp onion powder

    OPTIONAL:

    • 1/2 jalapeño If you do not like spice or are on the AIP diet, omit this.

    Instructions

    • Scoop out the avocado pits and remove the skin. Place all ingredients in a food processor and blend until smooth.

    Notes

    Servings: This recipe yields approximately 4 servings.
    Nutrition: The nutrition on this recipe is just an estimate and cannot be guaranteed. 
    Storage: You can store this recipe in the fridge for up to 5 days. Note it may brown a little but that does not mean it is bad, it is just from the avocado.
    Easy, simple and delicious Crema Avocado Recipe!
    Serving: 1serving | Calories: 26kcal | Carbohydrates: 3g | Protein: 1g | Fat: 1g | Saturated Fat: 1g | Cholesterol: 4mg | Sodium: 27mg | Potassium: 91mg | Fiber: 1g | Sugar: 2g | Vitamin A: 385IU | Vitamin C: 10mg | Calcium: 48mg | Iron: 1mg
    Tried this recipe?Tag me on instagram @alliannaskitchen!
    Close up photo of shrimp tacos on a plate with limes, coleslaw and spicy mayo.

    May 8, 2021 Autoimmune Protocol

    Baja Shrimp Tacos

    These Baja Shrimp Tacos are super easy to make and make for a great sheet pan easy weeknight dinner. The tangy cabbage slaw combined with the chipotle mayo and fresh toppings really does the trick! With this baja shrimp tacos recipe, you can have dinner on the table in under 30 minutes. 

    Close up photo of shrimp tacos on a plate with limes, coleslaw and spicy mayo.

    Seafood tacos are my absolute favorite! If you love this recipe you will want to check out my Halibut Fish Tacos and Buffalo Shrimp Tacos. If you love good fresh toppings too like I do, check out my Pineapple Pico de Gallo, Mexican Pickled Onions, Gluten Free Coleslaw, Avocado Cilantro Lime Crema, Easy Keto Salsa, Mango Salsa, and my Whole30 Guacamole.

    Why I Love This Recipe

    • This recipe is naturally dairy free and can be made gluten free, paleo and Whole30 friendly. 
    • This baja shrimp taco recipe only takes minutes to make thanks to shrimp requiring very little cooking time! If you love shrimp like I do, check out my other shrimp recipes I have on my blog like my Frozen Shrimp in the Air Fryer, Lemon “Butter” Sheet Pan Shrimp Meal, Whole30 Bang Bang Shrimp, or my Thai Shrimp Soup.
    • With how quick this recipe is, it makes for a great meal during a busy weeknight or lazy weekend. 
    • Tha baja sauce is what makes this recipe! It can be eaten with a lot of other things like my Air Fryer Home Fries too. 
    • You can meal prep this recipe and reheat it in the oven or air fryer so you can enjoy it throughout the week.
    • You can use store bought tortillas to make this recipe or use my Homemade Grain Free Tortillas. 
    • This recipe has become a healthier option staple in my house for taco night.

    Fresh Ingredients

    Shrimp taco ingredients laid out on the counter in glass bowls.
    • Wild caught shrimp–I love using Butcher Box! If you use my link you can get a few pounds of free meat every month when you subscribe. They send me a box of my favorite grass fed meats and wild caught shrimp every month. I keep it in the freezer then pop it out the night before prior to use. It is super convenient and I know I can trust that the quality is the best. I like using the mini shrimps for shrimp tacos, this is just personal preference though!
    • Tortillas-Since I am gluten free, I like using the Siete Cassava tortillas but any kind of tortillas will work. You can also use traditional corn tortillas or flour tortillas. 
    • Seasoning-You can use a store bought paleo taco seasoning. I like Siete or you can make your own using the spices you have at home!
    • Avocado oil-This is what helps marinate the shrimp and peppers and prevents them from drying out.
    • Peppers and red onion-This adds some flavor and veggies to your tacos. 

    For the slaw:

    Homemade coleslaw ingredients in glass bowls laid out on the counter.
    • Coleslaw mix-This will vary depending on your grocery store. I like getting the cabbage mixture that has a mix of cabbage and matchstick carrots shredded. You can also make your own homemade coleslaw mix with a mix of red and green cabbage. 
    • Mayo-This will make your slaw creamy. I like using avocado mayo. 
    • Apple cider vinegar-This gives the slaw a tangy flavor. 
    • Dill-For flavor. You can omit if you do not like dill. 

    For the creamy sauce:

    Spicy mayo sauce ingredients laid out in glass bowls.
    • Mayo-This is the base of the sauce. 
    • Adobo sauce-From the can. 
    • Lime juice, salt, black pepper and paprika-For flavor.

    See the full list of ingredients and instructions with the recipe card below. 

    Recipe Substitutions and Variations

    • Other taco toppings you may love-Sour cream, lime wedges to garnish, fresh cilantro, queso fresco, refried beans, chipotle sauce, black beans, green onion, or even fresh salsa. 

    This recipe has not been tested with any other substitutions or variations. If you try something else out please let me know how it turns out in the comments below!

    Recipe Instructions

    Shrimp, oil and taco seasoning in a large glass bowl.
    Step #1: Preheat the oven to 400 degrees F. Toss the shrimp with the remaining seasoning and oil.
    Slaw, avocado mayo and lime juice in a large glass bowl.
    Step #2: Add all the slaw ingredients to a large bowl.
    Spicy mayo sauce ingredients in a glass bowl.
    Step #3: Mix all sauce ingredients together until well mixed.
    Coleslaw mixed in a large bowl.
    Step #4: Toss the slaw ingredients in a large glass bowl.
    Marinated veggies laid out on a sheet pan.
    Step #5: Slice up the onions and peppers and toss with half of the seasoning and oil. Lay the peppers and onions out on a sheet pan and bake for 20 minutes.
    Marinated shrimp laid out on a sheet pan.
    Step #6: . After the 20 minutes is up for the onions and peppers, add the shrimp to the sheet pan and bake for an additional 15 minutes.

    Recipe FAQs

    How will I know if the shrimp is done?

    The shrimp will turn pink when it is done. The shrimp turns from translucent to pink when it is done.

    How long does shrimp last in the fridge?

    I suggest eating the shrimp within 3 days. It is best to assemble it right before eating.

    Can I make these tacos breaded?

    Although I prefer them without breading, you can use breading. Check out my Bang Bang Shrimp recipe to see the recipe for the gluten free breading.

    Recipe Tips and Tricks

    • Tip #1: Toast your tortillas. You can put your tortillas directly over the flame or heat up a medium size pan. Once the pan is hot, add the tortilla for 15 seconds one each side.
    • Tip #2: Wait to assemble the tortillas until you are ready to eat them.


    Other Gluten Free Weeknight Dinners

    • Buffalo marinated shrimp on tortilla shells with slaw and limes on top.
      Buffalo Shrimp Tacos
    • sausage, broccoli and potatoes on a plate with a fork and garlic aioli
      Easy Sausage Sheet Pan Dinner
    • halibut fish tacos on a pale blue plate
      Halibut Fish Tacos
    • blackened pork on a plate with lemons and mashed potatoes
      Blackened Pork Chops

    Are you interested in a list of my go to healthy alternatives?

    Download your FREE guide below.

    Download your free guide.
    Close up photo of shrimp tacos.

    Baja Shrimp Tacos

    Course Meals
    Cuisine Mexican
    Diet Gluten Free
    Prep Time 5 minutes minutes
    Cook Time 30 minutes minutes
    Total Time 35 minutes minutes
    Servings 6 people
    Author Allianna Moximchalk
    193kcal
    Cost $15
    Print Recipe Pin Recipe

    Equipment

    • Sheet pan

    Ingredients

    For the tacos:

    • 2 pounds shrimp Remove tail after cooking if tail is not already removed. Use this link for $30 off.
    • 2 packets taco seasoning Or your own taco seasoning
    • 3 tbsp avocado oil
    • 3 whole bell peppers sliced thin
    • 1 whole purple onion sliced thin

    Slaw:

    • 1 bag coleslaw mix
    • 1/2 cup avocado mayo or regular mayo if proffered
    • 2 tbsp apple cider vinegar
    • 1/2 tsp dill

    Creamy sauce:

    • 1 cup avocado mayo or regular mayo if proffered
    • 2 tbsp adobo sauce
    • 1 lime juiced

    To serve: OPTIONAL

    • pickled red onions
    • homemade or store bought tortillas
    • avocado crema

    Instructions

    • Preheat the oven to 400. Add the oil and spices to a bowl and mix. Add the peppers and onions to a separate bowl. Pour 1/2 of the oil mixture on the onions and peppers and arrange in a single layer on a baking sheet. Cook for 20 minutes.
    • While the vegetables are cooking. Add the shrimp to a separate bowl with the oil mixture and mix throughout. Let the shrimp marinate for 20 minutes while the vegetables are in the oven. Once the 20 minutes is up, move the vegetables to one half of the pan and add the shrimp to the other half. Cook for an additional 15 more minutes.

    For the sauce:

    • Mix together in a blender until smooth.

    For the slaw:

    • Toss in a bowl until mixed well throughout.

    Notes

    Servings: This recipe yields approximately 6 servings.
    Nutrition: The nutrition on this recipe is just an estimate and cannot be guaranteed. 
    Storage: You can store this recipe in the fridge for up to 5 days. 
    The easiest dinner for the nights when you do not have time to cook.
    Serving: 1serving | Calories: 193kcal | Carbohydrates: 1g | Protein: 31g | Fat: 7g | Saturated Fat: 1g | Cholesterol: 381mg | Sodium: 1175mg | Potassium: 122mg | Fiber: 1g | Sugar: 1g | Vitamin A: 16IU | Vitamin C: 7mg | Calcium: 219mg | Iron: 3mg
    Tried this recipe?Tag me on instagram @alliannaskitchen!
    crispy mini potatoes 7 scaled

    May 5, 2021 Allergy Friendly

    Crispy Mini Potatoes With Paleo Garlic Aioli

    These crispy mini potatoes paired with garlic aioli are to die for and a crowd pleaser for all! The roasted herbs combined with sea salt and the dijon in the honey is oh so delicious. This is a staple for my meal prep clients and this side dish goes great with just about anything!

    crispy mini potatoes with garlic aioli

    This recipe would be the perfect side for my Steak Date Night Dinner recipe as well.

    Ingredients: 

    • For the crispy mini potatoes:
    • Mini potatoes-cut in small pieces. Usually fourths.
    • Sea salt-To sprinkle on the potatoes.
    • Fresh parsley-To add to the potatoes to enhance the flavor.
    ingredients on a tray

    For the paleo garlic aioli:

    • Avocado mayonnaise-This is what makes this aioli paleo. This mayonnaise is made with avocado oil instead of canola oil which makes it a lot better for us. 
    • Dijon mustard-Adds a nice kick.
    • Lemon juice-This is what differentiates an aioli from mayo alone. The lemon juice!
    • Fresh garlic-The fresh garlic combined with the lemon juice is DELICIOUS! 
    close up photo of potatoes with garlic aioli

    How to make:

    For tha aioli-

    • Place all ingredients in a bowl and whisk together until blended throughout.
    mini potatoes on a baking sheet

    For the mini potatoes-

    • Preheat the oven to 400. 
    • Chop the potatoes into small bite size pieces. 
    • Toss the potatoes in the olive oil, sea salt, and fresh parsley.
    • Lay in a single layer on a baking sheet and bake for 15 minutes. Then toss around and cook for an additional 15 minutes. 
    • Now, turn up the oven to broil and broil for 3-5 minutes depending on how crispy you like your potatoes!

    What should I serve these with?

    • We love to make these mini potatoes with just about anything from steak to chicken!
    crispy potatoes on a blue plate

    If you like this recipe, you will LOVE my other potato recipes:

    • Dairy Free Ricotta With Crispy Mini Potatoes And Peas
    • Whole30 Mashed Potatoes

    Hey-you’ve made it this far! If you make this recipe, I would love for you to give it a star ★ rating and review below. Make sure you are following me on Instagram, Pinterest, and Facebook too

    crispy mini potatoes 5 scaled

    Crispy Mini Potatoes With Paleo Garlic Aioli

    Course Side Dish
    Cuisine American
    Prep Time 10 minutes minutes
    Cook Time 35 minutes minutes
    Total Time 45 minutes minutes
    Servings 3 people
    Author Allianna Moximchalk
    494kcal
    Cost $6
    Print Recipe Pin Recipe

    Equipment

    • baking sheet

    Ingredients

    For the potatoes:

    • 1 pound mini potatoes washed and cubed
    • 3 tbsp extra virgin olive oil
    • 1 pinch sea salt
    • 1/2 cup fresh parsley

    For the aioli:

    • 1 whole lemon juiced
    • 1/2 cup avocado mayo
    • 1 tsp dijon mustard
    • 6 cloves garlic minced

    Instructions

    For the potatoes:

    • Preheat the oven to 400. Place in a single layer on a baking sheet. Mix with the EVOO, sea salt, and fresh parsley. Bake for 15 minutes, then toss around and bake for another 15 minutes. Once the 30 minutes is up, kick the oven up to broil for 3-5 minutes to get the potatoes nice and crispy.

    For the aioli:

    • Place all ingredients in a bowl and mix.

    Notes

    Hey-you’ve made it this far! If you make this recipe, I would love for you to give it a star ★ rating and review below. Make sure you are following me on Instagram, Pinterest, and Facebook too
    This paleo and whole30 side dish goes great with just about anything!
    Serving: 1serving | Calories: 494kcal | Carbohydrates: 32g | Protein: 4g | Fat: 38g | Saturated Fat: 5g | Sodium: 261mg | Potassium: 719mg | Fiber: 4g | Sugar: 1g | Vitamin A: 847IU | Vitamin C: 45mg | Calcium: 44mg | Iron: 2mg
    Tried this recipe?Tag me on instagram @alliannaskitchen!
    Argentinean Chimichurri 2 scaled

    May 4, 2021 Allergy Friendly

    Argentinean Chimichurri

    This argentinean chimichurri goes great with just about anything! It is super simple, quick, and easy. My personal cheffing clients go crazy over it. We like to serve it with steak, chicken and honestly just about anything! This recipe was inspired by one of our favorite restaurants here in Pittsburgh, Gaucho. They have a ton of Argentinean food and their chimichurri was my favorite, but now my version beats it! 

    argentinean chimichurri in a bowl with a spoon

    If you enjoy this recipe, you will also enjoy my Whole30 Caesar Dressing and Red Chimichurri as well.

    Ingredients:

    • Olive oil-This acts as a base and gets everything mixed up. Olive oil has a neutral flavor so I suggest sticking with it and not substituting. 
    • Apple cider vinegar-Adds a nice kick.
    • Jalapeños and red pepper flakes-Adds a nice bit of spice! Totally optional but this is what gives it a kick and adds a nice touch of Argentina 🙂
    • Onion-Adds even more flavor!
    • Garlic-Compliments the onion oh so nicely.
    • Sea salt-Added to enhance the flavor.
    chimichurri ingredients

    How to make argentinean chimichurri: 

    • It is super simple, all you have to do is put it in the food processor and blend!
    all chimichurri ingredients in a blender

    How long does it last?

    • I suggest keeping this in the fridge in an airtight container for no longer than 5 days. 
    close up picture of argentinean chimichurri

    What can I serve it with?

    • We love to use this sauce with just about anything, but it goes really well with steak, chicken, and wings!
    mini potatoes with chimichurri

    If you like this recipe, you will LOVE my other homemade sauces:

    • Paleo Garlic Aioli 
    • Whole30 Ranch
    • Lemon Tahini Dressing

    Hey-you’ve made it this far! If you make this recipe, I would love for you to give it a star ★ rating and review below. Make sure you are following me on Instagram, Pinterest, and Facebook too

    Argentinean Chimichurri 1 scaled

    Argentinean Chimichurri

    Course Condiment
    Cuisine Argentinean
    Prep Time 10 minutes minutes
    Total Time 10 minutes minutes
    Servings 6 servings
    Author Allianna Moximchalk
    251kcal
    Cost $3
    Print Recipe Pin Recipe

    Equipment

    • high speed blender

    Ingredients

    • 1 cup fresh cilantro
    • 1 cup fresh parsley
    • 3/4 cup EVOO
    • 1/4 tsp red pepper flakes omit for AIP
    • 1 whole jalapeño sliced, stem removed. Omit for AIP
    • 1/4 cup apple cider vinegar
    • 1/2 cup red onions chopped

    Instructions

    • Place all ingredients in a blender and blend until smooth. You may need to push down on the side with a spatula.

    Notes

    Hey-you’ve made it this far! If you make this recipe, I would love for you to give it a star ★ rating and review below. Make sure you are following me on Instagram, Pinterest, and Facebook too!
    Quick and easy chimichurri recipe that goes great with just about anything!
    Serving: 2ounces | Calories: 251kcal | Carbohydrates: 2g | Protein: 1g | Fat: 27g | Saturated Fat: 4g | Sodium: 10mg | Potassium: 98mg | Fiber: 1g | Sugar: 1g | Vitamin A: 1049IU | Vitamin C: 15mg | Calcium: 20mg | Iron: 1mg
    Tried this recipe?Tag me on instagram @alliannaskitchen!
    123

    May 4, 2021 Blog

    Week 12 Weekly Whole30 & Paleo Meal Plan

    This is the paleo week 12 meal plan. I have received a lot of great feedback so I am going to continue to create them. All of this weeks recipes are paleo and gluten free friendly. If they are AIP and keto friendly it will say in the description. Feel free to use previous week’s meal plans that can be found here.  If you would like to get the complete shopping list be sure to sign up for my newsletter below and I will send you your grocery list weekly. All you have to do is shop!


    How The Paleo Week 12 Meal Plan Works:

    If meal prepping your food in advance is your thing I highly suggest getting meal prep containers or containers like these so your meals are ready to eat.

    Included in this post are 8 meals, 7 dinners and 1 breakfast. When making the meals for dinner I suggest making an extra portion so you can eat it for lunch. Keep in mind these are an inspiration, so feel free to swap things out. Each recipe contains the meal only, feel free to add a side. We love roasting veggies to go with our meals. If you would like the full complete shopping list that goes with my meal plan, be sure to subscribe to my email list. If you have questions or need assistance please comment below. If you make one of my recipes I would so grateful if  you left a comment and a star rating review on the recipe in my blog or took a picture and tagged me in it on instagram @alliannaskitchen

    I hope this is helpful as you begin to plan out your week. -Allianna

    For Breakfast:

    AIP Breakfast Muffins With Bacon & Apples (Paleo, Whole30)

    For Lunch & Dinner:

    Gluten Free Fried Shrimp (Paleo, Whole30, AIP)

    We all love those healthy recipes that you would never know are healthy, that is how I feel about this gluten free fried shrimp recipe. This recipe reminds me of my youth! The gluten free breading is crispy yet full of flavor. This recipe is naturally gluten free, paleo, Whole30 and AIP friendly.

    Whole30 Scallops w/ Ghee, Chives, Lemon & Garlic (AIP, Paleo)

    These buttery Whole30 scallops can be on your table in less than 15 minutes! They are crispy, buttery and full of flavor. The lemon, garlic and chives make these silky scallops oh so flavorful. This recipe is naturally paleo, keto, and AIP friendly.

    Garlic Butter BWW Copycat Wings (Paleo, Whole30, AIP)

    These crispy Buffalo Wild Wings copycat garlic butter wings are my fiance’s favorite. They are the perfect date night alternative to take out. With these crispy wings only requiring 5 minutes of hands on time, they are also perfect for all of your weeknight cooking needs! These garlic butter wings are naturally Whole30, paleo, keto and AIP friendly.

    Everything Bagel Seasoned Chicken Wings w/ Garlic Aioli (Keto, Paleo, Whole30)

    These crispy and savory everything bagel seasoned chicken wings paired with whole30 garlic aioli are a staple in our house. The lemony aioli sauce combined with the dijon mustard gives this aioli a nice kick. With this recipe taking less than 10 minutes to prep, we love using this recipe as a quick and easy dinner as well as a staple appetizer to meet all of our hosting needs. These wings and sauce are always a crowd pleaser.

    Shredded Lemon Dill Salmon Salad (Paleo, AIP, Whole30, Keto)

    This shredded lemon dill salmon salad is one of my most requested items from my weekly private chef clients. The combination of the lemon and dill with the crunchy almonds and onions is oh so delicious. This recipe only requires 10 minutes of hands on time and makes for the most perfect light lunch or dinner. This shredded salmon salad is naturally Whole30, paleo, and keto friendly. It can be made AIP friendly without the almonds

    Crispy Garlic AIP Chicken Thighs (Paleo, Whole30)

    These crispy garlic AIP chicken thighs are the perfect dinner that both you and your family will love to eat. The arrowroot powder acts as the breading and makes these chicken thighs oh so delicious. This recipe is naturally Whole30 and Paleo friendly. This crowd pleasing dish takes less than 10 minutes to prepare which makes it an easy to go for all of your weekly dinner needs.

    Garlic Butter BWW Copycat Wings (Paleo, Whole30, AIP)

    These crispy Buffalo Wild Wings copycat garlic butter wings are my fiance’s favorite. They are the perfect date night alternative to take out. With these crispy wings only requiring 5 minutes of hands on time, they are also perfect for all of your weeknight cooking needs! These garlic butter wings are naturally Whole30, paleo, keto and AIP friendly.

    Gluten Free Shrimp Scampi (Paleo, Whole30, Keto, AIP)

    This gluten free shrimp scampi is everything shrimp scampi should be: simple, garlic-y, buttery, zesty, and full of flavor. In this recipe, I include multiple pasta options which makes it paleo, keto, AIP, and Whole30 friendly. This crowd pleasing recipe is quick, easy and clean. It be on the dinner table within 15 minutes.


    pan seared sea bass 1 scaled

    April 26, 2021 Allergy Friendly

    Pan Seared Sea Bass With Tropical Pico De Gallo

    This Pan Seared Sea Bass with Tropical Pico De Gallo is cooked in ghee and melts in your mouth. The pan seared cooking method makes nice crispy edges with an inside that melts. This recipe only takes minutes to make meaning you can have dinner on the table within 15 minutes!

    Pan seared sea bass with pico de gallo on a plate with lime.

    This dish is filling but still so refreshing. I love to make this for a summer gathering. To me the tropical pico de gallo screams summer and this dish is always a crowd pleaser! Sea bass is a light fish so it pairs great with the delicious tastes of the fresh pico.

    [feast_advanced_jump_to]

    Why You Will Love This Recipe

    • This recipe is so simple but packed with flavor.
    • Kids will also like this recipe because it does not have an overwhelming fish flavor and is packed with flavor from the pico de gallo.
    • Even though this recipe is simple it is an easy way to impress your dinner guests.
    • This recipe is naturally gluten free, dairy free, soy free, paleo, and refined sugar free.
    • This recipe would also taste great with my Mango Pico De Gallo in place of the Tropical Pico De Gallo.
    • You can make this recipe even more simple by preparing the tropical pico de gallo in advance.

    Ingredients

    Pan seared sea bass with tropical pico de gallo ingredients in small glass bowls on a silver baking tray.

    For the sea bass:

    • Wild caught sea bass-I like to get this from Whole Foods.
    • Ghee-This gives the sea bass a nice buttery flavor. 
    • Pinch of sea salt-To enhance the flavor.
    • Lemon-To add a touch of citrus.

    For the pineapple pico de gallo:

    • Pineapple-We like to use a whole one and make plenty for leftovers to use with an appetizer. Chop this baby up into small 1 inch cubes.
    • Red bell pepper-Compliments the pineapple well, but any colored pepper will work.
    • Cilantro-I like fresh cilantro, it enhances the flavor big time.
    • Fresh lime juice-To keep this pico nice and fresh with adding a citrus touch to the sweet pineapple. 
    • Red onions-For a nice crunch. I like red onions because they are more savory in this recipe. I use yellow onions for things where I want a sweet flavor.

    See the recipe card below for a full list of ingredients and measurements.

    Substitutions and Variations

    • If you are not a fan of sea bass, you can substitute any white fish you prefer.
    • You can switch out the type of pico de gallo that you pair with this dish to change the flavor profile.
    • You could also grill the fish instead of pan searing it to change the flavor as well.

    This recipe has not been tested with other substitutions or variations. If you replace or add any ingredients, please let us know how it turned out int he comments below!

    Step by Step Instructions

    Seasoned sea bass in a skillet with lime slices on top.
    Photo 1: First, remove the sea bass from the refrigerator and allow to sit out for 30 minutes to come to room temperature. Once the 30 minutes is up, pat dry the fish and add ghee to a non stick pan over medium heat. Then, you will want to let the pan to get hot. Once pan is hot and the ghee is melted you will add the sea bass to the skillet face down. Then, you will allow to cook for 4 minutes, flip it over, and allow to cook for another 4 minutes. Finally, you will add in the lemon juice.
    Tropical pico de gallo ingredients chopped in a mixing bowl.
    Photo 2: While the sea bass is cooking, you will prepare all of the pico de gallo ingredients, place in a bowl, and mix together.

    Equipment Needed

    • Non Stick Skillet

    Expert Tips

    • Tip # 1: When cooking with ghee, if it is stored in the refrigerator I like to pull it out for about 10-15 minutes before to help soften the ghee so that it is easy to measure and place in the skillet.
    • Tip # 2: I like to make my own clarified butter so that I can control the ingredients that are going into it.
    • Tip # 3: I like to also make homemade gluten free corn tortilla chips to serve with this dish to eat with the pico de gallo as well.

    Recipe FAQ’s

    How can I reheat this?

    I suggest serving the pico de gallo cold, but you can reheat the sea bass in the oven at 350 degrees F for 5-10 minutes or until warmed through.

    How do you know if there are bones in the sea bass?

    I prefer to purchase my sea bass with the skin off and bones removed. If you would purchase fish that does have bones in it, you can reference this post to see how to remove them.

    Is there a different type of fish I can use?

    If you don’t have sea bass, you could use another white fish such as cod or tilapia.

    Pan seared sea bass with tropical pico de gallo on a plate with a fork.

    Storage Instructions

    • For this recipe, I suggest only keeping it in the fridge for 2-3 days. It serves best when fresh.

    Other Fish Recipes You Will Love

    • halibut fish tacos on a pale blue plate
      Halibut Fish Tacos
    • overhead shot of pasta with fresh pesto on top with mackerel
      Easy Mackerel Pasta With Creamy Pesto
    • close up picture of maple crusted salmon with thyme on top
      Maple Crusted Salmon
    • pan seared sea bass on a plate with greens and lemon
      Pan Seared Chilean Sea Bass In Lemon Caper Sauce

    Want a free guide of my go to healthy alternatives?

    download your FREE guide
    pan seared sea bass 8 scaled

    Pan Seared Sea Bass With Pineapple Pico De Gallo

    Course Meals
    Cuisine American
    Diet Gluten Free, Low Fat
    Prep Time 7 minutes minutes
    Cook Time 8 minutes minutes
    Total Time 15 minutes minutes
    Servings 2 people
    Author Allianna Moximchalk
    288kcal
    Cost $30
    Print Recipe Pin Recipe

    Equipment

    • non-stick pan

    Ingredients

    For the sea bass:

    • 1 pound wild caught sea bass bones removed, see above about instructions
    • 1 tbsp ghee
    • 1 pinch sea salt
    • 1 whole lemon juiced
    • pepper to taste

    Pineapple pico de gallo:

    • 1 whole pineapple skinned and cubed
    • 1 whole red pepper cubed, omit for AIP
    • 1 whole red onion diced
    • 4 whole limes juiced
    • 1/2 cup fresh cilantro

    Instructions

    For the fish:

    • Remove the sea bass from the fridge and set out for 30 minutes. Once the 30 minutes is up pat dry the fish and add ghee to the pan on medium heat on a non stick skillet. Let the pan get nice and hot. Add the sea bass face down for 4 minutes, then flip with a wide spatula and cook on the other side for 4 more minutes. Add the lemon juice in.

    For the pico de gallo:

    • Place all ingredients in a bowl and mix.

    Notes

    Storage: This recipe can be stored in an air tight container for up to 3 days in the refrigerator. 
    Nutrition: The nutrition for this recipe is an estimate and the calorie count is not guaranteed.  It is based on 2 servings. 
    Servings: This recipe should yield 2 servings. 
    Quick and easy sea bass recipe that everyone will love!
    Serving: 1serving | Calories: 288kcal | Carbohydrates: 1g | Protein: 40g | Fat: 13g | Saturated Fat: 6g | Cholesterol: 201mg | Sodium: 178mg | Potassium: 607mg | Fiber: 1g | Sugar: 1g | Vitamin A: 491IU | Vitamin C: 3mg | Calcium: 38mg | Iron: 2mg
    Tried this recipe?Tag me on instagram @alliannaskitchen!
    lemon tahini dressing in a bowl

    April 24, 2021 Allergy Friendly

    Lemon Tahini Dressing (Whole30, Dairy Free, Vegan)

    This Lemon Tahini Dressing is so good to say the least. I make it for my personal chef clients all of the time and they go crazy over it! The earthy tahini taste combined with lemon juice, coconut aminos and garlic is oh so delicious. This recipe only takes minutes to make and is perfect for your weekly meal prep. 

    lemon tahini dressing in a bowl

    If you enjoy this recipe, you would also love my Whole30 Caesar Dressing as well.

    Ingredients:

    • Tahini-Make sure your tahini is not dried out! This is important, or the dressing will not turn our right. I love the Trader Joe’s brand. It is perfectly moist. 
    • Lemon juice-The citrus from the lemon compliments the earthy tahini flavor oh so well. 
    • Coconut aminos-This is my go to swap for soy sauce in paleo cooking. It adds the soy sauce-like flavor but without the soy and gluten. 
    • Fresh garlic-The garlic and lemon combination is amazing!
    • Apple cider vinegar-This helps break up the tahini and adds a nice tangy taste!
    • Olive oil-to keep the dressing moist. 
    dressing ingredients on a tray

    How to make:

    • First mince the garlic, juice your lemons and add all ingredients to a bowl and whisk together. Be sure not to over whisk it or it will clump up.
    dressing ingredients in the food processor

    What to serve this with:

    • I love making this with just about any salad. If you use it with kale it is best to massage the dressing over the kale and let it sit. This helps break down the fibers in the kale which makes it easier to chew and digest!
    tahini dressing in the food processor

    How long does it last:

    • You can keep this in your fridge for up to a week. I have only tested it for a week. It will harden as it sits, so prior to using you may want to add a little bit of water and whisk again. 
    tahini dressing in a kale salad

    If you like this recipe, you will LOVE my salad recipes on my website:

    • The Best Kale Salad

    If you enjoyed this recipe it would mean the world to me if you rated it and left a comment below. It helps others find it on google.

    lemon tahini dressing in a bowl

    Lemon Tahini Dressing

    Course Condiment
    Cuisine American
    Prep Time 5 minutes minutes
    Total Time 5 minutes minutes
    Servings 6 servings
    Author Allianna Moximchalk
    314kcal
    Cost $5
    Print Recipe Pin Recipe

    Equipment

    • Large bowl
    • whisk

    Ingredients

    • 1 whole lemon juiced
    • 1/2 cup apple cider vinegar
    • 10 ounces tahini I like Trader Joe's brand best.
    • 3 tbsp coconut aminos
    • 1 tbsp olive oil
    • 3 cloves garlic minced

    OPTIONAL:

    • 1/4-1/2 cup water to achieve desired consistency

    Instructions

    • Add all ingredients to a bowl and whisk together. Add water if desired if you would like your dressing to be thinner. We like to use this dressing on kale salads by allowing it to marinate with the kale prior to serving.
      If you enjoyed this recipe it would mean the world to me if you rated it and left a comment below. It helps others find it on google.

    Notes

    If you enjoyed this recipe it would mean the world to me if you rated it and left a comment below. It helps others find it on google.
    This lemon tahini dressing goes great with just about anything, especially kale!
    Serving: 2ounces | Calories: 314kcal | Carbohydrates: 12g | Protein: 8g | Fat: 27g | Saturated Fat: 4g | Sodium: 187mg | Potassium: 238mg | Fiber: 2g | Sugar: 1g | Vitamin A: 32IU | Vitamin C: 3mg | Calcium: 71mg | Iron: 2mg
    Tried this recipe?Tag me on instagram @alliannaskitchen!
    paleo aioli 1

    April 24, 2021 Allergy Friendly

    Paleo Aioli With Garlic (Whole30 Friendly, Dairy Free)

    This paleo aioli with fresh garlic, dijon mustard and lemon sauce is to die for! It takes nearly 5 minutes to prep and goes good with just about anything. We love making this to accompany chicken wings, steak, and honestly..anything! This recipe is also naturally Whole30 friendly.

    paleo aioli in a bowl with a spoon

    If you enjoy this recipe, you will also like my Whole30 Caesar Dressing as well. This recipe is the perfect addition to my Steak Date Night Dinner recipe.

    Ingredients:

    • Avocado mayonnaise-This is what makes this aioli paleo. This mayonnaise is made with avocado oil instead of canola oil which makes it a lot better for us. 
    • Dijon mustard-Adds a nice kick.
    • Lemon juice-This is what differentiates an aioli from mayo alone. The lemon juice!
    • Fresh garlic-The fresh garlic combined with the lemon juice is DELICIOUS! 
    paleo aioli ingredients on a tray

    How to make:

    • Place all ingredients in a bowl and whisk together, super simple!

    How long does this last?

    • I have kept this in the fridge for up to 2 weeks. I have not tested it beyond the 2 week mark. 

    What should I serve it with?

    • I do not know where to start, there are so many great options! We love using this paleo aioli with chicken wings, steak, mini potatoes, chickpea appetizers and honestly just about anything. 
    aioli in a bowl

    If you like this recipe, you will LOVE my other condiment recipes:

    • Whole30 Ranch Dressing
    • Paleo & Whole30 Caesar Dressing

    Hey-you’ve made it this far! If you make this recipe, I would love for you to give it a star ★ rating and review below. Make sure you are following me on Instagram, Pinterest, and Facebook too

    paleo aioli 1

    Paleo Aioli With Garlic

    Course Condiment
    Cuisine American
    Prep Time 5 minutes minutes
    Total Time 5 minutes minutes
    Servings 5 servings
    Author Allianna Moximchalk
    300kcal
    Cost $3
    Print Recipe Pin Recipe

    Equipment

    • Mini whisk or spoon

    Ingredients

    • 2 whole lemons juiced
    • 1 cup avocado mayo
    • 2 tsp dijon mustard
    • 12 cloves garlic minced

    Instructions

    • Place all ingredients in a bowl and whisk together.

    Notes

    Hey-you’ve made it this far! If you make this recipe, I would love for you to give it a star ★ rating and review below. Make sure you are following me on Instagram, Pinterest, and Facebook too
    This paleo alternative to aioli is delicious and only takes minutes to make!
    Serving: 2ounces | Calories: 300kcal | Carbohydrates: 6g | Protein: 1g | Fat: 29g | Saturated Fat: 3g | Sodium: 280mg | Potassium: 32mg | Fiber: 1g | Sugar: 1g | Vitamin A: 2IU | Vitamin C: 2mg | Calcium: 14mg | Iron: 1mg
    Tried this recipe?Tag me on instagram @alliannaskitchen!
    key lime pie mocktail 5 scaled

    April 24, 2021 Autoimmune Protocol

    Key Lime Pie Mocktail

    This Key Lime Pie Mocktail is exactly what you need on a warm summer day! This baby is naturally dairy free and oh so delicious. It tastes just like the real thing, key lime pie. On top of that, it is super simple to make, requiring only 5 minutes of hands on time.

    key lime pie mocktail in a cocktail glass with flowers

    If you have been following along for a while you know how obsessed I am with mocktails. I took a poll on instagram the other asking what kind of recipes you guys wanted to see this spring and summer and this was one of them! This may be my new favorite. Be sure to check out all of my other favorite mocktails on my website like my Watermelon Mocktail, Fig Simple Syrup, Mint Lemonade Rosemary Mocktail, Peach Mocktails, and Grapefruit Mocktails! It is one of my favorites.

    [feast_advanced_jump_to]

    Why This Recipe Works

    • This recipe only takes 5 minutes to make!
    • My homemade mocktail tastes just like key lime pie, although it is much lighter and actually refreshing.
    • This recipe is naturally dairy free, gluten free, soy free, egg free, paleo, refined sugar free and vegan.
    • You can prep this drink in advance so you can have it all ready to go for dinner!
    • If you are a big pie fan, like me, and want to enjoy this mocktail with a slice of actual pie, you have to check out my Homemade Grain Free Pie Crust. It is so simple to make!

    Ingredients

    key lime pie mocktail ingredients on a tray
    • Coconut milk-This is what gives the drink the creamy pie like flavor. I like the coconut milk because it is nice and light.
    • Limes-The limes are what makes this drink! I always prefer fresh juice over store bought. If you do buy store bought, make sure there are not any added sugars.
    • Pineapple juice-This is what sweetens this drink. You can obviously make your own with a juicer, or you can buy organic pineapple juice. Just make sure nothing funky is added to it. 

    See the recipe card below for a full list of ingredients and measurements.

    Substitutions And Variations

    • Coconut sugar-for the rim. You can also also use brown sugar if you are not avoiding refined sugars.
    • Coconut whipped cream– to garnish and drizzle on top.
    • Dairy free graham crackers– to sprinkle. 
    • Fresh flowers- to garnish. 
    • Coconut milk-If you are not dairy free, you can use heavy cream.

    This recipe has not been tested with any other substitutions or variations. If you try something else out please let me know how it turns out in the comments below!

    Step By Step Instructions

    Coconut milk, pineapple juice and lime juice in a cocktail mixer with a large cocktail spoon.
    Step #1: Place the coconut milk, pineapple juice and lime juice in the cocktail mixer and mix with a spoon until well mixed throughout.
    Cocktail glass rim dipped in graham crackers.
    Step #2: Wet the rim of your cocktail glass with water and drip the rim in graham crackers and or coconut sugar. Then pour the mocktail in the glass and add ice cubes if desired.

    Fun Citrus Treats To Pair With

    • Healthy Lemon Poppyseed Muffins
    • Gluten Free Lemon Bars
    • Gluten Free Raspberry Lemon Muffins
    • Vegan No Bake Cherry Lime Cheesecake

    Equipment Needed

    • A large cocktail mixer- While this is not a must, it makes it easier to mix the mocktail!
    • Citrus juicer-If you are using fresh limes this will make it so much easier to juice them!

    Expert Tips

    • Tip #1: Make sure your limes are ripe! The best way to tell if your limes are ripe is by the texture. They should be somewhat soft. If you leave limes sit out on your counter it will help them ripen faster.
    • Tip #2: The sugar rim is what makes this drink! Do not skip this step.

    Recipe FAQs

    Can I make this recipe in advance?

    Yes! However, be sure to wait to mix it with ice and add the garnish until you are ready to drink it.

    What kind of pineapple juicer should I use?

    I love pure pineapple juice that comes in a can. Make sure whatever kind you buy is free of any additives.

    When should I make this drink?

    This drink is perfect for bridal showers, baby showers or just a girls tea part and brunch!

    Key lime mocktail in a fun cocktail glass with a lime on the rim.

    Storage Instructions

    • This recipe can last in the fridge for up to 5 days.
    • Be sure to store this drink in an air tight container to preserve it’s freshness!

    Other Fun Mocktails You Will Love

    • pineapple margarita mocktail 3 scaled
      Pineapple Margarita Mocktails
    • Blackberry mint mocktail7
      Blackberry Mojito Mocktail
    • IMG 2349
      Peach Mocktail Recipe
    • Cherry mocktail in a fun pink glass with a lime on top.
      Tart Cherry Juice Mocktail

    if you are into healthy eating, be sure to download my FREE healthy swap guide

    download your free guide

    key lime pie mocktail 5 scaled

    Key Lime Pie Mocktail

    Course Drinks
    Cuisine American
    Prep Time 5 minutes minutes
    Total Time 5 minutes minutes
    Servings 1 serving
    Author Allianna Moximchalk
    175kcal
    Cost $3
    Print Recipe Pin Recipe

    Equipment

    • fun cocktail glass

    Ingredients

    For the drink:

    • 1/2 cup pineapple juice Make sure it is pure pineapple juice with no sugar added!
    • 1/4 cup coconut milk Can use almond milk.
    • 3 whole limes Rolled, and juiced.

    For the garnish: (OPTIONAL)

    • lime slices
    • coconut whipped cream
    • gluten free graham crackers sprinkled

    Instructions

    • Place the coconut milk, pineapple juice, and lime juice in a glass and mix. Pour into a fun cocktail glass, add an ice cube. Garnish as desired!

    Notes

    Storage: You can store this drink in the fridge for up to 5 days. 
    Nutrition: The nutrition in this recipe is an estimate and not guaranteed. 
    Servings: This recipe is based off of 1 serving. 
    Substitutions: If you are not dairy free, you can sub the coconut milk with heavy cream. 
    This fun and easy mocktail recipe is perfect for summer!
    Serving: 1glass | Calories: 175kcal | Carbohydrates: 17g | Protein: 2g | Fat: 12g | Saturated Fat: 11g | Sodium: 10mg | Potassium: 281mg | Fiber: 1g | Sugar: 12g | Vitamin A: 7IU | Vitamin C: 13mg | Calcium: 26mg | Iron: 2mg
    Tried this recipe?Tag me on instagram @alliannaskitchen!
    • « Go to Previous Page
    • Page 1
    • Interim pages omitted …
    • Page 25
    • Page 26
    • Page 27
    • Page 28
    • Page 29
    • Interim pages omitted …
    • Page 38
    • Go to Next Page »

    Primary Sidebar

    Allianna Headshots

    Hi, I'm Allianna! Allianna's Kitchen started by accident after battling an undiagnosed autoimmune disease for nearly my whole life.

    More about me →

    GLUTEN FREE DINNER RECIPES

    • steak date night dinner 1
      Steak Date Night Dinner with Garlic Aioli
    • gluten free fried shrimp 3 scaled
      Gluten Free Fried Shrimp
    • cooked frozen pork chops with chives on top on a white plate with a gold fork
      Easy Frozen Pork Chops In The Air Fryer
    • halibut fish tacos on a pale blue plate
      Halibut Fish Tacos

    EASY WHOLE30 RECIPES

    • Beetroot dip on a plate with crackers and fresh parsley on top.
      Simple Beetroot Dip Recipe
    • close up photo of ginger apple pork in a bowl
      Apple Ginger Pulled Pork
    • dairy free lobster bisque in a bowl with a gold spoon and garnished with lemon, fresh green herbs, and red pepper flakes.
      Dairy Free Lobster Bisque
    • juicy filet mignon on a plate
      Air Fryer Filet Mignon

    GLUTEN FREE APPETIZERS

    • peanut butter and jelly chicken wings on a plate with limes
      Peanut Butter And Jelly Wings
    • Stuffed mushrooms on a brown and white plate with fresh parsley on top.
      Gluten-Free Stuffed Mushrooms
    • Gluten free pigs in a blanket in a pile on a plate.
      Gluten Free Pigs In A Blanket
    • Pretty french onion dip in a silver bowl with potato chips and chives on top.
      Vegan French Onion Dip Recipe

    EASY MOCKTAIL RECIPES

    • honey simple syrup 2
      Honey Simple Syrup
    • orange lime cranberry mocktail 4
      Cranberry Mocktail Recipe
    • Clear glass with a brown drink and a cinnamon stick in it.
      Pear Cocktail Recipe
    • Grapefruit mocktail in a glass with jalapeño slice and grapefruit slice.
      Easy Grapefruit Mocktail Recipe

    Footer

    • Recipes
    • My Courses
    • Meal Prep Services
    • Accessibility Policy
    • Contact
    • About Me
    • Blog
    • Privacy Policy
    • Pinterest
    • Instagram
    • Facebook
    • Twitter

    Allianna’s Kitchen 2025 - All Rights Reserved

    Rate This Recipe

    Your vote:


    A rating is required
    A name is required
    An email is required