• Skip to primary navigation
  • Skip to main content
  • Skip to primary sidebar
  • Spring Recipes
  • Recipes
  • Order Meal Prep
  • Healthy Gut Baby Food Course
  • About

Allianna's Kitchen

menu icon
go to homepage
  • Spring Recipes
  • Recipes
  • Order Meal Prep
  • Healthy Gut Baby Food Course
  • About
    • Facebook
    • Instagram
    • Pinterest
    • Twitter
  • search icon
    Homepage link
    • Spring Recipes
    • Recipes
    • Order Meal Prep
    • Healthy Gut Baby Food Course
    • About
    • Facebook
    • Instagram
    • Pinterest
    • Twitter
  • ×
    Allianna's Kitchen » Recipes

    Blog

    gluten free banana chocolate chip muffins 1

    September 15, 2020 Breakfast

    Gluten Free Banana Chocolate Chip Muffins

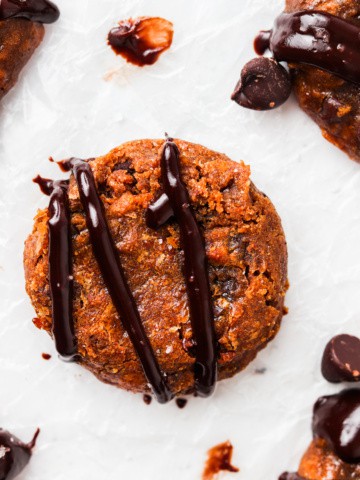
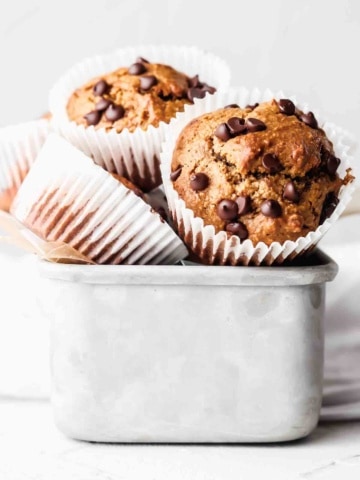
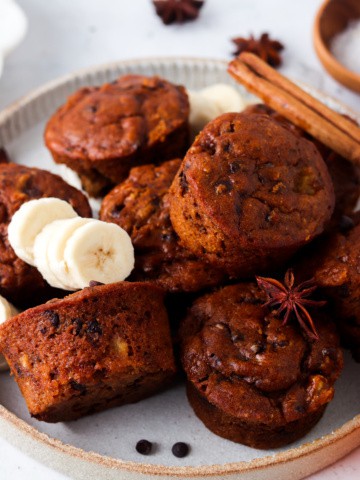
    These Gluten Free Banana Chocolate Chip Muffins are super easy to make and make for the perfect snack! These homemade healthy gluten free dairy-free banana chocolate chip muffins are naturally flourless and only take minutes to prep. We always keep a stash in my house for days where we want a snack on the go. 

    gluten free banana muffins stacked on top of each other

    If you love this gluten free treat recipe, you will also love my Vegan Chocolate Truffles, Gluten Free Chocolate Tart, my Gluten Free Smores Bars, and Vegan Milkshake recipe.

    What Makes These Banana Gluten Free Muffins So Good?

    • First off, they are so easy to make!
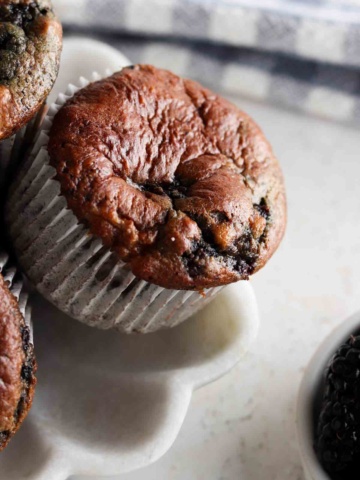
    • Secondly, they are super fluffy and moist. No dry muffins here!

    Gluten Free Banana Chocolate Chip Muffin Ingredients:

    • Nut butter-This is what acts in place of the flour. You can use almond butter or peanut butter here!
    • Eggs-This helps bind everything together. 
    • Maple syrup-To add some sweetness. You can skip this if you are trying to eat lower carb!
    • Chocolate chips-My favorite dairy free chocolate chips are made by Enjoy Life. They are allergy friendly so they are soy free too.
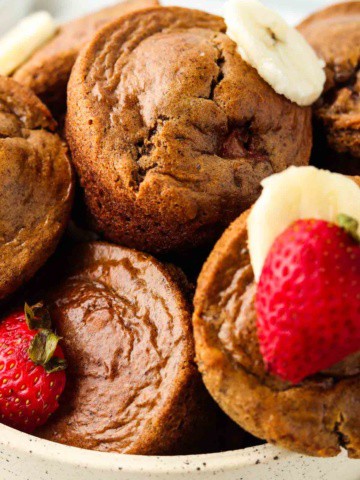
    • Banana-Mashed, this gives these gluten free banana muffins their banana flavor!
    • Apple cider vinegar & baking soda-This is what causes the muffins to rise and really poof up. 
    gluten free muffins on a pan

    How To Make:

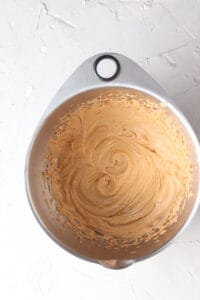
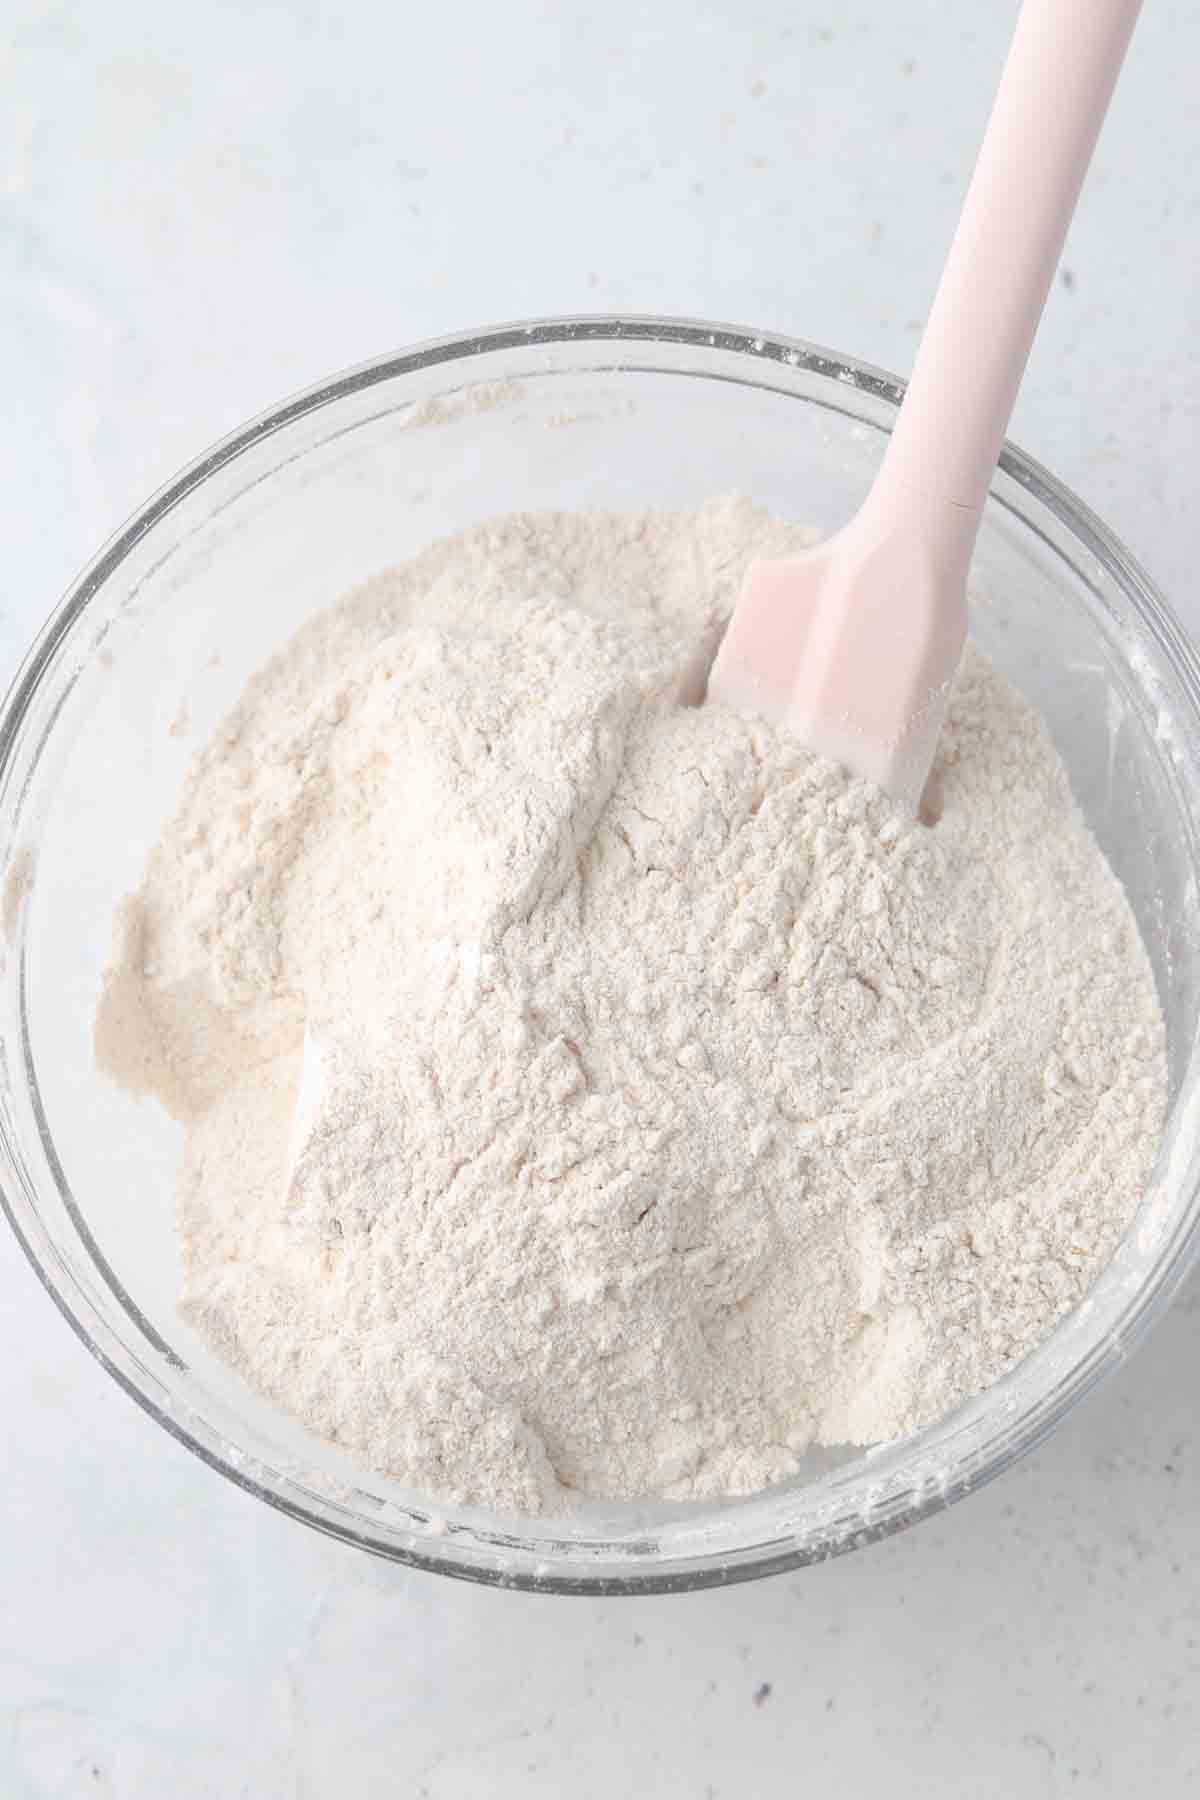
    • First, preheat the oven to 350 and place all ingredients into a mixing bowl and whisk until smooth.
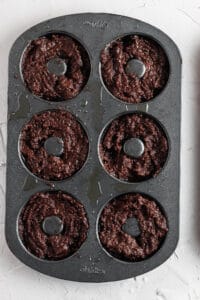
    • Next, line a cupcake pan with muffin liners so they do not stick. Personally I love using silicone muffin pans because the muffins just pop right out. You can find mine that I use HERE
    • Now, divide up the muffin mix into 8 muffins and bake for 25 minutes. Allow the muffins to cool for 10 minutes prior to popping them out.
    gluten free banana chocolate chip muffins 1

    Can I Freeze Homemade Muffins?

    • Yes! Be sure to allow the muffins to cool prior to placing them in the freezer. I suggest putting them in a glass container or ziplock bag (be sure to remove all of the air as best as you can.) the muffins will last in the freezer for a few weeks. 

    How Long Do These Healthy Chocolate Chip Muffins Last?

    • They will last for up to a week in the fridge.

    What Goes Well With These? 

    We love eating these muffins for breakfast or even at brunch! I love the idea of serving them with:

    • Oven Baked Turkey Bacon
    • Dairy Free Hollandaise Sauce
    • Gluten Free French Toast Casserole
    • Banana Chia Pudding
    gluten free muffins cooling on a rack

    Other Gluten Free Muffins On My Blog

    • Blackberry muffins on a flower plate with blackberries in a bowl on the side.
      Gluten-Free Blackberry Muffins
    • Close up photo of strawberry gluten free muffins in a bowl.
      Gluten Free Strawberry Muffins
    • raspberry muffins stacked on a plate
      Gluten Free Raspberry Lemon Muffins
    • paleo pumpkin muffins on a plate
      Gluten Free Pumpkin Muffins

    Are you interested in getting a list of my healthy go to alternative?

    Download your FREE guide below.

    Download the guide.
    Close up photo of a chocolate chip banana muffin with banana slices on top.

    Gluten Free Banana Chocolate Chip Muffins

    Course Breakfast, Dessert
    Cuisine American
    Prep Time 5 minutes minutes
    Cook Time 25 minutes minutes
    Total Time 30 minutes minutes
    Servings 8 muffins
    Author Allianna Moximchalk
    272kcal
    Cost $4
    Print Recipe Pin Recipe

    Equipment

    • muffin/cupcake pan
    • cupcake liners
    • mixing bowls
    • spatula

    Ingredients

    • 1 cup almond butter or peanut butter will work
    • 1/3 cup chocolate chips I like the enjoy life mini chocolate chips
    • 1/4 cup maple syrup
    • 2 eggs
    • 1 tsp apple cider vinegar
    • 1 tsp baking soda
    • 1 banana mashed

    Instructions

    • Preheat the oven to 350 degrees F. Place all ingredients in a bowl and mix together. Place the muffin liners in the muffin cups and and evenly divide up the batter into 8 muffins. Bake for 25 minutes or until you can stick a fork in the oven and it comes out clean.

    Notes

    Storage: This recipe can be stored in an air tight container in the refrigerator for up to 5 days. 
    Freezer:  This recipe can be stored in an air tight container in single layers for up to 3 months in the freezer. 
    Nutrition:  The nutrition for this recipe is an estimate and the calorie count is not guaranteed.  
    Servings:  This recipe should yield 8 muffins.
    Yummy flourless gluten free chocolate muffins! Super easy to make and so yummy!
    Serving: 1muffin | Calories: 272kcal | Carbohydrates: 19g | Protein: 8g | Fat: 20g | Saturated Fat: 3g | Polyunsaturated Fat: 4g | Monounsaturated Fat: 11g | Trans Fat: 1g | Cholesterol: 42mg | Sodium: 157mg | Potassium: 325mg | Fiber: 4g | Sugar: 12g | Vitamin A: 69IU | Vitamin C: 1mg | Calcium: 126mg | Iron: 1mg
    Tried this recipe?Tag me on instagram @alliannaskitchen!
    Creamy Curry Chicken Gnocchi Instant Pot Soup2

    September 14, 2020 Cooking Method

    Creamy Curry Chicken Gnocchi Whole30 Instant Pot Soup

    This whole30 and paleo instant pot soup is everything you need for a cold fall day. It is creamy with a splash of spice yet light on your stomach. The best part about this recipe aside from the taste of course is that it requires less than 5 minutes of hands on time! If you enjoy this recipe, you will also enjoy my Dairy Free Lobster Bisque, Gluten Free Tomato Soup, Pumpkin Slow Cooker Soup, Butternut Squash Curry, and Cauliflower Leek Soup recipe as well.

    Creamy Curry Chicken Gnocchi | Alliannas Kitchen

    The Ingredients For the Paleo Instant Pot Soup: 

    Trader Joe’s Cauliflower Gnocchi- In my opinion this is the best invention of all times! It is gnocchi made from cauliflower that does in fact taste like regular gnocchi. It does not need to be defrosted and can be put in the instant pot frozen. 

    Coconut cream- It is important that you get coconut cream vs. coconut milk. Coconut cream is thicker. As much as I love all things Trader Joe’s I do NOT recommend using Trader Joe’s Coconut cream. It has a coconut-y taste. My favorite brand is Thai Kitchen from Whole Foods. Depending on where you are and what grocery stores are available you may have you experiment with different coconut cream brands. Personally, I do not mind the flavor of Trader Joe’s brand, but I know it is too much for a lot of people. 

    Curry- I like using red curry powder for this recipe but you can essentially use any kind. 

    Garlic and onion powder- This will give the soup an added kick to it and more flavor. If you like a lot of garlic, you can add ½ tsp extra. 

    Sea salt- A pinch of salt goes a long way, You can choose to salt your soup after it is cooked if you would prefer. 

    Chicken breasts- I like to use defrosted but you can also use frozen. If you chose to use frozen be sure to set the settings on the instant pot to 10-12 minutes. 

    Red pepper flakes- I love a good added kick and love to garnish with red pepper flakes and fresh herbs on top.

    Chicken Gnocchi | Alliannas Kitchen

    How To Use An Instant Pot:

    First off, getting an instant pot was one of the best kitchen investments I have made. If you think crockpots are nice, instant pots are crock pots on steroids. You still get the slow cook tender texture but it is literally done within minutes. Once you get used to adjusting the settings you are good to go. This is the instant pot I have. There are a few things I want to go over first:

    The valve on top- this is what allows the pressure to build up. It MUST be completely closed for the food to cook properly. When the food is done cooking you can either allow the pot to naturally depressurize or you can open the valve to expedite the process. If you do open the valve yourself, be sure to have oven mitts on your hands and your face is AWAY from the valve. It gets hot!

    Cook time- regardless of how much chicken you have the cook time will be the same. It will just take longer to build up pressure in the tank. However, if you are cooking frozen chicken you want to change the cook time to 10-12 minutes. Note* cook time is different than the actual time it is in the instant pot. It takes additional time to pressurize the pot, which is not included in the cook time. 

    Setting the instant pot- Be sure the settings are on HIGH and you can adjust the cook time by the arrows. 8 minutes does the trick for me. You can choose to use a meat thermometer to ensure the chicken is cooked throughout. It should register 165 degrees.

    Keywords: whole30 instant pot recipes, paleo instant pot, paleo soup recipes. Paleo gnocchi, whole30 soup, paleo instant pot, creamy paleo soup, creamy whole30 soup, paleo comfort food, whole30 comfort food, low carb soup, cauliflower gnocchi

    Chicken Gnocchi Whole30| Alliannas Kitchen

    If you enjoyed this recipe you will LOVE:

    Cilantro Lime Chicken Wings

    5 Ingredient Buffalo Chicken Dip

    Shaved Steak Fajita Salad

    Meatloaf Muffins

    Cucumber Apple Salsa Over Fish

    Dijon Dill Salmon

    Thai Creamy Coconut Chicken Soup

    Creamy Curry Chicken Gnocchi Instant Pot Soup

    Creamy Curry Chicken Gnocchi Instant Pot Soup

    Course Dinner
    Cuisine Indian
    Prep Time 5 minutes minutes
    Cook Time 10 minutes minutes
    Servings 2 people
    Author Allianna Moximchalk
    Cost 8$
    Print Recipe Pin Recipe

    Equipment

    • Instant Pot
    • mixing bowl
    • forks

    Ingredients

    For the soup:

    • 1 bag Trader Joes Frozen Gnocchi You can use 2 cups of mushrooms if you do not have a trader joe's near you
    • 2 cans Coconut cream Make sure you get coconut cream and not milk, this is important!
    • 2 tsp curry
    • 1 tsp garlic powder
    • 1 pinch salt
    • 1 pound chicken breast
    • 1 tsp onion powder

    To garnish:

    • 1 tsp red pepper falkes
    • 1 tbsp fresh parsley

    Instructions

    • Place all ingredients into instant pot bowl insert in the instant pot.
    • Make sire the lit and vent is set to sealed.
    • Click pressure cook high for 8 minutes. (Note, the cook time stays the same regardless if you double or triple this recipe, it till just take longer for the instant pot to come to pressure. If you are using frozen chicken adjust the settings to 10-12 minutes. **See further explanation in the text above
      Instant Pot Duo Plus Electric Pressure Cooker LCD Buttons
    • Allow the instant pot to release naturally then turn the valve to venting (note, this will get REALLY HOT, do not put your face over the vent and use a pot holder to open)
    • Open the lid.
    • If desired, check the temperature of the chicken. It should read 165 degrees F. If it does not you can either shut the lid and let it rest for 5-10 minutes OR place it back in the instant pot on high for 1-3 minutes.
    • Shred the chicken breast.
    • ENJOY! If you make this recipe I would love it if you shared the link to this recipe with a friend, left a comment below or tagged me on instagram with a picture @alliannaskitchen

    Notes

    You can store in the fridge in an air tight container for up to 5 days. 
    A smooth and savory comfort food classic – chicken, cauliflower gnocchi, and a creamy coconut curry sauce combine to create the perfect bite.
    Tried this recipe?Tag me on instagram @alliannaskitchen!
    fig lime mocktail4

    September 11, 2020 Drinks

    Fig Simple Syrup

    This Fig Simple Syrup is oh so sweet and pairs great with just about anything. The raw honey combined with the fresh figs is literally to die for! Plus, this recipe can be made in bulk so you can freeze it and enjoy it all year round. 

    Fig simple syrup in a glass garnished with fresh flowers and lime.

    If you have been following along for awhile, you know I gave up alcohol 5 years ago. It was the best decision or me! I feel so much better ever since. I wrote a whole blog post about my dry experience. Given I do not drink, I love enjoying this homemade fig syrup with just some sparkling water and a fun garnish! You can also use this recipe to make a fig cocktail. My husband on the other hand loves making old fashioneds with this fig syrup recipe. It is so versatile, it goes with just about anything! If you love this recipe, you will love my other fun drink and mixers on my blog like my Watermelon Mocktail, The Best Grapefruit Mocktail, Ginger Mocktail Recipe, Pineapple Margarita Mocktails, and my Blood Orange Mocktail. Our favourite coffee shop also uses this recipe to add some more flavor to their coffee. 

    [feast_advanced_jump_to]

    Why I Love This Recipe

    • Fig season is one of my favorite times of year! It doesn’t last long, but when it is here I take full advantage of it. It normally runs from late August to early September. Figs truly have the best flavor. I love adding them to all things, even salads! If you like figs like me, you will love my Fig Sweet Potato Salad. 
    • Unlike most simple syrups, this flavorful syrup is not made with cane sugar, instead it is made with notes of honey!
    • This fresh fig syrup can be used all year around by making it in bulk and freezing it. 
    • If you have extra figs after making this recipe you can make fig preserves or fig jam! We love making fig jam over French Toast Casserole. 
    • This recipe is naturally dairy free, gluten free, soy free, paleo, and refined sugar free. It can be made vegan too.
    Two glasses of fig simple syrup garnished with fresh figs, lime slices, and fresh flowers.

    Simple Ingredients

    • Fresh Figs- Figs are to fall as what watermelon is to summer. They are sweet, soft, and add flavor to any dish. Fresh figs are only available during the fall season in the grocery store, but dried figs are available all year around. Ripe figs are soft, like blueberries, but you do not want them to be overly mushy. 
    • Limes-the tartness from the limes compliments the natural sweetness from the figs so well. Do not skip it! 
    • Honey-I use honey as a natural sweetener in all of my drinks. It is the perfect alternative to processed sugar. It keeps the drink light without a sugar hangover the following day! Honey can be expensive, especially if you like the good quality honeys that are not mixed with anything else like I do. I have found that the large gallons of honey Costco sells does the trick and it is only a fraction of the cost of a jar of honey from Whole Foods, and it lasts longer. This is especially great if you plan on serving and making a lot of mocktail/ cocktail drinks at home. The natural sugars from the figs also add even more sugar to this drink. When figs are ripe their natural sugars seep out giving a dish even more flavor. 
    • Club soda/ filtered water-Use club soda vs tonic water, tonic water has sugar in it and this drink is already sweet enough!

    See the recipe card below for a full list of ingredients and measurements.

    Recipe Variations and Substitutions

    • Dried mission figs-You can also use dried figs if you would like! If you use dried, you will need to cook your syrup longer. 
    • Honey-If you are vegan or do not have honey you can also use maple syrup. I prefer honey but maple words! You can also use brown sugar in this recipe. This would pair well with the warm and cozy fig flavors. 
    • Whiskey-If you plan on using this recipe to make an old-fashioned cocktail, you will want to have whisky on hand.
    • Garnishes-Totally optional but these make it more fun! I love using an orange peel, cinnamon stick, fresh fruit or other fun little things to top this drink off.

    This recipe has not been tested with any other substitutions or variations. If you try something else out please let me know how it turns out in the comments below!

    How To Store

    Fig simple syrup in a mason jar.

    Recipe Tips

    • Tip #1: Allow the recipe to completely cool prior to using. 
    • Tip #2: The taste really develops in this recipe once you take it off the heat, that is why allowing it to cool properly prior to using is essential! 

    Recipe FAQs

    How can I store this fig simple syrup?

    ​You can store this recipe in the fridge for up to 2 weeks or in the freezer for up to 3 months. Be sure the syrup is completely cool prior to putting it in an airtight container or mason jar. 

    What is the flavor difference between fresh fig syrup and dried fig syrup?

    Both taste like figs but the dried fig syrup is much richer and the fresh fig syrup is much lighter! I prefer the fresh fig syrup.

    A glass of fig simple syrup with a square ice cube and fresh flowers.

    Other Drink Recipes You Will Love

    • Grapefruit mocktail in a glass with jalapeño slice and grapefruit slice.
      Easy Grapefruit Mocktail Recipe
    • Watermelon mocktail margarita in a margarita glass with a lime and orange on top.
      The Best Watermelon Mocktail Recipe
    • pineapple margarita mocktail 3 scaled
      Pineapple Margarita Mocktails
    • Overhead shot of a blood orange mojito in a glass with a dehydrated blood orange on the edge.
      Blood Orange Mojito Mocktail

    Are you trying to eat healthier?

    Be sure to download my go to healthy swap guide where I share all of my favorite healthier alternatives!

    Download the guide.
    fig lime mocktail4

    Fig Simple Syrup

    Course Drinks
    Cuisine American
    Diet Gluten Free
    Prep Time 10 minutes minutes
    Cook Time 20 minutes minutes
    Total Time 30 minutes minutes
    Servings 2 people
    Author Allianna Moximchalk
    433kcal
    Cost $5
    Print Recipe Pin Recipe

    Equipment

    • large saucepan
    • Strainer
    • Mason jar
    • Large bowl

    Ingredients

    For the syrup: (this will make more than enough syrup for 2 drinks, you can store the remaining in the fridge)

    • 2 cups figs washed, and cut in half
    • 1/2 cup honey
    • 3 cups filtered water

    For the mocktail:

    • 2 whole limes juiced
    • 1 cup fig syrup
    • 1 cup club soda

    To garnish:

    • pretty flowers
    • limes
    • fig

    Instructions

    For the syrup:

    • Place all ingredients in a large saucepan and turn on to medium heat.
    • Bring the syrup to a boil, then simmer for 15 minutes.
    • Once the 15 minutes is up, allow the syrup to cool and get to room temperature.
    • Place a strainer/ colander over the bowl and strain the syrup.
    • Next, pour the syrup in a mason jar and set aside.

    For the mocktail:

    • Mix the syrup, club soda, and lime in a cocktail mixing cup. Pour the drink into 2 pretty cocktail glasses with an ice cube.

    Notes

    Storage: This dish can be stored in an air tight glass container for up to 2 weeks in the refrigerator.
    Nutrition: The nutrition for this recipe is an estimate and the calorie count is not guaranteed.
    Servings: This recipe should yield 2 servings. 
    The perfect combination of sweet and tart, this fall drink is my new favorite!
    Serving: 1serving | Calories: 433kcal | Carbohydrates: 115g | Protein: 2g | Fat: 1g | Saturated Fat: 0.1g | Polyunsaturated Fat: 0.3g | Monounsaturated Fat: 0.2g | Sodium: 48mg | Potassium: 596mg | Fiber: 7g | Sugar: 108g | Vitamin A: 336IU | Vitamin C: 5mg | Calcium: 105mg | Iron: 1mg
    Tried this recipe?Tag me on instagram @alliannaskitchen!

    PALEO Chocolate Donuts with Pumpkin Maple Cream Cheese Frosting1

    September 10, 2020 Breakfast

    Gluten Free Chocolate Donuts with Pumpkin Maple Frosting

    These Gluten Free Chocolate Donuts with Pumpkin Maple Cream Frosting are officially my favorite fall treat. The almond cream based frosting paired with pumpkin and sweetened with pure maple syrup bring out all of your favorite fall flavors! These donuts are a crowd pleaser and simple to make. If you enjoy this recipe, you will also enjoy my Gluten Free Pumpkin Cookies and Gluten Free Pumpkin Cake as well.

    What You Need For Gluten Free Chocolate Donuts

    • Almond flour- my go to base in gluten free baking. This cannot be subbed out. Keep in mind not all gluten free flours are made equally, therefore, if a recipe calls for almond flour. Be sure to use it!
    • Cocoa powder- this is what is going to give your donuts that chocolate flavor. Make sure your cocoa powder does not have added sugar in it. You need plain cocoa flour for this recipe.I like using the Trader Joe’s cocoa, but any brand will work!
    • Baking soda- do not skip this small ingredient! Baking soda is needed to make the donuts rise. 
    • Eggs-the eggs are used to bind all of the ingredients. I like using cage free eggs, but any kind of chicken eggs could work. I have yet to test this recipe using flax eggs. 
    • Maple syrup-the syrup is used to sweeten the donuts. If you are like me and do not like things overly sweet ½ cup is the perfect amount, if you like things to be sweeter, you can add a little more maple syrup. Make sure you buy pure maple syrup, I like Costco’s brand. Like a lot of ingredients some brands add in extra sugar in it, which I do not recommend using. 
    • Olive oil spray- I use Trader Joe’s olive oil spray to spray the donut tin to ensure that they do not stick. This is a crucial step! If you don’t have spray olive oil, another type of oil should work. 

    For the frosting:

    • Almond cream cheese- I am obsessed with the Kite Hill Brand. It is naturally dairy free and made from almonds. I like almond based cream cheeses over soy based because personally I believe they taste richer and actually like cream cheese. If you tolerate dairy you can use regular cream cheese for the frosting. 
    • Maple syrup- This is what sweetens the frosting and gives it that maple flavor. If you like things extra sweet, you can continue to add one tablespoon of maple syrup to the frosting until you reach your desired level of sweet.
    • Pumpkin- Make sure you are buying pure canned pumpkin. Most cans have other added ingredients which are not necessary for this recipe. I like the Trader Joe’s brand so much that I went and bought 15 cans to stock up for fall baking 🙂
    • Ghee-you can omit the ghee, but I like it because it adds a buttery taste to the frosting.

    Equipment For These Gluten Free Chocolate Donuts:

    • Donut pans- I use these donut pans. You can also use silicon ones, which could help prevent them from sticking.
    • Hand mixer-This is to be used for maxing the frosting!

    If you like this recipe, you will LOVE:

    • Chocolate ganache tarts
    • Protein loaded banana blueberry zucchini muffins 
    • Protein loaded pancakes
    • Pumpkin Spice Oat Flour Muffins
    PALEO Chocolate Donuts with Pumpkin Maple Cream Cheese Frosting6

    Gluten Free Chocolate Donuts with Pumpkin Maple Cream Frosting

    Course Dessert
    Cuisine American
    Prep Time 15 minutes minutes
    Cook Time 16 minutes minutes
    Servings 12
    Author Allianna Moximchalk
    Cost 12$
    Print Recipe Pin Recipe

    Equipment

    • mixing bowls
    • electric mixer
    • donut molds (linked above)
    • icing spatula

    Ingredients

    For the donuts:

    • 1 1/2 cup almond flour
    • 1/2 cup cocoa
    • 1 tsp baking soda
    • 1 tsp cinnamon
    • 4 egg
    • 1/2 cup maple syrup
    • olive oil spray

    For the icing

    • 2/3 cup canned pumpkin
    • 1 tsp cinnamon
    • 1 tbsp ghee
    • 2/3 cup maple syrup For a sweeter icing, add maple syrup 1 tbsp at a time until desired taste is met.
    • 1 container Kite Hill Plain Cream Cheese If you aren't dairy-free, substitute with 8 oz regular cream cheese.

    Instructions

    For the frosting:

    • Add all listed ingredients to a bowl and use an electric mixer to combine.

    For the donuts:

    • Preheat oven to 350 F.
    • Gather two mixing bowls and required ingredients. Begin by adding and incorporating all dry ingredients in one mixing bowl.
    • In a seperate bowl, add and whisk together all wet ingredients.
    • Slowly add and mix the wet ingredients into the dry ingredients.
    • Spray donut molds with olive oil spray, then spoon batter into each mold, filling to just beneath the brim of each mold.
      PALEO Chocolate Donuts with Pumpkin Maple Cream Cheese Frosting9
    • Place in oven for 16 minutes. Once finished baking, remove and let doughnuts sit in their molds for about 10 minutes to cool. During this time, use a spoon to edge around each donut. This separates the edges from the pan and makes it easier to remove them from the molds.
    • After cooling, use a spoon to remove the donuts from the molds. The best way to do this is to use the spoon to lift and twist each doughnut from its mold.
    • Adding the donuts to the freezer for about 10 minutes prior to frosting will help the frosting stick to and spread evenly on the surface of each doughnut. 
    • Using a kitchen knife or icing spatula, spread desired amount of frosting on each donut. Frost the side that was facing down in the donut pan. Garnish with anise stars, cinnamon, and cinnamon sticks.
      PALEO Chocolate Donuts with Pumpkin Maple Cream Cheese Frosting8
    • ENJOY! If you make this recipe I would love it if you shared the link to this recipe with a friend, left a comment below or tagged me on instagram with a picture @alliannaskitchen

    Notes

    Store the donuts in the fridge for up to a week. 
    Perfect for fall, these donuts have subtle notes of chocolate and cinnamon, with a delectable cream cheese pumpkin frosting on top.
    Tried this recipe?Tag me on instagram @alliannaskitchen!
    chicken nuggets on a plate with ketchup

    September 7, 2020 Appetizers

    Chicken Nuggets In The Air Fryer

    These Air Fryer Chicken Nuggets are so easy, only requiring a couple ingredients, and seriously come out so crispy and delicious! If you are ever craving a crispy fast-food style chicken nugget, this healthy recipe is for you. The pickle brine in this recipe is the secret ingredient to making the best nuggets. This recipe literally tastes like Chick-Fil-A chicken minus all of the crazy additives and junk! Your whole family, including the kids, will be begging for these nuggets!

    Crispy chicken nuggets on a plate with a small wooden bowl of ketchup.

    This recipe is always a great hit for all ages! This would be a great option to have on hand for when the kids are off school during the summer or on break. If you like this recipe, you will love my Gluten Free Fried Chicken recipe too. I love having fun dipping sauces for recipes like this. My Lemon Dill Aioli pairs so well with these chicken nuggets!

    [feast_advanced_jump_to]

    Why This Recipe Works

    • These Air Fryer Chicken Nuggets come out perfectly crispy. 
    • Kids will love these! 
    • Prep is simple. While the chicken is soaking in the pickle brine, you can get any side dishes or sauces ready. 
    • Air Fryer Chicken Nuggets make a great snack or meal. 
    • This recipe is naturally gluten free, grain free, dairy free, paleo, soy free, and refined sugar free. This recipe can also be made AIP friendly (autoimmune protocol).  
    • There are a variety of side dish recipes on my website. Pick your favorite to serve with these chicken nuggets. My personal favorite is my Crockpot Gluten Free Mac and Cheese.
    • If you are in the Pittsburgh area and would like to get these chicken nuggets delivered right to your front door, check out my weekly meal prep menu. We feature new, allergen friendly dishes every week. 

    Ingredients

    Air fryer chicken nugget ingredients in glass bowls.
    • Chicken breast– You can use fresh chicken breasts or frozen chicken breasts. If you use frozen, you will have to let them completely thaw before using. I love to get my meat (and seafood) from Butcher Box. I get a delivery once a month and their products are seriously the best quality! Use my Butcher Box link to get a free essentials bundle every month, with your order.  You can also use chicken thighs if you prefer your chicken to be more juicy.
    • Pickle brine- This is the secret to the BEST chicken nuggets. This tenderizes the meat while also keeping it super juicy. 
    • Cassava flour- I only use Otto’s brand – not all cassava flour is the same! I buy it in bulk, so that I always have some on hand. This is the best way to get things nice and crispy. When combined with the seasonings, this will create the perfect breading for your chicken nuggets. Note that not all cassava flour is created equally so I only suggest using Otto’s.
    • Coconut milk- Keeps the chicken moist during the air frying process. 
    • Garlic powder, onion powder, paprika- The seasonings for the nuggets. This mixture will crisp up so well in the air fryer, when combined with the cassava flour. 

    See the recipe card below for a full list of ingredients and measurements.

    Substitutions and Variations

    • You can switch out the dipping sauces to your favorites kind!
    • To make this recipe even easier you could bulk make ahead of time and freeze so you only have to heat it up and serve.
    • Adding additional seasonings to the flour mixture can help to enhance and change the flavoring of the nuggets.
    • If you like your chicken to be juicier, swap your chicken breast out for chicken thighs.

    This recipe has not been with other substitutions or variations. If you replace or add any ingredients, please let us know how it turned out in the comments below!

    Step by Step Instructions

    Cubbed chicken soaking in pickle brine in a glass bowl.
    First, cut the chicken breast into 1.5 inch pieces and place in a large bowl. Add the pickle brine to the bowl and let the chicken soak for 30-45 minutes.
    Cassava flour, paprika, onion powder, and garlic powder mixed together in a glass mixing bowl.
    While the chicken is soaking, combine the cassava flour, paprika, onion powder, and garlic powder in a bowl and mix together.
    Cubbed chicken breast coated in flour on a pink plate.
    When the chicken is done soaking, dunk each piece of chicken in the coconut milk, then submerge in the cassava flour mixture. Toss the chicken in the flour mixture to ensure it is fully coated.
    Raw chicken nuggets in an air fryer basket.
    Spray your air fryer with cooking oil spray. Add the coated chicken pieces to the air fryer in a single layer. Cook in multiple batches, if necessary. Cook for 7 minutes at 400 degrees F.
    Crispy chicken nuggets in an air fryer basket.
    When 7 minutes is up, flip each chicken nugget. Add more cooking oil spray and cook for another 7 minutes at 400 degrees F. Serve with your favorite dipping sauce.

    Equipment Needed

    • Mixing Bowls
    • Air Fryer
    • Measuring Cups

    Expert Tips

    • Tip # 1: Make sure to spray the both the air fryer basket and the chicken well with cooking spray. This will assist with making sure that the chicken does not stick and also helps get the great golden brown coloring and crispy coating.
    • Tip # 2: Don’t soak the chicken in the pickle brine longer than 1 hour. It will become overly salty and mushy. 30-45 minutes is the perfect amount of time. 
    • Tip # 3: If you like more breading on your chicken, you can do a second coating of the flour mixture.

    Recipe FAQ’s

    What Can I Serve With These?

    There are so many options! I would recommend my Whole30 Greek Salad, Air Fryer Sweet Potato Cubes, or Blanched Broccoli.

    Can I Save Leftovers?

    Yes! Leftover chicken nuggets can be stored in the refrigerator for up to 5 days in an air tight container. Reheat in the air fryer at 350 degrees F at 5 minute increments, shaking the air fryer basket frequently.

    What Kind Of Dipping Sauce Do You Use?

    I like to use ketchup or homemade Whole30 Ranch.

    Can I Make These Without Breading?

    If you want chicken nuggets without breading I suggest chicken out the Keto Chicken Tenders on my blog. You can easily still brine the chicken with the pickle juice if you make them without the breading. This gives them so much flavor.

    Can I Freeze These?

    Yes! You can make these frozen. I suggest freezing them in a single layer and separating them with wax paper. They can be stored in the freezer for up to a month.

    Crispy chicken nuggets in a white basket with a wooden bowl of ketchup next to it.

    Storage Instructions

    • This recipe can be stored in an air tight container in the refrigerator for up to 5 days.

    More Chicken Recipes You Will Love

    • chicken tenders in a basket with ketchup
      Keto Chicken Tenders
    • Crispy Air Fried AIP Chicken Thighs 4
      Crispy Garlic AIP Chicken Thighs
    • crispy buffalo wings 3
      Crispy Buffalo Chicken Wings (Paleo, Whole30)
    • crispy bacon chicken ranch wraps on a black plate with slices of tomato held on with toothpicks
      Crispy Bacon Chicken Ranch Wraps (Whole30, AIP option)

    Are you interested in a list of my go to healthy alternatives?

    Download your FREE guide below

    download here


    chicken nuggets on a plate with ketchup

    Air Fryer Chicken Nuggets

    Course Appetizer, Dinner, Lunch, Main Course, Snack
    Cuisine American
    Prep Time 30 minutes minutes
    Cook Time 15 minutes minutes
    Total Time 45 minutes minutes
    Servings 4 servings
    Author Allianna Moximchalk
    354kcal
    Cost $10
    Print Recipe Pin Recipe

    Equipment

    • mixing bowls
    • Air fryer

    Ingredients

    • 1 lb chicken breast
    • 1 cup cassava flour Otto's brand
    • 1 cup pickle brine This is the juice in a pickle jar
    • 1 cup coconut milk or regular milk if you are not dairy free
    • 1 tbsp garlic powder
    • 1 tsp onion powder

    Instructions

    • Cut the chicken into 1.5 inch pieces and place in a large bowl. Add pickle brine to the bowl.
    • Let the chicken soak in pickle brine for 30-45 minutes.
    • While soaking, combine the cassava flour, paprika, onion powder, and garlic powder in a bowl and mix together.
    • When the chicken is done soaking, dunk each piece of chicken in the coconut milk, then submerge in the cassava flour mixture. Toss the chicken in the flour mixture to ensure it is fully coated.
    • Spray your air fryer with cooking oil spray. Add the coated chicken pieces to the air fryer, in a single layer. Cook in multiple batches, if necessary. Cook for 7 minutes at 400 degrees F.
    • When 7 minutes is up, flip each chicken nugget. Add more cooking oil spray. Cook for another 7 minutes at 400 degrees F.
    • Serve with your favorite dipping sauce.

    Notes

    Storage: This can be stored in an air tight container in the refrigerator for up to 5 days. 
    Nutrition: The nutrition for this recipe is an estimate and the calorie counts are not guaranteed.  It is based on 4 servings. 
    Servings: This recipe should yield 4 servings.
    These chicken nuggets are crispy on the outside and tender on the inside. They would be perfect as a snack or a meal, and are packed with protein!
    Serving: 1serving | Calories: 354kcal | Carbohydrates: 28g | Protein: 26g | Fat: 15g | Saturated Fat: 11g | Polyunsaturated Fat: 1g | Monounsaturated Fat: 1g | Trans Fat: 0.01g | Cholesterol: 73mg | Sodium: 142mg | Potassium: 579mg | Fiber: 1g | Sugar: 1g | Vitamin A: 34IU | Vitamin C: 4mg | Calcium: 64mg | Iron: 4mg
    Tried this recipe?Tag me on instagram @alliannaskitchen!
    Blackberry mint mocktail7

    September 3, 2020 Autoimmune Protocol

    Blackberry Mojito Mocktail

    The citrus lime and blackberry combo combined with the herbaceous mint flavors make this Blackberry Mojito Mocktail so refreshing for any occasion. This non-alcoholic drink uses raw honey in place of processed sugar which makes this drink refined sugar-free. My recipe only uses 4 ingredients making it super simple to make!

    Blackberry mojito in a clear cup with fresh blackberries and mint on top sitting next to flowers in a vase.

    This recipe was inspired by my favorite summer drink-Mojitos! This virgin mocktail is so simple to make yet so delicious. If you love mocktails as much as I do, be sure to check out my Watermelon Mocktail and Grapefruit Mocktail on my blog! It is another one of my favorites.

    Why This Recipe Works

    • This recipe is refined sugar free, dairy free, alcohol free, gluten free, and paleo.
    • This recipe only takes 10 minutes to make!
    • Making your own simple syrups at home will save you money!
    • Kids love these simple syrups too!
    • Homemade simple syrups are a great alternative to soda.
    • If you love blackberries like I do check out the other blackberry recipes on my blog like my Gluten Free Blackberry Crisp and Gluten-Free Blackberry Muffins.
    [feast_advanced_jump_to]

    Ingredients

    • Blackberries– The sweet yet slightly tart taste from blackberries add the perfect kick. Although blackberries are typically in season June- August, I have made this recipe with blackberries in the winter and it was still good. If you are eating the blackberries out of season and find that they are super tart, you may want to add a little more honey. 
    • Lime-The lime compliments the mint and blackberries so nicely. I did make the lime optional because the drink tastes delicious without it, but it tastes even better with it!
    • Mint-The mint is what makes this drink! Do not substitute.
    • Honey-I use honey as a natural sweetener in all of my drinks. It is the perfect alternative to processed sugar. It keeps the drink light without a sugar hangover the following day! Honey can be expensive, especially if you like the good quality honeys that are not mixed with anything else like I do. I have found that the large gallons of honey Costco sells does the trick and it is only a fraction of the cost of a jar of honey from Whole Foods, and it lasts longer. This is especially great if you plan on serving and making a lot of mocktail/ cocktail drinks at home. 
    • Club soda-This will give this drink those pop like bubbles but without all of the additives and sugar in regular pop.

    See the full recipe card below with a full list of ingredients and measurements.

    Substitutions and Variations

    • Blackberries-Any kind of berries will work! Just make sure they are ripe.
    • Honey-You can also use cane sugar if you are not worried about this drink being refined sugar free.
    • Club soda-You can also use tonic water.

    This recipe has not been tested with any other substitutions or variations. If you replace or add any ingredients, please let us know by leaving a comment below!

    Instructions

    Blackberries, mint, honey and water in a pot.
    Step #1: Add all ingredients to a sauce pot on medium heat and bring to a boil, then lower the head so it simmers for 5-10 minutes.
    Simple syrup being strained over a metal strainer.
    Step #2: Add a strainer over a bowl and strain the simple syrup.
    Blackberry simple syrup in a glass jar.
    Step #3: Add the simple syrup to a glass jar and store in the fridge. Combine the simple syrup, garnishes and club soda when you are ready to serve.

    Equipment Needed

    • I like using a large saucepan. The most important part of this step is having a colander to then drain the syrup with over a bowl. I like using a bowl with a lip because it makes it easier to then pour the syrup into a mason jar. 
    • I love drinking all of my drinks in fun cocktail glasses. It makes it so much more fun to drink. Do not forget about the garnishes! Mint or edible flowers go great with this recipe to garnish. 

    Chefs Tips

    • Allow the syrup to completely cool prior to mixing the mocktail.
    • If you like your drinks very sweet, you can add extra honey.

    Recipe FAQs

    What is the difference between club soda and tonic water?

    Club soda is just carbonated water. Tonic water has sweetener in it.

    What is a mojito?

    Mojitos are referred to as Cuban punches. A traditional mojito contains sugar, rum, soda water and mint. Since we are going for a healthier alternative in this recipe we are using honey in place of the sugar and since this is a virgin drink we are omitting the alcohol.

    Can I add alcohol?

    Yes! You can add alcohol to this drink Rum is typically the go to with mojitos, but vodka also works too.

    How much syrup does this recipe make?

    This recipe makes enough syrup for up to 2 drinks.

    Overhead shot of a blackberry mojito in a glass with blackberries on top.

    Storage Instructions

    • This simple syrup can last in the fridge for up to 2 weeks.
    • I like to store my simple syrups in mason jars!

    Other Mocktails You Will Love

    • apple margarita mocktail4
      Apple Margarita Mocktail
    • Overhead shot of a blood orange mojito in a glass with a dehydrated blood orange on the edge.
      Blood Orange Mojito Mocktail
    • pineapple margarita mocktail 3 scaled
      Pineapple Margarita Mocktails
    • Grapefruit mocktail in a glass with jalapeño slice and grapefruit slice.
      Easy Grapefruit Mocktail Recipe


    download your FREE anti-inflammatory guide below with all of my favorite health swaps

    download your guide here
    Blackberry mint mocktail5

    Blackberry Mint Simple Syrup

    Course Drinks
    Cuisine American
    Prep Time 5 minutes minutes
    Cook Time 20 minutes minutes
    Total Time 25 minutes minutes
    Servings 2 drink
    Author Allianna Moximchalk
    322kcal
    Cost $5
    Print Recipe Pin Recipe

    Equipment

    • Strainer
    • Large bowl
    • Sauce pan
    • Mason jar

    Ingredients

    For the blackberry mint syrup (makes up to 10 drinks)

    • 2 cups blackberries
    • 3 cups water
    • 1/2 cup honey
    • 5 mint leaves

    For the mocktail (for one person)

    • 1/2 cup blackberry mint simple syrup
    • 1/2 cup club soda
    • 1/4 whole lime, squeezed

    To garnish:

    • 3 whole mint leaves

    Instructions

    For the syrup:

    • Rinse blackberries, measure, and place in a saucepan with water, honey, and mint leaves.
    • Bring to a boil, then simmer for 15 minutes.
    • Place the colander/strainer over the bowl in the sink. (It makes it easier if you use a bowl with a lip on it to easily pour in the mason jar to store)
    • Then, strain the syrup over the colander/strainer.
    • Add the syrup to a mason jar and store in the fridge. Be sure the syrup is cold prior to using.

    For the mocktail:

    • Mix the club soda, lime, and blackberry syrup in a cocktail mixing glass or a big cup.
    • Pour the drink over ice in a fun glass! Garnish with extra mint leaves.

    Notes

    Storage: You can store this syrup in the fridge for up to 2 weeks. 
    Servings: This recipe yields approximately 2 drinks.  
    Nutrition: The nutrition in this recipe is an estimate and cannot be guaranteed. 
     
    This fruity and refreshing syrup is sure to brighten any drink you choose to put it in!
    Serving: 1drink | Calories: 322kcal | Carbohydrates: 84g | Protein: 2g | Fat: 1g | Saturated Fat: 0.03g | Polyunsaturated Fat: 0.4g | Monounsaturated Fat: 0.1g | Sodium: 36mg | Potassium: 301mg | Fiber: 8g | Sugar: 77g | Vitamin A: 478IU | Vitamin C: 32mg | Calcium: 70mg | Iron: 1mg
    Tried this recipe?Tag me on instagram @alliannaskitchen!

    Do not forget to pin this recipe on pinterest for later!


    Sweet Potato Brussels Sprout Bacon Breakfast Sheet Pan3

    September 2, 2020 Breakfast

    Sweet Potato, Brussels Sprout, Bacon Breakfast Sheet Pan

    This Whole30 and Paleo fall harvest sweet potato, brussels sprout, bacon sheet pan breakfast is the perfect sweet yet savory breakfast to tide you over until lunch! The  added bacon gives this nutrient dense breakfast even more flavor!

    The sheet pan breakfast ingredients:


    The Bacon- If you do not already have a set of kitchen scissors, I highly recommend getting a set! They make cooking so much easier. I used them to trim up the bacon without getting raw meat everywhere.

    Brussel sprouts-They give this dish a nutty yet savory flavor that compliments the sweet potatoes so nicely. Make sure you cut them into 4’s so they cook evenly.

    Sweet potatoes-Make this dish a combination of sweet and savory. You can sub the sweet potatoes for yams. 

    Bacon- I cannot reiterate enough how much I love Butcher Box Bacon. It is delicious and is far the best tasting bacon I have tasted! As the bacon cooks, the grease rubs off on the veggies giving this dish even more flavor.

    The pure maple syrup- This is an option. You should leave this out if you are doing the Whole30, but if you want added flavor, add it in!

    Eggs- If you would like more protein you can add as many eggs as you would like! I found that one egg per person is the sweet spot for my family and I.

    How To Cook Sheet Pan Breakfasts:

    It is important that you flip the dish halfway throughout the 40 minutes to allow the vegetables to cook evenly. 

    Storing:

    You can store this dish in an airtight container for up to a week in the fridge. I love these glass containers for all of my food storage.

    Keywords: whole30 recipes breakfast, whole30 breakfast, paleo breakfast, sheet pan breakfast, easy paleo meal, low carb breakfast

    If you like this recipe, you will LOVE:

    Protein Loaded Blueberry Zucchini Muffins

    Gluten and Dairy Free Bagels

    Apple Bacon Chicken Breakfast Muffins

    Protein Loaded Pancakes

    Egg Muffins

    Bacon and Butternut Squash Breakfast Bowl

    Sweet Potato Brussels Sprout Bacon Breakfast Sheet Pan3

    Sweet Potato, Brussels Sprout, Bacon Breakfast Sheet Pan

    Course Breakfast
    Cuisine American
    Prep Time 20 minutes minutes
    Cook Time 50 minutes minutes
    Servings 3 people
    Author Allianna Moximchalk
    Cost $8
    Print Recipe Pin Recipe

    Equipment

    • baking sheet
    • mixing bowls
    • spatula
    • measuring spoons
    • cutting board
    • kitchen knives
    • Strainer

    Ingredients

    • 1 whole large sweet potato
    • 16 oz brussels Sprouts
    • 16 oz bacon
    • 1/4 tsp salt
    • 1 tbsp olive oil
    • 1/2 tsp everything bagel seasoning I like Trader Joe's Brand.
    • 2 tbsp pure maple syrup (OPTIONAL, OMIT FOR WHOLE30)
    • 3 whole eggs optional, omit for aip

    Instructions

    • Preheat oven to 400 F
    • Rinse and trim the brussels sprouts. Cut into quarters, adding them to the baking sheet when finished.
    • Cut the ends off the sweet potato and chop into 1/2 inch cubes. Add these to the baking sheet with the brussels sprouts.
    • Over the pan, cut the bacon into 1/2 inch pieces using kitchen scissors. If you do not have kitchen scissors, use a knife to chop the bacon.
    • Once the bacon is added, drizzle the olive oil, herbs, and salt over the vegetables and the bacon. Mix together with your hands.
    • Bake for 20 minutes, mixing the ingredients around, and place back in the oven for another 20 minutes.
    • After 40 minutes of bake time, pull the sheet pan out of the oven. Crack three eggs over the vegetables and bacon. Place back into the oven for 3-5 more minutes (longer if you like your eggs really well done)
    • To finish, sprinkle everything bagel seasoning on the eggs and vegetables.
    • ENJOY! If you make this recipe I would love it if you shared the link to this recipe with a friend, left a comment below or tagged me on instagram with a picture @alliannaschneider

    Notes

    You can store in the has in the fridge in an air tight container for up to 5 days.
    A simple, yet delicious combination of sweet and savory flavors! Brussels sprouts and sweet potatoes, complimented by oven crisped bacon and freshly cracked eggs will ensure that this recipe becomes a staple in your morning routine.
    Tried this recipe?Tag me on instagram @alliannaskitchen!


    paleo fig salad2

    August 31, 2020 Appetizers

    Fall Salad With Fig Balsamic Salad Dressing

    This Fall Salad with Fig Balsamic Salad Dressing is super easy to make and makes for the best Fall or Winter Salad. This recipe only takes 15 minutes to make and pairs well with just about anything! The sweet ripe figs combined with the sweet potatoes, blackberries and homemade dressing is so so delicious. 

    paleo fig salad4 1
    [feast_advanced_jump_to]

    You don’t need to go to an expensive restaurants to have a fun salad like this. I love creating salads that make you actually want to eat them at home! No boring salads here. If you like a good salad like I do, check out some of my other favorite salads on my blog like my Cucumber Watermelon Salad, Strawberry Poppyseed Salad, Arugula Pear Salad, Butternut Squash Feta Salad, and The Best Kale Salad.

    Why I Love This Recipe

    • You can make this extra salad dressing into a flavorful marinade with chicken or salmon. 
    • This simple salad is naturally dairy free, gluten free, soy free, refined sugar free, paleo and egg free. 
    • This is a great salad to make for dinner at home or even take to a gathering. 
    • I love to make extras of this tangy vinaigrette so you have extra dressing on hand at all times. It is so much more economical to make your own dressings plus they usually end up being better for you too! If you like making your own dressings check out my other homemade salad dressing on my blog: Orange Poppyseed Dressing or my Lemon Tahini Dressing.

    Simple Ingredients

    Salad Ingredients:

    • Sweet potatoes-These are a must! I love the added taste and a healthier source of a carb.
    • Avocado oil and sea salt-To roast the sweet potatoes in.
    • Blackberries & sweet figs-Adds some juicy sweetness. The ripeness of the figs adds so much sweet flavor.
    • Pine nuts-This adds a nice crunch.
    • Blue cheese or goat cheese-Adds a touch of saltiness deliciousness. 
    • Baby spinach-This is my go to salad greens for this salad.

    For the balsamic dressing:

    • Balsamic vinegar- This adds 
    • Dijon mustard-This cuts the vinegar in the dressing so it is a bit creamy.
    • Fresh garlic cloves-For flavor.
    • Fresh figs-You will want to save some of the fresh figs for the dressing and the salad itself. 
    • Extra virgin olive oil-This is the base of the dressing. 
    • Maple syrup-This adds a tad bit of sweetness to the dressing. 
    • Sea salt & black pepper-For flavor.

    See the recipe card below for a full ingredient list and measurements.

    Recipe Substitutions and Variations

    • Cheese-If you are dairy free like I am, you can use a nut cheese or other dairy free cheeses. 
    • Maple syrup-You can also use honey in its place. 
    • Vinegar-You can also use apple cider vinegar in its place. 
    • Greens-You can use arugula if you want more peppery greens or romaine if you would like something softer. 
    • Protein-If you would like added protein on top, salmon and marinate chicken are my favorites!

    This recipe has not been tested with other substitutions or variations. If you replace or add any ingredients, please let us know how it turned out in the comments below!

    Recipe Instructions

    • Preheat the oven or air fryer to 400 degrees F.
    • Now, wash the sweet potatoes and dice them up into small 1/2 inch cubes and toss with the avocado oil and sea salt. Now roast for 30 minutes or until they are soft all the way through. You can push a pork through to do the trick.
    • While the sweet potatoes are cooking, wash the fruit and slice the stems off of the fresh figs. Slice the figs in half.  
    • Now, add the balsamic fig dressing ingredients into a food processor or a bowl with an immersion blender and blend until smooth. Set the balsamic vinaigrette aside and pour the dressing over the salad as you are ready to serve. 
    • Lastly, assemble the salad with the fruit and sweet potatoes on top. 

    Recipe Tips and Tricks

    • Tip #1: Make sure your figs are ripe! Ripe figs are a bit softer to touch. This will ensure they are nice and sweet. 
    • Tip #2: Wait to assemble the salad until you are ready to eat to ensure freshness.
    • Tip #3: Invest in a high quality food processor to make your dressings, it will blend them nicely!

    Recipe FAQs

    How long does this recipe last?

    If you are preparing the salad, I would wait to assemble it until you are ready to serve. The dressing itself lasts for up to 7 days in the fridge in an airtight container. 

    How do I choose the best balsamic?

    Be sure to choose a balsamic vinegar that does not have additives like caramel coloring or sugar in it.

    What if my dressing separates?

    This is common and nothing to worry about. Just add the dressing back into a bowl or food processor and blend or mix until well mixed throughout.

    How else can I use this dressing?

    This recipe can also be used for marinating proteins as well as over a pasta salad or on a sandwich.

    Other Fall Recipes You Will Love

    • Carrot and butternut squash soup in a black bowl with fresh parsley on top.
      Carrot and Butternut Squash Soup
    • gluten free pumpkin chocolate chip cookies
      Gluten Free Pumpkin Cookies
    • Arugula salad with squash, feta sheet, pine nuts and dates on a plate.
      Butternut Squash Feta Salad
    • apple crisp on a plate with whipped cream
      Gluten Free Apple Crisp

    Are you trying to eat healthier?

    Download my FREE better for you swap guide.

    Download the free guide here.

    Herb Crusted Salmon

    paleo fig salad3 1

    Fall Salad With Fig Balsamic Salad Dressing

    Course Salad
    Cuisine American
    Diet Gluten Free
    Prep Time 10 minutes minutes
    Cook Time 30 minutes minutes
    Total Time 40 minutes minutes
    Servings 3 people
    Author Allianna Moximchalk
    650kcal
    Cost $8
    Print Recipe Pin Recipe

    Equipment

    • baking sheet
    • food processor or whisk

    Ingredients

    For the salad:

    • 7 cups spinach
    • 1 whole sweet potato washed and diced into 1/2 inch pieces
    • 2 tablespoon avocado oil
    • 10 whole figs washed and sliced in half, use dried if out of season
    • 1 cup blackberries washed
    • 1 pinch sea salt
    • 1/3 cup pine nuts
    • 1/2 cup goat cheese Or blue cheese, use vegan cheese if you are dairy free.

    For the dressing:

    • 1/2 cup balsamic vinegar
    • 5 figs Washed, stems removed and sliced.
    • 1 tbsp dijon mustard
    • 1 clove garlic minced
    • 1/2 tsp sea salt
    • 2/3 cup olive oil

    Instructions

    • Preheat the oven or air fryer to 400 degrees F.Now, wash the sweet potatoes and dice them up into small 1/2 inch cubes and toss with the avocado oil and sea salt. Now roast for 30 minutes or until they are soft all the way through. You can push a pork through to do the trick.
    • While the sweet potatoes are cooking, wash the fruit and slice the stems off of the fresh figs. Slice the figs in half.
    • Now, add the balsamic fig dressing ingredients into a food processor or a bowl with an immersion blender and blend until smooth. Set the balsamic vinaigrette aside and pour the dressing over the salad as you are ready to serve. 
    • Lastly, assemble the salad with the fruit and sweet potatoes on top. 

    Notes

    Storage: This dressing can be stored in the fridge for up to 7 days.
    Nutrition: The nutrition for this recipe is an estimate and the calorie count can not be guaranteed. 
    Servings: This recipe should yield 4 servings.
    Nutrient dense fall harvest salad.
    Serving: 1serving | Calories: 650kcal | Carbohydrates: 32g | Protein: 4g | Fat: 58g | Saturated Fat: 8g | Polyunsaturated Fat: 7g | Monounsaturated Fat: 42g | Sodium: 523mg | Potassium: 730mg | Fiber: 7g | Sugar: 23g | Vitamin A: 6841IU | Vitamin C: 32mg | Calcium: 131mg | Iron: 3mg
    Tried this recipe?Tag me on instagram @alliannaskitchen!
    strawberry mint mocktail6

    August 26, 2020 Autoimmune Protocol

    Easy Strawberry Mocktail

    This strawberry mint mocktail is the perfect refreshing drink after a warm summer day! The raw honey takes the place of the processed sugar making this drink refined sugar free.


    If you love mocktails as much as I do, be sure to check out my other fun drinks on the blog like my Watermelon Mocktail, Grapefruit Mocktail, and Strawberry Simple Syrup.

    4 Simple Ingredients: 

    • Strawberries– Obviously!  
    • Honey– The honey takes the place of the sugar. It gives the drink a soothing taste. I have found that even regular mocktails I still feel “hungover” the next day due to the sugar rather than the alcohol itself. The honey takes care of that!
    • Mint– Fresh strawberries pair so nicely with mint. It gives any drink or dish a kick. I like mint because I find it to be so soothing for my stomach. 
    • Filtered water & club soda- When you make the simple syrup, be sure to use filtered water. When you make the drink, mix it with club soda. DO not use tonic water. Tonic water is loaded with added sugar. The drink will be sweet enough with the syrup itself. 

    How to store the syrup:

    • I like to store all mocktail syrups in the fridge in an airtight mason jar for up to 2 weeks in the fridge! In this recipe you will have enough syrup to make approximately 8 drinks. 

    Equipment needed: 

    • A large saucepan– This is needed to simmer the syrup.
    • A large bowl (preferably with a lip)- Once the syrup is made you will drain it into a bowl, it makes it easier to pour the syrup in the mason jar when it has a lip on it. I like these bowls!
    • A strainer-This will be used to strain the mint and strawberry syrup over the bowl. It is best if the strainer is just a tad smaller than the bowl so it strains easily. 
    • Mason jar– You can use the airtight mason jar to store the syrup for up to 2 weeks!

    Keywords: strawberry mint, mojito mocktail, strawberry mocktail, paleo drink, AIP drink, autoimmune protocol

    If you like this recipe, you will LOVE:

    • Rosemary Rhubarb Mocktail
    • Cherry Limeade
    • Strawberry Basil Mocktail 
    • Rhubarb Ginger Mocktail 
    • Grapefruit Jalapeno Mocktail
    • Watermelon Ginger Mojito 
    strawberry mint mocktail5

    Strawberry Mint Mocktail

    Course Drinks
    Cuisine American
    Prep Time 5 minutes minutes
    Cook Time 20 minutes minutes
    Total Time 25 minutes minutes
    Servings 2 people
    Author Allianna Moximchalk
    613kcal
    Cost $5
    Print Recipe Pin Recipe

    Equipment

    • Strainer
    • Large bowl
    • Sauce pan
    • Mason jar

    Ingredients

    The simple syrup:

    • 2 cups diced strawberries stems removed
    • 3 cups filtered water
    • 10 leaves mint
    • 3/4 cup honey

    For the mocktail:

    • 1/2 cup simple syrup
    • 1/2 cup club soda

    To garnish:

    • 2 leaves mint

    Instructions

    For the syrup:

    • Place all ingredients in a saucepan and bring to a boil, once it boils let it simmer for 15 minutes.
    • Place the colander/ strainer over the bowl in the sink.
    • Then, strain the syrup over the calendar/ strainer.
    • Add the syrup to a mason jar.

    For the mocktail:

    • Mix the syrup and club soda in a pretty cocktail glass. This step is important 😉
    • Add your desired garnishes on top.
    • ENJOY! I would be so grateful if you gave this recipe a star rating and comment here on my blog, took a picture of the recipe and tagged me on instagram @alliannaschneider or shared the link to this recipe with a friend! Thank you so much for cooking with me 🙂

    Notes

    You can store the syrup in an air tight mason jar for up to 2 weeks. 
    Refined sugar free paleo mocktail.
    Serving: 1drink | Calories: 613kcal | Carbohydrates: 166g | Protein: 1g | Sodium: 84mg | Potassium: 122mg | Fiber: 1g | Sugar: 166g | Vitamin A: 13IU | Vitamin C: 1mg | Calcium: 33mg | Iron: 4mg
    Tried this recipe?Tag me on instagram @alliannaskitchen!
    Thai Creamy Coconut Chicken Soup2

    August 24, 2020 Autoimmune Protocol

    Thai Creamy Chicken Soup

    This creamy comforting Whole30 & paleo Thai Chicken Soup is loaded with nutrients and is super simple to make! The creamy coconut cream combined with the fresh ginger makes this warm comforting soup oh so delicious. This recipe is naturally lower on the carbs and can be modified to be AIP friendly. You can make this soup in both on the stovetop or in the instant pot. You can have a nutrient dense dinner made in under 30 minutes.

    Thai Creamy Chicken Soup in a bowl garnished with red pepper flakes and fresh green herbs.

    This recipe is great for any time of the year from a cold winter night to a cozy meal during the summer. The flavors will keep you coming back for more. If you enjoy this soup, you would also love my Dairy Free Lobster Bisque, Slow Cooker Pumpkin Soup, Butternut Squash Curry, and Cauliflower Leek Soup recipe as well.

    [feast_advanced_jump_to]

    Why You Will Love This Recipe

    • You can have a healthy meal ready in 30 minutes or less.
    • This recipe is naturally paleo, whole30, gluten free, dairy free, soy free, and can be modified to autoimmune protocol (AIP) friendly.
    • This recipe is great for kids as well.
    • I love to pair this recipe with my AIP Bread Rolls.
    • This recipe is only 10 ingredients but has a ton of flavor.
    • You can prepare this dish in an Instant Pot to cut down on cook time even more.

    Ingredients

    Thai creamy chicken soup ingredients in glass bowls on a silver tray.
    • Coconut cream-Coconut cream  is a staple in any paleo, dairy free, AIP house! It is the closest alternative to heavy cream. Be aware that different brands may taste different. While I love the Trader Joe’s brand of coconut cream, it does give that coconut taste. It is great for baked goods, but I try to use other brands when I am cooking with it. My favorite is this brand. 
    • Fish sauce-Red boat fish sauce is the only brand of fish sauce I use because it is whole 30, paleo, and AIP compliant. Most fish sauce brands have gluten in them, so check your labels! This is the bottle I use. 
    • Bone broth– While you can leave the bone broth out I highly recommend adding it, it adds a lot more flavor and a ton of nutrients. Sometimes I make my own, but other times I just buy it. I love this brand. 
    • Chicken breasts– I like to cut mine up in small once inch cubes prior to cooking to skip the shredding step. That is totally optional. 
    • Lemon-The combination of the lemon, ginger, and fish sauce is what gives this soup its flavor. If you are doing AIP, skip the lemon!
    • Ginger-A little bit of ginger can go a long way. Ginger can give dishes a spicy yet sweet flavor. I love fresh ginger because I feel the taste is much stronger. 
    • Mushrooms-Mushrooms are my veggie of choice for this recipe, however, you can add peppers too.
    • Yellow onions-When I am going for a sweeter taste, the yellow onions are far better than the red onions. 
    • Red pepper flakes-Gives this soup a nice kick. If you are in the beginning stages of AIP, skip the red pepper flakes! The ginger alone will give it enough flavor.

    See the recipe card below for a full list of ingredients and measurements.

    Substitutions and Variations

    • If you do not eat chicken, you could swap out for a different protein such as shrimp.
    • If you do not like the taste of coconut, you can choose a brand that does not carry the taste or try other dairy free creams as alternatives.

    This recipe has not been tested with with other substitutions or variations. If you replace or add ingredients, please let us know how it turned out in the comments below!

    Step By Step Instructions

    Thai Creamy Chicken soup ingredients in a stock pot.
    First, in a tall soup pot, add the olive oil over medium heat. Over the pot, cut the chicken breasts into 1 inch pieces using kitchen scissors. Once the chicken is added to the pot, mix around for 3 minutes. Then add the yellow onions, ginger, and red pepper flakes and sauté for 3 minutes. Add the remaining ingredients to the pot: coconut cream, mushrooms, bone broth, lemon, and fish sauce. Simmer for 7 minutes on medium heat.

    Equipment Needed

    • Kitchen scissors
    • Soup pot
    • Instant pot (optional)

    Expert Tip

    • Tip # 1: If you like additional spice, you can add more red pepper flakes to the soup for additional heat.
    • Tip # 2: If you do not have kitchen scissors, you can cut the chicken breast into 1 inch cubes with a knife before adding to the stock pot.
    • Tip # 3: If you are using an Instant Pot your cooking times will vary.

    Recipe FAQ

    Are there additional benefits to cooking with ginger root?

    Ginger root is one of my favorite vegetables to use to flavor so many dishes. It adds a kick and can be so soothing for the gut.

    How should I serve this dish?

    You can serve this dish in a large serving bowl on the table or have each person serve themselves from the stock pot. I love to garnish any soups with fresh herbs like basil and parsley, it adds the perfect touch.

    What should I serve with this dish?

    I love to eat this plain, my partner loves to eat it with brown rice. If you are strictly paleo but want to add a little extra, I suggest adding cauliflower rice or more veggies! Cauliflower would go great with this.

    Creamy thai chicken soup in a dish and garnished with red pepper flakes and fresh green herbs.

    Storage Instructions

    • This recipe can last up to 5 days in the refrigerator in an air tight glass container.

    Other Dairy Free Soup Recipes You Will Love:

    • thai shrimp soup 1 scaled
      Thai Shrimp Soup
    • Pumpkin carrot soup in a scalloped bowl with parsley and pomegranate on the side.
      Chicken Carrot Pumpkin Soup
    • Creamy Curry Chicken Gnocchi Instant Pot Soup2
      Creamy Curry Chicken Gnocchi Whole30 Instant Pot Soup
    • dairy free lobster bisque in a bowl with a gold spoon and garnished with lemon, fresh green herbs, and red pepper flakes.
      Dairy Free Lobster Bisque

    Did you try this recipe?

    Leave a star rating and review below

    Be sure to tag me on Instagram


    Thai Creamy Coconut Chicken Soup2

    Thai Creamy Coconut Chicken Soup

    Course Main Course, Soup
    Prep Time 10 minutes minutes
    Cook Time 15 minutes minutes
    Total Time 25 minutes minutes
    Servings 2 people
    Author Allianna Moximchalk
    859kcal
    Cost $6
    Print Recipe Pin Recipe

    Equipment

    • soup pot
    • kitchen scissors
    • instant pot (optional)

    Ingredients

    For the soup:

    • 1 can coconut cream; 13 ounces
    • 12 ounces chicken breast chopped up in 1 inch cubes
    • 1 1/2 cups baby mushrooms (crimini), chopped any kind of mushrooms will work
    • 1 whole yellow onion chopped
    • 1 tsp freshly ground ginger I like using this tool to grate it!
    • 1/2 tsp red pepper flakes SKIP FOR AIP
    • 1 whole lemon
    • 1/4 cup bone broth
    • 1 tsp olive oil
    • 1 tbsp fish sauce I like red boat because it's gluten free.

    To garnish:

    • 1 pinch red pepper flakes omit if you cannot tolerate nightshades or are doing AIP
    • 1 pinch fresh parsley

    Instructions

    For the soup:

    • In a tall soup pot, add the olive oil over medium heat.
    • Over the pot, cut the chicken breasts into 1 inch pieces using kitchen scissors, if you do not have a pair, buy them! I have 5 pairs and use the all of the time in my kitchen. But if you do not have a pair, chop up the chicken with a knife.
    • Once the chicken is added to the pot, mix around for 3 minutes.
    • Add the yellow onions, ginger, and red pepper flakes (if tolerated to the pot) and sauté for 3 minutes.
    • Add the remaining ingredients to the pot: coconut cream, mushrooms, bone broth, lemon, and fish sauce.
    • Simmer for 7 minutes on medium heat.

    Intant pot option:

    • Place all ingredients in the instant pot, with adding the liquid first. Then, add all other ingredients. Click pressure cook for 8 minutes.

    Notes

    Storage: This recipe can be stored in the refrigerator for up to 5 days in an air tight container. 
    Nutrition: The nutrition for this recipe is an estimate and the calorie count is not guaranteed.  It is based on 2 servings. 
    Servings: This recipe should yield 2 servings. 
    Creamy, comforting and nutrient dense soup!
    Serving: 1bowl | Calories: 859kcal | Carbohydrates: 16g | Protein: 47g | Fat: 72g | Saturated Fat: 59g | Cholesterol: 109mg | Sodium: 936mg | Potassium: 1492mg | Fiber: 5g | Sugar: 2g | Vitamin A: 241IU | Vitamin C: 9mg | Calcium: 29mg | Iron: 5mg
    Tried this recipe?Tag me on instagram @alliannaskitchen!
    IMG 2421

    August 21, 2020 Drinks

    Vibrant Rosemary Rhubarb Mocktail (Paleo)

    The combination of rhubarb and rosemary make for one refreshing summer drink. This rhubarb mocktail is the perfect combination between savory, sweet, and sour! The honey compliments the sour and savory taste from the rosemary oh so well.


    The rhubarb syrup:

    • Honey: this is a staple for all of my paleo mocktails, it acts as the sweetener instead of plain old regular sugar. 
    • Rhubarb: rhubarb is a vegetable and it’s known for its sour taste, however when it is combined with something sweet it literally is the best taste ever. I first experimented with rhubarb when I made this Rhubarb Ginger Mocktail 
    • Rosemary: gives this drink a little splash of savory and pairs so perfectly with the rhubarb. 

    Rhubarb is my one of my favorite things to bake with in the Summer! If you have rhubarb leftover from this recipe, check out my Gluten Free Rhubarb Cake recipe on my blog.

    The garnishes: 

    • You can totally garnish this drink with a rosemary sprig if you are pressed for time, but if you have the time I highly suggest the rhubarb candies!  I love candied rhubarb. They are so beautiful and simple to make. I like to serve the drink in these cute little glasses. 
    • Keywords: rhubarb drink, paleo mocktail, healthy drink, clean mocktail

    If you like this drink, you will LOVE:

    • Peach Basil Mocktail
    • Cherry Limeade Mocktail 
    • Strawberry Basil Mocktail 
    • Rhubarb Ginger Mocktail 
    • Lavender Lemonade 
    IMG 2421

    Vibrant Rosemary Rhubarb Mocktail

    Course Drinks
    Cuisine American
    Prep Time 5 minutes minutes
    Cook Time 30 minutes minutes
    Total Time 35 minutes minutes
    Servings 2 people
    Author Allianna Moximchalk
    Cost $5
    Print Recipe Pin Recipe

    Equipment

    • Large bowl
    • Strainer
    • Vegetable peeler for the candied rhubarb
    • Mason jar

    Ingredients

    Rhubarb Rosemary Simple Syrup

    • 2 cups chopped rhubarb, chopped into ½-1 inch pieces
    • 1/2 cup honey
    • 3 cups purified water
    • 2 sprigs fresh rosemary

    For The Drink:

    • 2 cups club soda
    • 1 cup rhubarb rosemary simple syrup

    OPTIONAL to garnish: candied rhubarb

    • 1 whole piece rhubarb
    • 1 jar rhubarb rosemary simple syrup

    Instructions

    First decide if you are going to make the candied rhubarb to garnish, if so preheat the oven to 225 and proceed to the simple syrup first. If not, skip this step.

      For the simple syrup:

      • Add the chopped rosemary, honey, rhubarb, and filtered water to a large sauce pot
      • Bring the syrup to a boil, then reduce to simmer and simmer for 30 minutes with a lid on.
      • Once the 30 minutes is up, allow the syrup to sit in the pan for a few minutes (the longer you let it sit, the more the flavors will soak in)
      • Place a large strainer over a large bowl (preferably with a lip) and pour the syrup into the bowl. The strainer will catch the rosemary and rhubarb.
      • You can store the syrup in a mason jar in the fridge for up to two weeks.
        IMG 2442

      For the spritzer:

      • Mix the simple syrup and club soda in a large cup or cocktail mixing cup.
        IMG 2445
      • Divide the drink into two cups, add an ice cube and garnish if desired.

      For the candied rhubarb: (OPTIONAL)

      • With a vegetable peeler, peel the washed rhubarb long ways. You should be able to get 5-10 pieces from a stalk.
        IMG 2439
      • Dip the rhubarb strands in the mason jar filled with the simple syrup and let sit for 5 minutes.
      • While it is sitting, line a baking sheet with wax paper.
      • After the 5 minutes is up, pull out the rhubarb ribbons and lay them in a single layer on the cooking sheet.
      • Bake in the oven at 225 for 40 minutes.
      • Once the rhubarb has baked, take either a long spoon or other kitchen utensil and wrap the ribbons, then set down the rhubarb and allow the ribbons to mold to the utensil, this will give it it's pretty shape!
      • Allow it to sit for 15 minutes so it can harden.
      The combination of rhubarb and rosemary makes for the most refreshing summer drink!
      Serving: 2g
      Tried this recipe?Tag me on instagram @alliannaskitchen!


      IMG 2626

      August 20, 2020 Appetizers

      Cilantro Lime Chicken Wings (PALEO | WHOLE 30 | KETO)

      The fresh cilantro combined with the red pepper flakes and lime is what makes this cilantro lime chicken wing sauce POP! Grilling the wings makes them extra crispy and who doesn’t like a little bit of char? This recipe is easy peasy with literally taking 5 minutes to prep! These chicken wings are keto, paleo, and WHOLE 30 compliant.

      Cilantro Lime Chicken Wings | Alliannas Kitchen

      The sauce:


      Cilantro- You either love or hate cilantro. A portion of the population has a gene that registers cilantro to have a “soapy” taste, but there’s another portion of the population who LOVES cilantro and I think it is safe to say that is most of us! Fresh cilantro in combination with citrus makes any dish POP!

      Red pepper flakes-The red pepper flakes add the perfect kick.

      Lime juice-The lime juice nicely compliments the fresh cilantro.

      EVOO-The EVOO makes for the most perfect healthy fat base.

      Cilantro Lime Chicken | Alliannas Kitchen

      Grilling the wings:

      When it comes to grilling do NOT miss this specific step. You want to apply the sauce AFTER you cook the wings. Cooking the wings with the sauce will make the wings mushy and we do not want that! The cooking time will depend on how crispy and how charred you like your wings. The more char, the longer you want to cook them. It is important to rotate them halfway to be sure they cook thoroughly. If you want to use frozen chicken wings, that is totally fine: just be sure to take out the wings with plenty of time in advance. If I use frozen wings, I like to defrost them in a bag on a plate in the fridge the night before.


      Air Frying Alternative:

      You can air fry these wings in lieu of cooking them on the grill. You can follow the steps in my

      Crispy Air Fried Everything Bagel Chicken Wings recipe.


      To serve:

      I like to serve these wings with extra lime and red pepper flakes!

      Paleo Cilantro Lime Chicken Wings | Alliannas Kitchen

      Keywords: Keto chicken wings, keto wings, paleo chicken wings, whole 30 chicken wings, cilantro lime wings


      You can check out my favorite grilling tools here!

      Whole30 Cilantro Lime Chicken Wings | Alliannas Kitchen

      If you like this recipe, you will LOVE:

      Crispy Air Fried Everything Bagel Chicken Wings

      Healthy Buffalo Chicken Dip

      Pepperoni Pizza Chicken

      Chicken Meatballs With Curry Sauce

      Curry Chicken Salad


      IMG 2623

      Cilantro Lime Chicken Wings

      Course Appetizer, Main Course
      Cuisine American
      Prep Time 5 minutes minutes
      Cook Time 30 minutes minutes
      Total Time 35 minutes minutes
      Author Allianna Moximchalk
      Cost $10
      Print Recipe Pin Recipe

      Equipment

      • Grill or air fryer

      Ingredients

      • 3 pounds chicken wings Frozen is okay, be sure to defrost in time. See notes above.
      • 1 whole bunch fresh cilantro
      • 3/4 cup extra virgin olive oil
      • 1/4 tsp pink sea salt
      • `1 tbsp red pepper flakes
      • 3 whole limes, juiced

      Garnishes:

      • 1 whole lime
      • 1 pinch red pepper flakes

      Instructions

      For the sauce:

      • Wash the cilantro and place all ingredients (including the cilantro stems) in a food processor and blend until smooth. This should take between 60-90 seconds.

      For the wings:

      • If you are air frying these wings, check out the text in the blog post above for instructions.
      • Preheat the grill to 375 degrees F.
      • Mix the sea salt with the wings.
      • Lay the wings in a single layer on the grill and close the top. Do not touch them for 15 minutes!
      • Flip the wings and grill for an additional 15 minutes.
      • Check on the wings, If they are to your desired crispiness and char level remove them from the grill.
      • Once the wings are done, you can either chose to toss the wings in the sauce or dip the wings in the sauce.
      • Add additional lime and red pepper flakes on top if desired.
      • ENJOY! If you make this recipe I would love it if you shared the link to this recipe with a friend, left a comment below or tagged me on instagram with a picture @alliannaschneider

      Notes

      You can also air fry these wings by following the cooking instructions in this recipe: Crispy Air Fried Everything Bagel Chicken Wings
      WHOLE 30 | PALEO | KETO
      Tried this recipe?Tag me on instagram @alliannaskitchen!

      • « Go to Previous Page
      • Page 1
      • Interim pages omitted …
      • Page 33
      • Page 34
      • Page 35
      • Page 36
      • Page 37
      • Page 38
      • Go to Next Page »

      Primary Sidebar

      Allianna Headshots

      Hi, I'm Allianna! Allianna's Kitchen started by accident after battling an undiagnosed autoimmune disease for nearly my whole life.

      More about me →

      GLUTEN FREE DINNER RECIPES

      • steak date night dinner 1
        Steak Date Night Dinner with Garlic Aioli
      • gluten free fried shrimp 3 scaled
        Gluten Free Fried Shrimp
      • cooked frozen pork chops with chives on top on a white plate with a gold fork
        Easy Frozen Pork Chops In The Air Fryer
      • halibut fish tacos on a pale blue plate
        Halibut Fish Tacos

      EASY WHOLE30 RECIPES

      • Beetroot dip on a plate with crackers and fresh parsley on top.
        Simple Beetroot Dip Recipe
      • close up photo of ginger apple pork in a bowl
        Apple Ginger Pulled Pork
      • dairy free lobster bisque in a bowl with a gold spoon and garnished with lemon, fresh green herbs, and red pepper flakes.
        Dairy Free Lobster Bisque
      • juicy filet mignon on a plate
        Air Fryer Filet Mignon

      GLUTEN FREE APPETIZERS

      • peanut butter and jelly chicken wings on a plate with limes
        Peanut Butter And Jelly Wings
      • Stuffed mushrooms on a brown and white plate with fresh parsley on top.
        Gluten-Free Stuffed Mushrooms
      • Gluten free pigs in a blanket in a pile on a plate.
        Gluten Free Pigs In A Blanket
      • Pretty french onion dip in a silver bowl with potato chips and chives on top.
        Vegan French Onion Dip Recipe

      EASY MOCKTAIL RECIPES

      • honey simple syrup 2
        Honey Simple Syrup
      • orange lime cranberry mocktail 4
        Cranberry Mocktail Recipe
      • Clear glass with a brown drink and a cinnamon stick in it.
        Pear Cocktail Recipe
      • Grapefruit mocktail in a glass with jalapeño slice and grapefruit slice.
        Easy Grapefruit Mocktail Recipe

      Footer

      • Recipes
      • My Courses
      • Meal Prep Services
      • Accessibility Policy
      • Contact
      • About Me
      • Blog
      • Privacy Policy
      • Pinterest
      • Instagram
      • Facebook
      • Twitter

      Allianna’s Kitchen 2025 - All Rights Reserved

      Rate This Recipe

      Your vote:


      A rating is required
      A name is required
      An email is required