• Skip to primary navigation
  • Skip to main content
  • Skip to primary sidebar
  • Spring Recipes
  • Recipes
  • Order Meal Prep
  • Healthy Gut Baby Food Course
  • About

Allianna's Kitchen

menu icon
go to homepage
  • Spring Recipes
  • Recipes
  • Order Meal Prep
  • Healthy Gut Baby Food Course
  • About
    • Facebook
    • Instagram
    • Pinterest
    • Twitter
  • search icon
    Homepage link
    • Spring Recipes
    • Recipes
    • Order Meal Prep
    • Healthy Gut Baby Food Course
    • About
    • Facebook
    • Instagram
    • Pinterest
    • Twitter
  • ×
    Allianna's Kitchen » Recipes

    Blog

    carrot ginger dressing in a bowl with tomatoes and radishes

    January 27, 2022 Allergy Friendly

    Japanese Steakhouse Carrot Ginger Dressing

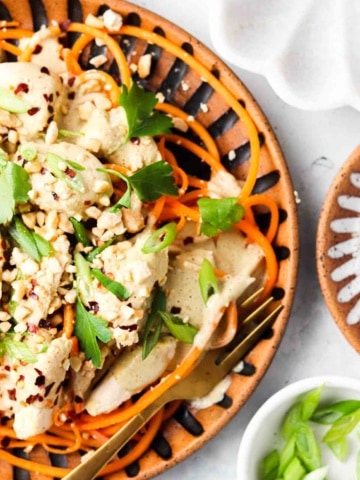
    This Japanese Steakhouse Carrot Ginger Dressing is seriously to die for! It tastes just the stuff you get at a restaurant yet it is much healthier and naturally gluten free, soy free, and paleo friendly! This dressing only takes minutes to prep which makes it great for weeknight dinners. 

    carrot ginger dressing in a bowl with tomatoes and radishes

    If you enjoy this recipe, you would also like my Whole30 Caesar Dressing as well.

    What Makes This Carrot Ginger Dressing So Good?

    • First off, it takes 5 minutes to make! You can’t beat that.
    • Secondly, it tastes just like your traditional steakhouse dressing except there aren’t any hidden additives like sugar. 
    carrot ginger dressing ingredients laid out in bowls

    Japanese Steakhouse Carrot Ginger Dressing Ingredients: 

    • Shredded carrots-They do not have to be shredded but shredded works best in the blender! If you do not have shredded, I suggest using regular carrots but chopping them up before you put them in the blender. 
    • Coconut aminos-This is a soy sauce alternative. If you tolerate soy, you can use regular soy sauce here! Just also know that soy sauce usually contains gluten too. 
    • Olive oil-The oil base of choice. You can also use avocado if it is all you have, but note if it may change the flavor profile. 
    • Fresh ginger-This is a must! It gives this salad a nice kick. Note that dried ginger will make the flavor a bit different so I suggest sticking with real ginger here. 
    • Shallots-Diced for flavor.
    • Rice vinegar-To add a nice tangy touch. 
    • Sesame oil & fish sauce-For flavor. I like Red Boat Fish Sauce.
    • Salt & pepper-To taste.
    carrots, ginger, sesame oil in a food processor

    How To Make The Best Carrot Ginger Dressing:

    • This recipe is SO simple! All you have to do is put it in your food processor and blend until smooth. 
    carrot ginger dressing in the food processor

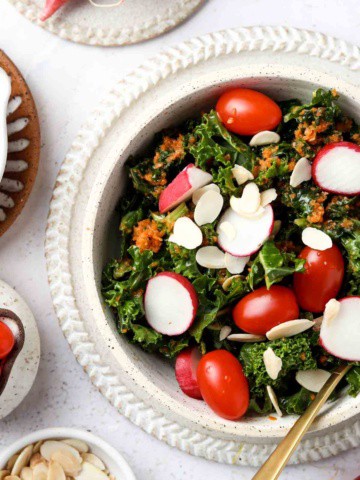
    What Should I Serve With This?

    • I love serving this salad with shredded kale, fresh radishes, tomatoes and almond slivers. 

    How Long Does This Dressing Last?

    • I would store it in the fridge for up to 1 week.
    close of photo of Japanese steakhouse carrot ginger dressing

    If you like this recipe, you will love my other homemade salad dressings:

    • Lemon Tahini Dressing
    • Whole30 Ranch Dressing
    • Whole30 Caesar Dressing

    If you enjoyed this recipe it would mean the world to me if you rated it and left a comment below. It helps others find it on google.xoxo-Allianna

    close of photo of Japanese steakhouse carrot ginger dressing

    Japanese Steakhouse Carrot Ginger Dressing

    Course Salad
    Cuisine Japanese
    Prep Time 5 minutes minutes
    Total Time 5 minutes minutes
    Servings 3 servings
    Author Allianna Moximchalk
    427kcal
    Cost $3
    Print Recipe Pin Recipe

    Equipment

    • high speed blender

    Ingredients

    • 2 cups shredded carrots
    • 1/4 cup diced shallots
    • 1 1/2 inches fresh ginger grated
    • 1/2 cup extra virgin olive oil
    • 1/4 cup coconut aminos
    • 2 tbsp rice vinegar apple cider vinegar for AIP
    • 4 tsp toasted sesame oil avocado oil for AIP
    • 1 tbsp fish sauce
    • 1/2 tsp sea salt
    • dash ground pepper omit for AIP

    To serve: (OPTIONAL)

    • 8 cups kale shredded
    • 6 radishes sliced
    • 18 mini tomatoes
    • 3 tbsp almond slivers

    Instructions

    • Place all ingredients in a high speed blender and blend until smooth.
      If you enjoyed this recipe it would mean the world to me if you rated it and left a comment below. It helps others find it on google.xoxo-Allianna

    Notes

    If you enjoyed this recipe it would mean the world to me if you rated it and left a comment below. It helps others find it on google.xoxo-Allianna
    Delicious, easy japanese steakhouse dressing!
    Serving: 1serving | Calories: 427kcal | Carbohydrates: 13g | Protein: 1g | Fat: 42g | Saturated Fat: 6g | Polyunsaturated Fat: 6g | Monounsaturated Fat: 28g | Sodium: 1371mg | Potassium: 306mg | Fiber: 2g | Sugar: 4g | Vitamin A: 14257IU | Vitamin C: 5mg | Calcium: 33mg | Iron: 1mg
    Tried this recipe?Tag me on instagram @alliannaskitchen!
    round up of all of my favorite paleo super bowl snacks

    January 25, 2022 Appetizers

    Paleo Super Bowl Snacks (Whole30)

    No super bowl party is complete without some good snacks! Below is a list of my favorite gluten free Paleo Super Bowl Snacks for Football Sunday!

    round up of all of my favorite paleo super bowl snacks

    Paleo Super Bowl Snacks:

    Whole30 Loaded Air Fryer Potato Skins– These air fryer potato skins are seriously to die for! They are super simple to make and something everyone will love. After all who doesn’t like potatoes? 

    tgif loaded potato skins on a plate

    Dairy Free Buffalo Chicken Dip–Do I need to say more? This 3 ingredient buffalo chicken dip is seriously so creamy and full of flavor! We like to eat it with veggies or chips, or even on gluten free bread as a sandwich!

    BUFFALO CHICKEN DIP2

    Paleo Buffalo Chicken Meatballs– Omg these are amazing! These gluten free buffalo chicken meatballs go great as is on mini toothpicks, but they also go great with my dairy free ranch!

    whole30 buffalo chicken meatballs

    Almond Cream Stuffed Dates Wrapped in Bacon-These are to die for! These bacon wrapped dates stuffed with almond cream are the perfect combination of sweet AND savory!

    bacon wrapped dates on a place

    Chili Lime Chicken Wings–These chili lime chicken wings are super simple to make and have the best sauce! 

    paleo chili lime chicken wings on a platter

    Keto Crab Cakes-I could eat crab cakes all year round. These gluten free crab cakes are amazing to say the least and taste even better with my dill aioli! 

    whole30 crab cakes 13 scaled

    Crispy Buffalo Chicken Wings-These are such a crowd pleaser with my personal chefs. I love to make mine in the air fryer to make them nice and crispy. 

    crispy buffalo wings on a white plate

    Paleo Teriyaki Meatballs-Oh my these are good! The sauce is a must and quite frankly the icing on the cake. You can serve these on little toothpicks rolled in sauce or with the sauce on the side. 

    paleo asian meatballs 1

    If you enjoyed this blog post it would mean the world to me if you rated it and left a comment below. It helps others find it on google.xoxo-Allianna

    Paleo Meal Plan Week 34

    January 24, 2022 Meal Plans

    Paleo Meal Plan Week 34

    This is this weeks paleo meal plan. I have received a lot of great feedback so I am going to continue to create them. All of this weeks recipes are paleo and gluten free friendly. If they are AIP and keto friendly it will say so in the description. Feel free to use previous week’s meal plans that can be found here.  If you would like to get the complete shopping list be sure to sign up for my newsletter below and I will send you your grocery list weekly. All you have to do is shop!

    Paleo Meal Plan Week 34

    How the Paleo Meal Plan Works:

    • If meal prepping your food in advance is your thing, I highly suggest getting meal prep containers or containers like these so your meals are ready to eat.
    • Included in this post are 8 meals, 7 dinners and 1 breakfast. When making the meals for dinner I suggest making an extra portion so you can eat it for lunch. Keep in mind these are an inspiration, so feel free to swap things out. Each recipe contains the meal only, feel free to add a side. We love roasting veggies to go with our meals. If you would like the full complete shopping list that goes with my meal plan, be sure to subscribe to my email list. If you have questions or need assistance, please comment below. If you make one of my recipes I would so grateful if  you left a comment and a star rating review on the recipe in my blog or took a picture and tagged me in it on Instagram @alliannaskitchen
    • I hope this is helpful as you begin to plan out your week. -Allianna

    For Breakfast:

    spinach mushroom frittata

    Spinach Mushroom Frittata 

    • This quick and easy spinach mushroom frittata is perfect for all of your breakfast needs. We like to make it for our weekly meal prep as well as all of our family breakfasts. It only requires 10 minutes of prep time. You can have breakfast on the table within 30 minutes!

    For Lunch & Dinner:

    whole30 chicken pad thai on a plate

    Paleo Pad Thai

    • This Paleo Pad Thai dish puts a healthier twist on modern day Pad Thai. The creamy nut butter combined with fresh ginger and lime juice is oh so delicious. This recipe is loaded with all of the best authentic Thai flavors. Not only is this recipe paleo friendly, but it is naturally Whole30 friendly and can be made Keto and AIP friendly too!

    whole30 pizza casserole

    Paleo Pizza Casserole 

    • This paleo pizza casserole is seriously to die for! The creamy cashew cream combined with the cassava flour gluten free noodles, ground beef and turkey pepperoni is seriously to die for! This recipe takes less than 30 minutes to prepare and is something the whole family can eat.

    honey lemon chicken wings in a bowl with green onions

    Honey Lemon Pepper Wings 

    • These honey lemon pepper wings are to die for. The citrus from the lemons combined with the raw honey and red pepper flakes are delicious! This recipe only takes 10 minutes to prep and 35 minutes to cook in the oven.

    sloppy joe bowls

    Whole30 Sloppy Joe Bowls

    • These Whole30 sloppy joe bowls are to die for! The cassava flour noodles combined with the roasted broccoli and homemade sloppy joe sauce is delicious! This is something the whole family can eat.

    Paleo Chicken Parmesan on a white plate with basil

    Paleo Chicken Parmesan 

    • This healthy chicken parmesan recipe has a Whole30 twist! This paleo chicken parmesan recipe is crispy, filling, easy and quick! With this recipe you can have dinner on the table in less than 30 minutes.

    whole30 crab cakes on a black plate with aioli dipping sauce green herb garnish and a lemon wedge

    Keto Crab Cakes with Garlic Aioli 

    • These keto crab cakes made with old bay seasoning and buffalo sauce have a nice kick. The creamy garlic aioli combined with the old bay is oh so delicious. This recipe makes for a great summer dinner or appetizer.

    pesto chicken salad 18 scaled

    Pesto Chicken Salad

    • This pesto chicken salad is creamy and oh so fresh. The fresh basil mixed with the spinach, pine nuts and fresh garlic is oh so delicious. This paleo chicken salad makes for the easiest on the go lunch.


    my favorite supplements stacked on each other

    January 22, 2022 Anxiety

    My Daily Supplements

    Recently in my instagram stories I was asked questions about my daily supplement routine. I want to preface this by saying that everyone’s body is different and I encourage you to figure out what is best for you. Also note that this is not medical advice, I suggest reaching out to a Functional Medicine doctor to help you on your wellness journey.

    my favorite supplements stacked on each other

    I want to preface this and also say that my supplement regimen looked different at different times in my healing journey. When I first started and I was really sick I was taking SO many supplements a day. I carried around a journal with me and documented when I would take them, everything I ate in a day and how I felt. A lot of this came down to trial and error in figuring out what worked for me. One last thing to note, supplements work best when they are combined with other forms of care-good eating, balanced hormones, and sleep! You can take all of the supplements in the world, but if your eating isn’t good or you aren’t sleeping, they probably won’t help much.

    The supplements I take below are my daily supplements, I will write another blog post about ones I take on occasion.

    My daily supplements:

    • Magnesium glycinate– This is the only brand I use HERE. If you have been following along for a while you probably know that I used to really struggle with anxiety. Once I started to really nourish my body and get off of a ton of medications with side effects of anxiety, the anxiety slowly started to go away but I realized there was always a small baseline of some present. My functional medicine doctor at the time suggested magnesium glycinate to help turn my brain off at night and help me sleep and let me tell you, it has been the biggest game changer. I have taken it every day for years. I started off taking one a day and now I take 6. The body uses up more magnesium when it is stressed, so sometimes I take even more when I am feeling stressed to help combat that.
    • Epsom salts-I felt funny putting this on there but let me tell you, epsom salts have been a HUGE game changer for me. I take a bath with them at least once a day. One a good day, I take one in the morning and one in the evening. Epsom salts are made from magnesium, which is why they make me feel so calm! I use this brand HERE.
    • Magnesium threonate- A few months ago the crippling anxiety started to come back and I was trying so many different things and nothing seemed to work. I saw an ad online for Pittsburgh Victory Float (which is essentially a senseless bath with a ton of epsom salts aka magnesium) . I tried it and OMG my anxiety diminished. I will never really know exactly what causes it to go away but to me it was kinda obvious, my body needed those high doses of magnesium in the baths so now I take magnesium threonate every night to help my brain just relax. The brand I have currently is not online, but I have used THIS brand too!
    • Pregnenolone– This has been one of the things we have added over the years to help keep me calm. Pregnenolone is a hormone and helps balance me out! The brand I have now I cannot find online, but I have used this brand HERE before too.
    • Ion gut health-This helps with nourishing and healing the gut lining in my stomach. So many people struggle with gut issues which then can lead to other issues. When I work with health coaching clients we always start with the gut which typically looks like starting with the food you eat and supplements to support the gut!

    Be on the lookout for another blog post talking about the other supplements I take here and there!

    Xoxo
    Allianna

    paleo pad thai on a plate with peanuts on top

    January 18, 2022 Allergy Friendly

    Paleo Pad Thai (Whole30)

    This Paleo Pad Thai dish puts a healthier twist on modern day Pad Thai. The creamy nut butter combined with fresh ginger and lime juice is oh so delicious. This recipe is loaded with all of the best authentic Thai flavors. Not only is this recipe paleo friendly, but it is naturally Whole30 friendly and can be made Keto and AIP friendly too! If you enjoy this recipe, you will also enjoy my Cauliflower Leek Soup as well. If you enjoy pasta dishes, you will also enjoy my Gluten Free Ravioli as well.

    pad thai with a lime being squeezed on top

    What Makes This Whole30 Pad Thai So Good?

    • First off, this recipe is super simple to make! The creamy nut butter sauce only takes minutes to make and this recipe has so much flexibility with different modifications for different food restrictions! 
    pad thai sauce ingredients laid out in bowls

    Whole30 Pad Thai Ingredients: 

    For the sauce:

    • Sesame oil-This is the main base. If you are doing the autoimmune protocol, you can substitute the sesame oil with avocado oil. Note that this will change the flavor profile a tiny bit but it will still be good!
    • Almond butter-You can also use peanut butter for this recipe! If you are doing the autoimmune protocol (AIP) you can use tigernut butter. This is my go to Tigernut Butter recipe HERE.
    • Limes-To add a nice kick.
    • Fresh ginger-This is my favorite part of this recipe and it adds so much flavor! Please note that fresh ginger is different from dried ginger. Fresh ginger tastes different and is a lot less potent. If you are using fried ginger (which I do not suggest) cut the amount in half as it is much stronger. 
    • Apple cider vinegar-To add some acid to this dish. 
    • Poblano pepper-To add a kick. You can use jalapeno to make it even spicier. Skip for AIP.
    • Fish sauce-For flavor. 
    chicken pad thai ingredients laid out in bowls

    For the dish:

    • Veggie noodles-You can even use cassava noodles for this but veggie zoodles are my favorite! I love spaghetti squash noodles (can find out how to make them HERE) zucchini zoodles, or even beet noodles. 
    • Eggs-A must for a healthy pad thai dish! Omit for AIP.
    • Green and red onion-To taste.
    • Shredded carrot-To get those veggies in. 
    • Avocado oil-To cook the chicken in. 
    • Salt & pepper-To taste. Omit the pepper for AIP.

    To serve:

    • Red pepper flakes
    • Crusted peanuts
    • Limes 
    paleo pad thai sauce in a blender

    How To Make Paleo Chicken Pad Thai:

    For the sauce:

    • Place all ingredients in the blender and blend until smooth.

    For the chicken dish:

    • Add the avocado oil to a non-stick pan on medium heat. 
    • Next, season the chopped up chicken breasts with salt and pepper. 
    • Add the onions and chicken to the pan and move around for 5 minutes. 
    • Then crack in the egg and stir fry it until the egg is cooked.
    • Now, add in the carrots & sauce and cook for 3 more minutes. 
    • If you are using zoodles, cook them with a little bit of ghee to get them soft for 3 minutes on the stovetop.  Or if you are using cassava noodles make those according to the instructions. 
    • Finally, mix the noodles, chicken, vegetables and sauce together in a bowl. 
    • Serve with optional nuts, limes and cilantro on top.
    paleo chicken pad thai in a pan

    Can I Make This Into Paleo Shrimp Pad Thai?

    • Yes! Absolutely! Adjust the cooking time for the chicken to 4 minutes for the shrimp. Everything else you can do the same. 

    Can I Make Paleo Pad Thai With Sweet Potato Noodles?

    • Yes! For sure. Be sure to cook your sweet potato noodles with a little bit of oil on the stovetop for 5 or so minutes. 

    How Can I Make This Keto Friendly?

    • Use zucchini noodles as the noodles!
    whole30 chicken pad thai on a plate

    If you like this recipe, you will also LOVE:

    • Asian Honey Sticky Pulled Pork
    • Thai Shrimp Soup
    • Asian Chicken Teriyaki Meatballs

    If you enjoyed this recipe it would mean the world to me if you rated it and left a comment below. It helps others find it on google.xoxo-Allianna

    paleo pad thai on a plate with peanuts on top

    Paleo Pad Thai

    Course Meals
    Cuisine Asian
    Prep Time 15 minutes minutes
    Cook Time 15 minutes minutes
    Total Time 30 minutes minutes
    Servings 3 servings
    Author Allianna Moximchalk
    780kcal
    Cost 8
    Print Recipe Pin Recipe

    Equipment

    • high speed blender
    • frying pan

    Ingredients

    For the sauce:

    • 1/3 cup sesame oil avocado oil for AIP
    • 1/2 cup almond butter or peanut butter. Tigernut butter for AIP
    • 3 limes juiced
    • 1 tbsp ginger freshly grated
    • 3 cloves garlic minced
    • 1 tbsp apple cider vinegar
    • 1/3 cup poblano pepper can use thai chilies for a spicier touch. omit for AIP
    • 1 tsp fish sauce
    • 1/3 cup water

    For the pad thai:

    • 6 cups noodles I like spaghetti squash noodles or butternut squash noodles. You can even use cassava noodles or zucchini noodles for a low carb option. See notes above about how to make spaghetti squash.
    • 2 eggs omit for AIP
    • 1 pound chicken breasts
    • 1/4 cup green onions chopped
    • 1/2 cup red onion chopped
    • 1/2 cup shredded carrots
    • 1 tbsp avocado oil
    • 1/2 tsp salt
    • 1/2 tsp pepper

    To serve:

    • fresh cilantro
    • limes
    • crushed peanuts omit for AIP

    Instructions

    For the sauce:

    • Place all ingredients in the blender and blend until smooth.

    For the pad thai:

    • For the cassava noodles, make according to the box. If you are making homemade zoodles, place the zoodles in a frying pan with 1 tbsp cooking oil for 3-5 minutes until they soften up.

    For the noodles:

    • Add the avocado oil to the pan. Thinly slice the chicken breasts and season with salt and pepper. Add the chicken and onion to the pan and sautee for 5 minutes. Then, crack in the egg (omit for AIP.) Cook for an additional 5 minutes while constantly breaking up the egg. Add in the shredded carrots and veggie noodles. Pour in the sauce. Garnish with lime juice and cilantro to serve.
    • If you enjoyed this recipe it would mean the world to me if you rated it and left a comment below. It helps others find it on google.xoxo-Allianna

    Notes

    If you enjoyed this recipe it would mean the world to me if you rated it and left a comment below. It helps others find it on google.xoxo-Allianna
     
     
    Serving: 1serving | Calories: 780kcal | Carbohydrates: 23g | Protein: 46g | Fat: 59g | Saturated Fat: 8g | Polyunsaturated Fat: 18g | Monounsaturated Fat: 29g | Trans Fat: 1g | Cholesterol: 206mg | Sodium: 785mg | Potassium: 1175mg | Fiber: 8g | Sugar: 6g | Vitamin A: 3949IU | Vitamin C: 40mg | Calcium: 220mg | Iron: 3mg
    Tried this recipe?Tag me on instagram @alliannaskitchen!
    paleo meal plan week 33

    January 16, 2022 Meal Plans

    Paleo Meal Plan Week 33

    This is this weeks paleo meal plan. I have received a lot of great feedback so I am going to continue to create them. All of this weeks recipes are paleo and gluten free friendly. If they are AIP and keto friendly it will say so in the description. Feel free to use previous week’s meal plans that can be found here.  If you would like to get the complete shopping list be sure to sign up for my newsletter below and I will send you your grocery list weekly. All you have to do is shop!

    paleo meal plan week 33

    How the Paleo Meal Plan Works:

    • If meal prepping your food in advance is your thing, I highly suggest getting meal prep containers or containers like these so your meals are ready to eat.
    • Included in this post are 8 meals, 7 dinners and 1 breakfast. When making the meals for dinner I suggest making an extra portion so you can eat it for lunch. Keep in mind these are an inspiration, so feel free to swap things out. Each recipe contains the meal only, feel free to add a side. We love roasting veggies to go with our meals. If you would like the full complete shopping list that goes with my meal plan, be sure to subscribe to my email list. If you have questions or need assistance, please comment below. If you make one of my recipes I would so grateful if  you left a comment and a star rating review on the recipe in my blog or took a picture and tagged me in it on Instagram @alliannaskitchen
    • I hope this is helpful as you begin to plan out your week. -Allianna

    For Breakfast:

    close up photo of hollandaise sauce over paleo eggs benedict

    Dairy Free Hollandaise Sauce 

    • This Dairy Free Hollandaise Sauce is seriously to die for. This paleo sauce only takes 5 minutes to make and goes great on just about anything: steak, eggs, salmon and so much more!

    For Lunch & Dinner:

    pulled pork in a bowl with green onions and sesame seeds on top

    Sticky Honey Ginger Pulled Pork 

    • This Sticky Honey Ginger Pulled Pork recipe may be the BEST recipe on my website and that is saying a lot! The warm honey combined with the fresh ginger, sriracha sauce and sesame seeds is oh so delicious. This recipe can be made both in the crockpot or pressure cooker. It requires minimal time and is something the whole family can enjoy.

    paleo chili lime chicken wings on a platter

    Chili Lime Chicken Wings 

    • These Chili Lime Chicken Wings are seriously to die for! The fresh lime juice combined with the chili powder and honey makes for the best combination. This quick and easy weeknight meal is something the whole family can enjoy!

    close up of pesto meatballs

    Gluten Free Pesto Meatballs 

    • These Gluten Free Pesto Meatballs are super easy to make and something the whole family can enjoy! These meatballs are soft, moist, and full of flavor. The fresh pesto to serve and inside the meatball is what takes this recipe to a whole new level!

    Keto beef and broccoli keto beef and broccoli 1

    Keto Beef and Broccoli 

    • This Keto Beef And Broccoli is super simple to make, full of flavor and something the whole family can eat. This low carb dinner recipe is clean and naturally paleo and Whole30 friendly too! The fresh garlic and ginger makes this recipe oh so delicious. This 20 minute meal is great as is or served over cauliflower rice!

    lemon and shrimp with broccoli on a plate with a gold fork

    Lemon Garlic “Butter” Shrimp 

    • This Lemon Garlic Butter Shrimp is seriously to die for! We eat this meal weekly in my house. The lemon combined with the garlic is oh so delicious. This meal is a sheet pan meal which means it literally takes less than 5 minutes to prep so it is perfect for those weeknights where you do not have much time to prepare dinner!

    paleo chicken on a plate

    Maple Dijon Chicken 

    • This one pan paleo maple dijon chicken recipe is seriously to die for! The coconut cream combined with the maple syrup, dijon mustard and mushrooms is so delicious. The bacon on the top is the icing on the cake! This recipe only requires one pan and takes less than 15 minutes of hands-on time.

    close up picture of maple crusted salmon with thyme on top

    Maple Crusted Salmon 

    • This maple crusted salmon is seriously to die for! The warm maple syrup combined with the paprika and crunchy nuts is delicious. This paleo salmon recipe makes for a perfect weeknight dinner and is something the whole family can enjoy! This recipe only takes 10 minutes to prepare.
    side shot of fruit salad in a bowl

    January 14, 2022 Breakfast

    Easy Winter Fruit Salad

    This easy Winter Fruit Salad is super simple to make and is an elegant step up from your traditional fruit salad. The kiwi combined with the fresh pomegranate seeds, clementines and poppyseed dressing is quite delicious. In my house we like to prepare a nice batch of this on Sundays to eat with Sunday brunch and eat it all week long!

    side shot of fruit salad in a bowl

    If you enjoy this recipe, you will also enjoy my AIP Pancakes as well.

    What Makes This Winter Fruit Salad So Good?

    • First off, this lime poppyseed dressing is to die for! It is so simple to make and adds the most perfect touch. 
    • Secondly, this salad is so fun! I like to cut the kiwi using a little cookie cutter to give it a fun shape. 
    clementines, pomegranate, kiwi and bananas in bowls

    Winter Fruit Salad Ingredients: 

    • Pomegranate seeds-You can buy your pomegranate seeds already in small cups or you can cut the seeds out yourself.
      Clementines-You can also use cuties too! Make sure they are peeled. 
    • Banana-Ripened. If you are making this salad in advance make sure to add in the banana prior to serving or it will get mushy. 
    • Kiwi-In my opinion this is the BEST part! I like using mini cookie cutters here to make them in fun little shapes. You can buy the cookie cutters I have HERE. The kiwi will get mushy like the banana so I suggest waiting to cut it prior to serving.
    • Fresh mint leaves-I LOVE the fresh mint in this salad.
    poppyseed lime dressing ingredients laid out in bowls

    Lime Poppyseed Dressing:

    • Honey-For a tab of sweetness. You can omit the honey if you are vegan and use maple syrup!
    • Lime & apple cider vinegar-To give a nice kick!
    • Olive oil-To thin out the dressing.
    • Poppy Seeds-For texture.
    • Sea salt-For taste.
    lime poppyseed salad dressing in a bowl

    How To Make:

    • First, place the dressing ingredients in the food processor and blend until smooth.

    For the salad:

    • Peel apart the clementines, dice up the banana, and cut and peel the kiwi. Place everything in a bowl and mix! I like to add the fresh mint leaves on top.
    pomegranate, mint, bananas, and kiwi in a bowl

    How To Cut A Pomegranate:

    • First, cut off the ends of the pomegranate, 
    • Then, cut the pomegranate into 6ths like you would an apple. 
    • Now, pull off the pieces and the seeds should just pop out. 
    • Keep in mind that pomegranate stains so be careful while you are doing this!
    • For more of a detailed explanation on how to cut and seed pomegranate, check out this blog post HERE.

    What Should I Make This Easy Winter Fruit Salad For?

    I love making this fruit salad for brunch on Sundays. It goes so well with my favorite brunch favorites below:

    • Dairy Free Hollandaise Sauce for Eggs Benedict 
    • Cranberry Oatmeal Bars
    • Spinach Mushroom Frittata 
    • Turkey Bacon In The Oven 
    overheat shot of a fruit salad in a a bowl

    If you like this recipe you may want to check out my other fruity recipes:

    • Strawberry Banana Smoothie Bowl
    • Mango And Pineapple Smoothie

    If you enjoyed this recipe it would mean the world to me if you rated it and left a comment below. It helps others find it on google.xoxo-Allianna

    overheat shot of a fruit salad in a a bowl

    Easy Winter Fruit Salad

    Course Breakfast, Side Dish, Snack
    Cuisine American
    Prep Time 15 minutes minutes
    Total Time 15 minutes minutes
    Servings 6 servings
    Author Allianna Moximchalk
    246kcal
    Cost $10
    Print Recipe Pin Recipe

    Equipment

    • mixing bowl

    Ingredients

    • 1 cup pomegranate seeds
    • 10 clementines peeled and seperated
    • 6 whole kiwi sliced and peeled
    • 2 bananas peeled and chopped

    For the poppyseed dressing:

    • 1/4 cup honey
    • 2 tbsp apple cider vinegar
    • 1/4 cup olive oil
    • 1 tsp poppyseeds
    • 3 fresh mint leaves chopped
    • pinch sea salt
    • 1 lime juiced

    Instructions

    For the dressing:

    • Place all ingredients in the food processor (or whisk) and blend until smooth.

    To assemble:

    • Place all ingredients in a bowl and mix.
      If you enjoyed this recipe it would mean the world to me if you rated it and left a comment below. It helps others find it on google.xoxo-Allianna

    Notes

    If you enjoyed this recipe it would mean the world to me if you rated it and left a comment below. It helps others find it on google.xoxo-Allianna
    Quick, easy and delicious fruit salad with poppyseed dressing.
    Serving: 1serving | Calories: 246kcal | Carbohydrates: 42g | Protein: 2g | Fat: 10g | Saturated Fat: 1g | Polyunsaturated Fat: 1g | Monounsaturated Fat: 7g | Sodium: 4mg | Potassium: 456mg | Fiber: 5g | Sugar: 32g | Vitamin A: 53IU | Vitamin C: 71mg | Calcium: 55mg | Iron: 1mg
    Tried this recipe?Tag me on instagram @alliannaskitchen!
    Vegan and gluten free twix bars stacked up on a plate with

    January 13, 2022 Dairy free

    Vegan Twix Bars

    These homemade Vegan Twix Bars are super simple to make and great for a great healthier candy bar alternative! The yummy dairy free caramel sauce combined with sweet chocolate ganache is oh so delicious. This recipe only takes 20 minutes to prep and freezes so well which means this is a great batch friendly baking treat. 

    4 twix bars on a marble plate with a bowl of caramel sauce on the side.

    Growing up I was a chocolate lover. Halloween was my favorite holiday and I always went right for the Twix Bars! When I found out I had celiac disease and a dairy allergy I thought I would have to go without my favorite candy bar-boy was I wrong! After multiple experiments in the kitchen I stumbled upon this recipe and let me tell you, these homemade candy bars will not disappoint!

    If you enjoy this treat, you will also enjoy my Gluten Free Pumpkin Cookies and Homemade Vegan Milkshake.

    [feast_advanced_jump_to]

    Why This Recipe Works

    • First off, my husband (who still sometimes eats regular candy) says they taste like the real thing. 
    • Secondly, they freeze so well. If you are like me you probably like to keep a few desserts on hand in the house so you never run out. I have a nice little stash of these  homemade candy bars in my freezer. 
    • I love making these bars for date night of a Valentine’s Day treat!
    • This recipe was inspired by my other favorite candy bar, Vegan Reeses.
    • If you want my dessert recipes ready to eat and delivered right to your door, check out my paleo meal prep company!
    • Lastly, the homemade shortbread combined with the dairy free chocolate ganache and homemade caramel is super simple to make, yet such an elegant homemade dessert!

    Ingredients

    Homemade twix bar ingredients laid out in small glass bowls with each individual ingredient.

    Gluten free shortbread crust:

    • Almond flour- This is the base of the shortbread crust.
    • Maple syrup- To help hold everything together. 
    • Vanilla-For flavor.
    • Coconut oil-To make it soft. 
    • Sea salt-For flavor.

    Dairy free caramel sauce:

    • Coconut sugar-Maple sugar will also work.
    • Coconut milk- Or almond milk.
    • Arrowroot powder- To thicken the sauce. 

    Dairy free chocolate ganache:

    • Dairy free chocolate-I like Hu or Enjoy Life brand.
    • Coconut milk-I like the canned coconut milk from Trader Joe’s.

    See recipe card below for a full list of ingredients and measurements.

    Substitutions & Variations

    • Maple syrup-The maple syrup in the shortbread crust can be substituted for honey. Just note that honey is not as rich and will not be as sweet.
    • Coconut milk-The coconut milk can be substituted with almond milk.

    This recipe has not been tested with other substitutions or variations. If you replace or add any ingredients, please let us know how it turned out in the comments below!

    Step By Step Instructions

    Gluten free shortbread ingredients mixed together in a bowl.
    Photo #1: Preheat the oven to 350 degrees F and add the gluten free short bread ingredients to a bowl.
    Well mixed shortbread crust in a clear bowl with a pink spatula.
    Photo #2 Mix the shortbread ingredients until mixed well throughout.
    Gluten free shortbread curst in candy bar molds.
    Photo #3: Spray the candy bar molds with cooking spray oil and evenly distribute the crust into a smooth layer. Bake in the oven for 10 minutes then set aside for it to cool.
    Coconut milk in a sauce pan on the stove top.
    Photo #4: Add the dairy free milk to a sauce pan on the stove.
    Coconut milk and coconut sugar in a sauce pan on the stove.
    Photo 5: Add the coconut sugar into the sauce pan and bring it to a boil. Once it comes to a boil turn it down and constantly whisk to prevent it from burning. Then once the caramel sauce forms take it off the stove.
    Caramel sauce on a jar with a small whisk.
    Photo 6: Add a layer of the caramel sauce to the candy bar molds making a seal on all sides to ensure the sauce is spread throughout. Allow the caramel sauce to set in the molds in the freezer for 30 minutes.
    Dairy free chocolate and coconut milk whisked together in a sauce pan.
    Photo #7: Place the dairy free chocolate and milk in a sauce pan and whisk together on low until smooth.
    Homemade chocolate bars in a pink mold.
    Photo 8: Pour the chocolate in the molds and set in the freezer for at least 5 hours.

    Equipment

    • 8 by 8 pyrex-This clear square oven safe container is my favorite one.
    • Candy bar mold-I like these homemade large candy bar molds.

    Recipe Tips & Tricks

    • Tip #1: Fully allow the shortbread to cool prior to pouring the caramel sauce on top. Once you pour the caramel sauce you will need to fully allow it to cool prior to adding the chocolate.
    • Tip #2: This recipe needs to fully set prior to serving. I like to put the molds or the pyrex in the freezer to firm them up faster.

    Recipe FAQs

    Can I make homemade Twix Bars without the candy mold?

    Yes, you can! You can make them in a pyrex baking dish. You will just need to cut them once they have set with a pizza cutter or knife.

    Can I make this into a cake?

    Yes! You will just want to make it in a pyrex dish and not cut it until you are ready to serve it.

    Can I microwave the chocolate?

    Yes! Place the chocolate chips and milk in the microwave for 30 seconds, then whisk, and place in the microwave for another 30 seconds, whisk again and place in the microwave for a final 30 seconds.

    4 stacked homemade twix bars on a marble plate.

    Storage Instructions

    • This recipe can last in the fridge for up to 5 days in an air tight glass container.
    • These homemade candy bars are also freezer friendly which means you can keep them in an air tight container in the freezer for up to one month.

    Other Vegan Chocolate Recipes You Will Love

    • close up photo of a strawberry covered in dairy free chocolate and sea salt
      Vegan Chocolate Covered Strawberries
    • Cashew cream peanut butter vegan cheesecake bars with a chocolate crust on a white plate.
      Vegan Peanut Butter Cheesecake Bars
    • dairy free peanut butter cups stacked on a plate
      Vegan Reese’s (Paleo, AIP Option)
    • Peanut butter and almond butter buckeyes wrapped in chocolate on a plate.
      Vegan Buckeyes


    Do you want to learn more about anti-inflammatory eating? Download my FREE anti-inflammatory guide below to learn all about my favorite swaps.

    Download your FREE guice
    Vegan and gluten free twix bars stacked up on a plate with

    Vegan Twix Bars

    Course Dessert
    Cuisine easy, gluten free, vegan
    Diet Gluten Free
    Prep Time 20 minutes minutes
    Cook Time 10 minutes minutes
    Freeze time: 5 hours hours
    Total Time 5 hours hours 30 minutes minutes
    Servings 8 bars
    Author Allianna Moximchalk
    743kcal
    Cost $12
    Print Recipe Pin Recipe

    Equipment

    • 8 by 8 baking casserole dish or something with the same area.

    Ingredients

    For the crust:

    • 1/4 cup coconut oil
    • 2 tbsp maple syrup
    • 1/2 tsp vanilla
    • 1.5 cups almond flour

    For the caramel:

    • 1.5 cups coconut milk
    • 1 cups coconut sugar
    • 1 tbsp arrowroot powder

    For the chocolate sauce:

    • 2 cups dairy free chocolate I like the enjoy life brand
    • 1/3 cup almond milk or coconut milk

    Instructions

    • First, preheat the oven to 350 and place the shortbread ingredients in a bowl and mix. Either line ab 8 by 8 casserole dish with wax paper or use bar molds (notes above on this) Divide up the shortbread into the bar molds or spread evenly in the casserole dish and bake for 10 minutes.. Place all ingredients for the caramel sauce in a sauce pan and bring to a boil on medium heat-once it comes to a boil, turn down to simmer while constantly whisking. After 5 minutes is up, turn off the heat.
    • Allow the shortbread to cool for 10 minutes, then pour the caramel sauce on top. Now place in the freezer for 30 minutes. Once the 25 minute mark approaches, make the ganache sauce. Add the milk to the stove top in a sauce pan and bring to a boil, once it is boiling remove from the head and add in the chocolate-whisk until smooth. The chocolate should be smooth at this point.
    • Now pour the chocolate on top of the caramel layer and place the twix bars back in the freezer for at least 5 hours. Then cut into bars. Store in the fridge.

    Notes

    Storage: You can store this recipe in the fridge for up to 5 days or in the freezer for up to 1 month. 
    Nutrition: The nutrition on this recipe is an estimate and not guaranteed. It is based off of 8 candy bars. 
    Servings: This recipe estimates to yield at least 8 candy bars. 
    Quick, easy, delicious, dairy free & gluten free twix bars.
    Serving: 1bar | Calories: 743kcal | Carbohydrates: 78g | Protein: 9g | Fat: 51g | Saturated Fat: 32g | Polyunsaturated Fat: 1g | Monounsaturated Fat: 1g | Sodium: 118mg | Potassium: 199mg | Fiber: 5g | Sugar: 54g | Vitamin C: 1mg | Calcium: 137mg | Iron: 7mg
    Tried this recipe?Tag me on instagram @alliannaskitchen!
    vegan chocolate ganache in a bowl with a whisk

    January 12, 2022 Dairy free

    Vegan Chocolate Ganache

    This Vegan Chocolate Ganache goes great on top of just about any dessert. This dairy free chocolate sauce is super simple to make and only requires 5 minutes of hands on time! This recipe can be made two ways: in the microwave or on the stovetop.

    vegan chocolate ganache in a bowl with a whisk

    If you love this dairy free chocolate recipe, you will want to check out my Gluten Free Tart Crust Recipe with Chocolate Ganache filling, Chocolate Covered Oranges, and my Vegan Chocolate Truffles as well. This recipe would go so well topped over my edible Gluten-Free Cookie Dough Bites.

    What Makes This Vegan Chocolate Ganache So Good?

    • First off, it is so easy and simple to make! It only takes 5 minutes. 
    • Secondly, it’s nice and silky.
    chocolate chips and coconut milk laid out in a bowl

    Vegan Chocolate Ganache Ingredients: 

    • Dairy free chocolate– I am obsessed with the Enjoy Life brand. I use their dairy free chocolate chips for just about anything. Note I do suggest the mini chips over the chocolate chunks because it will be easier to break up. Hu is also a great dairy free chocolate brand alternative! I can find both brands here at my local Whole Foods, but if you do not have one near you, you can buy them online.
    • Coconut milk-Or any kind of dairy free milk will work. We love almond milk too! I like the Trader Joe’s canned coconut milk. The ingredients are super simple: just coconut and water! 
    coconut milk in a saucepan

    How To Make Dairy Free Chocolate Sauce:

    • This recipe will teach you how to make it two separate ways: the microwave and the stovetop. It is super easy to burn chocolate, so you want to be sure to follow these instructions to a T!
    • For the stovetop-Place the coconut milk in a saucepan on medium heat and bring to a simmer. Once the milk is simmering, turn off the heat and add in the chocolate-whisking in fast so the chocolate gets nice and smooth. 
    • For the microwave-Place the coconut milk in a microwave safe bowl in the microwave for 30 seconds. Once the 30 seconds is up, whisk together and place it back in the microwave for 30 seconds. Then whisk it again. By this point it should be nice and silky!
    paleo chocolate sauce in a pan

    What If My Chocolate Sauce Is Clumpy?

    • Add ¼ cup more milk! 

    Can I Make Vegan Chocolate Ganache With Almond Milk And No Coconut?

    • Yes! Just swap the coconut milk with almond milk 1 for 1.

    Can I Reheat This?

    • I suggest making the homemade chocolate sauce as you are ready to eat it! It tastes best served hot. If you have any leftovers, I suggest storing it in an air tight glass jar in the fridge for 3-5 days.

    What Can I Serve With This?

    I love eating this paleo chocolate sauce on just about anything but it especially goes well with:

    • Gluten Free Pumpkin Cookies
    • Gluten Free Donuts With Chocolate Ganache 
    • Vegan Buckeyes
    • Vegan Skillet Cookie
    vegan chocolate ganache in a bowl with a whisk

    If you like this recipe, you will LOVE:

    • Vegan Caramel Sauce

    If you enjoyed this recipe it would mean the world to me if you rated it and left a comment below. It helps others find it on google.xoxo-Allianna

    vegan chocolate ganache in a bowl with a whisk

    Vegan Chocolate Ganache

    Course Dessert
    Cuisine American
    Prep Time 5 minutes minutes
    Cook Time 5 minutes minutes
    Total Time 10 minutes minutes
    Servings 1 cup
    Author Allianna Moximchalk
    1100kcal
    Cost $4
    Print Recipe Pin Recipe

    Equipment

    • Saucepan or microwave friendly bowl

    Ingredients

    • 1 1/2 cups chocolate chips I like the enjoy life brand
    • 3/4 cup coconut milk or almond milk

    Instructions

    For the microwave:

    • Place the coconut milk in a microwave safe bowl in the microwave for 30 seconds. Once the 30 seconds is up, whisk together and place it back in the microwave for 30 seconds. Then whisk it again. By this point it should be nice and silky!

    For the stovetop:

    • Place the coconut milk on the stovetop and bring to a simmer. Then turn the stove off and add in the chocolate and continuously whisk together until smooth. Serve over your favorite dessert or fruit.
      If you enjoyed this recipe it would mean the world to me if you rated it and left a comment below. It helps others find it on google.xoxo-Allianna

    Notes

    If you enjoyed this recipe it would mean the world to me if you rated it and left a comment below. It helps others find it on google.xoxo-Allianna
    Quick easy and delicious chocolate ganache sauce that goes great on top of just about anything!
    Serving: 1cup | Calories: 1100kcal | Carbohydrates: 116g | Protein: 2g | Fat: 74g | Saturated Fat: 53g | Polyunsaturated Fat: 1g | Monounsaturated Fat: 1g | Cholesterol: 50mg | Sodium: 77mg | Potassium: 249mg | Sugar: 100g | Vitamin C: 1mg | Calcium: 20mg | Iron: 4mg
    Tried this recipe?Tag me on instagram @alliannaskitchen!
    gluten free croutons in a bowl with a plate under it

    January 11, 2022 Air Fryer

    Homemade Gluten Free Croutons Recipe

    These Gluten Free Croutons are a great addition to so many different kinds of dishes: soups, salads and so much more! These easy homemade croutons can also be made low carb and keto friendly!

    Gluten free croutons in a bowl with a plate under it.

    These are the best croutons I’ve ever had, and you’d never even know that they are gluten free! I can’t even taste the difference and neither can my friends that don’t have dietary restrictions like I do.

    [feast_advanced_jump_to]

    Why You Will Love This Recipe

    • First off, they are so simple! This recipe literally takes minutes to prep and is a nice elegant addition to so many different kinds of meals.
    • Secondly, it is so hard to find gluten free croutons in the store that are also dairy and soy free, so having an easy recipe to make at home is perfect.
    • This homemade version is a fraction of the cost of store bought and even more delicious!
    • Your kids and your friends will love this recipe and won’t even taste a difference.
    • This recipe can be made in the oven or even the air fryer!
    • You can even make this recipe low carb by using a different kind of gluten free bread.

    Ingredients

    Ingredients for croutons in glass bowls on a tabletop.
    • Gluten free bread-Any kind of gluten free bread will work but my favorites are Udi’s, Trader Joe’s brand that comes in a green bag, or Carbonaut gluten free bread from Whole Foods. If you want to make homemade keto croutons, I highly suggest the Carbonaut brand. It is absolutely delicious and naturally low carb!
    • Roasting oil-Any kind will work. I like using avocado or olive oil. You could even use ghee here!
    • Sea salt-For flavor.
    • Dried herbs-I love oregano, parsley and basil. You can use all 3 or you can use just one. It is up to you, it is personal preference! Personally I like mine with a ton of herbs!
    • Garlic powder-For flavor.

    OPTIONAL:

    • Parmesan cheese-I am a huge fan of the 365 vegan plant based parmesan cheese. You can totally use real parmesan cheese if you are not dairy free, too!

    See recipe card for a full list of ingredients and measurements.

    Substitutes and Variations

    • Gluten free bread– You can use any type of gluten free bread, even a low carb option!
    • Roasting Oil -Although I love olive oil, you can substitute avocado oil or even ghee. You can even make your own Ghee!

    The recipe has not been tested with other substitutions and variations. If you replace or add any ingredients, please let us know how it turned out in the comments below!

    Step by Step Instructions

    Gluten free croutons ingredients in a glass bowl.
    Step #1: Preheat the oven to 275 degrees F. Then, cut your bread into 1/2 inch cubes. Place all ingredients in a bowl and mix well.
    Bread on a baking sheet.
    Step #2: Place the bread mixture on a baking sheet in a single layer, and bake for 1 hour. Serve warm, if desired.

    Equipment Needed

    • baking sheet

    Expert Tips

    • Tip #1: Although you can use any type of gluten free bread, my favorite brand is Udi’s which is available in many grocery stores including Whole Foods.
    • Tip #2: To cut the bread, you can use a knife or kitchen scissors. I love using kitchen scissors because they make the job so much easier.
    • Tip #3: Instead of the oven, you can make this recipe in the air fryer. They only take about 6 minutes to cook!
    Can I use these gluten free croutons in a stuffing recipe?

    Yes! These croutons would taste amazing in your favorite stuffing recipe!

    Can I make this recipe in the air fryer?

    Yes! You will follow the same steps until you get to the cooking time. Place the seasoned bread in the air fryer basket at 350 degrees F for 3 minutes. After the 3 minute mark is up, toss and cook for another 3 minutes.

    What should I serve with this recipe?

    I love serving my homemade croutons with salads and soups. My favorites are Thai Chicken Soup and Whole30 Chili.

    How can I make low carb keto croutons?

    The Carbonaut gluten free brand from Whole Foods is my favorite low carb/keto bread brand. It makes for great gluten free croutons!

    Baked gluten free croutons with tons on a baking sheet.

    Storage Instructions

    • This recipe can be stored in an airtight container for up to 5 days.

    Other Gluten Free Recipes You Will Love

    • 4 slices of gluten free garlic bread with parsley on top on a baking sheet
      The Best Vegan Garlic Bread Recipe
    • toast on a plate with butter
      Air Fryer Toast
    • close up photo of biscuits stacked on top of each other
      The Best Gluten Free Biscuits
    • 4 aip paleo bread rolls stacked on a plate
      AIP Bread Roll

    Did you try this recipe?

    Leave a rating and a review below.

    Be sure to tag me on Instagram.
    gluten free croutons in a bowl with a plate under it

    Gluten Free Croutons

    Course Side Dish
    Cuisine American
    Prep Time 5 minutes minutes
    Cook Time 1 hour hour
    Total Time 1 hour hour 5 minutes minutes
    Servings 10 servings
    Author Allianna Moximchalk
    292kcal
    Cost $5
    Print Recipe Pin Recipe

    Equipment

    • baking sheet

    Ingredients

    • 1 loaf gluten free bread See notes above on keto bread choices
    • 1/3 cup olive oil or Ghee
    • 1 tbsp dried herbs I like parsley, basil or oregano
    • 1/2 tsp sea salt
    • 1 tsp garlic powder

    OPTIONAL:

    • 1/3 cup parmesean cheese I like the 365 dairy free brand

    Instructions

    • Preheat the oven to 270. Cut up the gluten free bread into 1/2 inch cubes. Place all ingredients in a bowl and mix. Lay out cubes in a single layer and bake for 1 hour.

    For the air fryer:

    • Cut up the gluten free bread into 1/2 inch cubes. Place all ingredients in a bowl and mix. Place in the air fryer at 350 for 3 minutes, then toss around and cook for 3 more minutes.

    Notes

    Storage: This recipe can be stored in an airtight glass container for up to 5 days.
    Nutrition: The nutrition for this recipe is an estimate , and the calorie count is not guaranteed.  It is based on 10 servings.
    Servings: This recipe should yield 10 servings.
    Quick, easy, crunch gluten free crouton recipe!
    Serving: 1serving | Calories: 292kcal | Carbohydrates: 37g | Protein: 4g | Fat: 13g | Saturated Fat: 1g | Polyunsaturated Fat: 1g | Monounsaturated Fat: 5g | Cholesterol: 15mg | Sodium: 398mg | Potassium: 7mg | Fiber: 2g | Sugar: 6g | Vitamin A: 199IU | Vitamin C: 1mg | Calcium: 100mg | Iron: 1mg
    Tried this recipe?Tag me on instagram @alliannaskitchen!
    4 sausages on a plate with a gold fork

    January 10, 2022 Air Fryer

    Sausages In The Air Fryer

    Cooking Sausages In The Air Fryer is seriously the best way to cook it! Air fried sausages get really crispy on the outside, yet stay nice and juicy on the inside. This is the best hassle free way to do it and it requires minimal clean up!

    4 sausages on a plate with a gold fork

    What Makes Cooking Sausage In The Air Fryer So Good?

    • First off, I use my air fryer more than I use my oven! It doesn’t require any heat up time and it gets whatever I am making nice and crispy. When I first got my air fryer, I thought it was only good for frying-boy was I wrong! I use my air fryer for everything-including reheating leftovers! 

    raw sausage in a package on a plate

    What Do I Need To Make Sausages In The Air Fryer?

    • Sausages-You can use any kind of sausages! You can use breakfast sausages, bratworse, or even Italian sausages. Keep in mind that different sizes will mean different cooking times. So if your sausages are a little thinner, they won’t take as long to cook!

    sausages on the air fryer metal insert

    What Kind Of Air Fryer Do You Suggest?

    • I am obsessed with the multi-functional ones. They take up a fraction of the counter space yet have so many different functions. The one I have HERE also functions as a pressure cooker, slow cooker, saute pan, steamer, sous vide cooker, warmer, air fryer, roaster, oven, broiler and dehydrator all in one yet it takes up only one spot on the counter. 

    raw sausage in the air fryer

    How Do I Make Sausage In The Air Fryer?

    • First, remove the sausages from the packaging. 
    • Then, lay them on the metal grate insert or in the air fryer basket and bake them at 375 for 8 minutes then flip them and cook for 7 minutes. Keep in mind that if you are using bigger sausages, they could take up to 20 minutes. Smaller breakfast like sausages could take as little as 10 minutes. 

    Will Chicken Sausages In The Air Fryer Work?

    • Yes! You can cook any kind of sausage in the air fryer: chicken, turkey or pork based!

    What Should I Serve With Crispy Sausage?

    • If you are going for a breakfast vibe I am obsessed with my Dairy Free Hollandaise Sauce or Gluten Free French Toast Casserole. 
    • For an Italian like vibe, check out my Paleo Gnocchi Bolognese.

    cooked sausage in the air fryer

    If you like this recipe, you will LOVE my other simple air fryer recipes:

    • How To Cook Frozen Broccoli In The Air Fryer
    • Easy Air Fryer Spaghetti Squash

    If you enjoyed this recipe it would mean the world to me if you rated it and left a comment below. It helps others find it on google.xoxo-Allianna

    4 sausages on a plate with a gold fork

    Air Fryer Sausage

    Course Breakfast
    Cuisine American
    Prep Time 2 minutes minutes
    Cook Time 2 hours hours 31 minutes minutes
    Total Time 17 minutes minutes
    Servings 4 pieces
    Author Allianna Moximchalk
    198kcal
    Cost $3
    Print Recipe Pin Recipe

    Equipment

    • Air fryer

    Ingredients

    • 4-6 links sausage Italian sausage or bratwurst

    Instructions

    • Place the metal pop up grate or basket in the air fryer. Lay the sausages in a single layer on top. Set the air fryer to 375 and air fry for 8 minutes, then flip and air fry for 7 more minutes. You can air fry a few minutes longer if you like your sausages nice and crispy!
      If you enjoyed this recipe it would mean the world to me if you rated it and left a comment below. It helps others find it on google.xoxo-Allianna

    Notes

    If you enjoyed this recipe it would mean the world to me if you rated it and left a comment below. It helps others find it on google.xoxo-Allianna
    Quick, easy and delicious way to make sausage in the air fryer!
    Serving: 1link | Calories: 198kcal | Protein: 1g | Fat: 1g | Saturated Fat: 1g | Polyunsaturated Fat: 1g | Monounsaturated Fat: 1g | Trans Fat: 1g | Cholesterol: 1mg | Sodium: 6mg | Potassium: 2mg | Vitamin A: 1IU | Vitamin C: 1mg | Calcium: 1mg | Iron: 1mg
    Tried this recipe?Tag me on instagram @alliannaskitchen!

    Allianna Moximchalk in a pink dress with a green headband on holding a cookie cake with a candle in it.

    January 9, 2022 Blog

    Celebrating 28 & Aging Backwards!

    The weeks leading up to the end of the year are always special to me. Not only do we celebrate Christmas, but we also celebrate my birthday. As we were with my family over the holiday, we were talking about growing up and what I was like as a kid. I had health issues from the time I was born, but no one could really figure out what was wrong. I would just scream and scream. Sometimes I would cry so hard that I would pass out!  As I grew older, I started experiencing pain all over, from migraines, to my body literally just aching all of the time. As I got into my teenage years, it kept getting worse and worse. I was told by my doctors that I essentially just had some bad genes, and there was not much, aside from medications, that could help. The thing was, I would try medication after medication, and while they would help for a little while, each one would eventually stop working. 

    Picture of Allianna Moximchalk in a pink dress with a green headband holding a cookie cake with a candle in it.

    By the time I was in college, I hit my rock bottom. I was prescribed 13 medications a day, and I was sick and tired of feeling sick and tired. That was when I dove deep into my diet and lifestyle. As I started making small and sustainable changes, I started feeling better, and I began to realize that 99% of my symptoms were caused by my poor diet and lifestyle. 

    This past week I turned 28. I feel 100 times better than I did when I was a teenager! I have more energy than I have ever had before. I owe it all to taking better care of my body. I now make decisions about what I do and what I put in my body based on how I want to feel. Here are 3 things that have helped me feel better even as I get older:

    1. I manage my blood sugar and hormones by eating regular meals throughout the day. I never skip meals! For years, my weight yo-yoed, and I could not figure out why. It was because I was grazing and often skipping meals. Now I eat 4-5 small meals a day. I also eat my vegetables first, followed by protein, and then fat and carbs. This helps my body best balance my blood sugar levels. When I snack and eat random things throughout the day, I experience fluctuations in my sugars which results in my weight yo-yoing and also feeling moody and tired. 
    2. I prioritize sleep.I am that girl when I am out that counts backward on my fingers to figure out when I need to be on my way home.. If I go to bed at this time and have to wake up at this time, how many hours of sleep am I going to get? I strive to get at least 7 hours a night and wake up at the same time every day. I find that an early wake up makes the biggest difference in my energy and mood. 
    3. I intentionally move my body every single day. I have done this for 2 years straight -even on my wedding day! I hop on my elliptical every single morning as soon as I wake up. Some days it is for 30 minutes; other days it is only for 5 minutes. I have found that continuing to keep this practice even when I do not have time keeps me in the routine of doing it. Now it is just second nature. Even if it is just for 5 minutes, I feel good starting my day knowing I accomplished something. I love the way moving my body makes me feel so much that I do resistance training 5 days a week during my lunch break. While just being in the routine feels amazing in itself, resistance training is such a great stress reliever. It helps remove negative energy from the body.
    • « Go to Previous Page
    • Page 1
    • Interim pages omitted …
    • Page 15
    • Page 16
    • Page 17
    • Page 18
    • Page 19
    • Interim pages omitted …
    • Page 38
    • Go to Next Page »

    Primary Sidebar

    Allianna Headshots

    Hi, I'm Allianna! Allianna's Kitchen started by accident after battling an undiagnosed autoimmune disease for nearly my whole life.

    More about me →

    GLUTEN FREE DINNER RECIPES

    • steak date night dinner 1
      Steak Date Night Dinner with Garlic Aioli
    • gluten free fried shrimp 3 scaled
      Gluten Free Fried Shrimp
    • cooked frozen pork chops with chives on top on a white plate with a gold fork
      Easy Frozen Pork Chops In The Air Fryer
    • halibut fish tacos on a pale blue plate
      Halibut Fish Tacos

    EASY WHOLE30 RECIPES

    • Beetroot dip on a plate with crackers and fresh parsley on top.
      Simple Beetroot Dip Recipe
    • close up photo of ginger apple pork in a bowl
      Apple Ginger Pulled Pork
    • dairy free lobster bisque in a bowl with a gold spoon and garnished with lemon, fresh green herbs, and red pepper flakes.
      Dairy Free Lobster Bisque
    • juicy filet mignon on a plate
      Air Fryer Filet Mignon

    GLUTEN FREE APPETIZERS

    • peanut butter and jelly chicken wings on a plate with limes
      Peanut Butter And Jelly Wings
    • Stuffed mushrooms on a brown and white plate with fresh parsley on top.
      Gluten-Free Stuffed Mushrooms
    • Gluten free pigs in a blanket in a pile on a plate.
      Gluten Free Pigs In A Blanket
    • Pretty french onion dip in a silver bowl with potato chips and chives on top.
      Vegan French Onion Dip Recipe

    EASY MOCKTAIL RECIPES

    • honey simple syrup 2
      Honey Simple Syrup
    • orange lime cranberry mocktail 4
      Cranberry Mocktail Recipe
    • Clear glass with a brown drink and a cinnamon stick in it.
      Pear Cocktail Recipe
    • Grapefruit mocktail in a glass with jalapeño slice and grapefruit slice.
      Easy Grapefruit Mocktail Recipe

    Footer

    • Recipes
    • My Courses
    • Meal Prep Services
    • Accessibility Policy
    • Contact
    • About Me
    • Blog
    • Privacy Policy
    • Pinterest
    • Instagram
    • Facebook
    • Twitter

    Allianna’s Kitchen 2025 - All Rights Reserved

    Rate This Recipe

    Your vote:


    A rating is required
    A name is required
    An email is required