• Skip to primary navigation
  • Skip to main content
  • Skip to primary sidebar
  • Spring Recipes
  • Recipes
  • Order Meal Prep
  • Healthy Gut Baby Food Course
  • About

Allianna's Kitchen

menu icon
go to homepage
  • Spring Recipes
  • Recipes
  • Order Meal Prep
  • Healthy Gut Baby Food Course
  • About
    • Facebook
    • Instagram
    • Pinterest
    • Twitter
  • search icon
    Homepage link
    • Spring Recipes
    • Recipes
    • Order Meal Prep
    • Healthy Gut Baby Food Course
    • About
    • Facebook
    • Instagram
    • Pinterest
    • Twitter
  • ×
    Allianna's Kitchen » Recipes

    Blog

    sausage, broccoli and potatoes on a plate with a fork and garlic aioli

    April 20, 2022 Beef

    Easy Sausage Sheet Pan Dinner

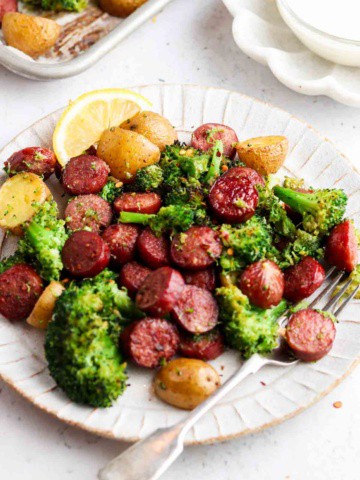
    This Sausage Sheet Pan Dinner is super simple to make and something the whole family can enjoy! The crispy sausage combined with the roasted potatoes and broccoli is seriously to die for. The homemade optional but highly recommended garlic aioli is the icing on the cake in this recipe. This recipe only requires 15 minutes or hands on time which makes it great for those nights where you want a home cooked meal but do not have much time to devote to cooking. 

    overhead shot of sausage, potatoes, broccoli and garlic aioli on two plates

    If you love easy dinner recipes as much as I do, be sure to check out my super simple Blackened Pork Chop recipe on my blog too!

    What Makes This Recipe So Good?

    1. First off, it only requires 15 minutes of hands-on time. 
    2. Secondly, it is super kid friendly, which means you do not need to worry about making a separate dinner for the kids. 
    3. Third, it stores really well which makes this a great option for meal prep. 
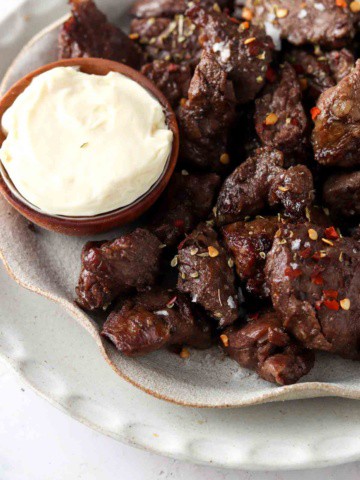
    4. The sausage in this recipe is unreal, it is so good! I normally don’t eat sausage but when it is grass fed and made with no questionable ingredients- it is so good!
    5. The garlic aioli in this recipe is to die for. I left it as optional, but let me tell you, you are going to want to make it!
    6. This recipe reheats so well which gives you another reason as to why you should make it for meal prep. 
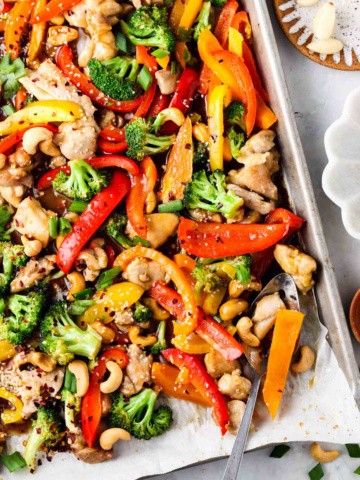
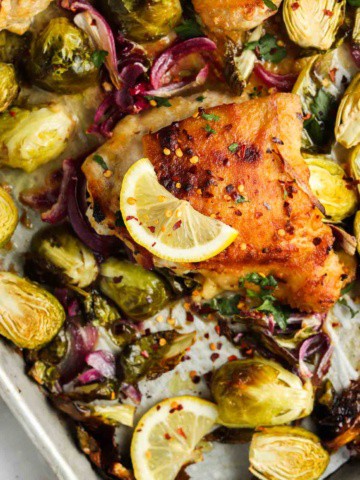
    7. Lately I am into sheet pan meals because they require minimal clean up, if you are into sheet pans like me you will want to check out one of my new favorites-these Honey Garlic Sheet Pan Chicken Thighs and my Chicken Sausage Sheet Pan Dinner.
    sheet pan ingredients laid out in bowls

    Recipe Ingredients:

    • Polish Sausage-I am not a big sausage eater but let me tell you the grass fed sausage from Teton Waters is seriously to die for! The grass fed aspect makes a big difference in the taste. I buy it from Costco and keep multiple packages of it in my freezer at all times. 
    • Mini potatoes-You can buy just the yellow ones or the multi-colored ones, whichever you prefer. Be sure to wash them beforehand and cut them in either halves or fourths depending on how big they are. 
    • Broccoli florets-This just means the end of broccoli on the big head. Some grocery stores buy it already pulled apart. 
    • Garlic powder & salt-For flavor. 
    • Avocado oil-My go to oil for roasting. A lot of oils become toxic when they are exposed to high heats, but avocado oil does not so it is always my go to for roasting. 

    OPTIONAL but highly recommended garlic aioli ingredients-

    • Avocado mayo-This is my go to mayo alternative. It is made with healthier fats in comparison to regular mayo which is made with canola oil. 
    • Dijon mustard-For taste.
    • Lemon juice-So necessary. Adds a perfect touch. 
    • Garlic cloves-A must!
    chopped up sausage

    Step By Step How To Make:

    • Step 1:

      • First, preheat the oven to 400 degrees F. Dice your sausages into ½ inch coins. Then add the cut up sausage and potatoes to the sheet pan. Mix with half of the oil, salt and garlic powder. 
    chopped up potatoes
    • Step 2:

      • Roast the potatoes and sausage for 50 minutes. 
    potatoes and sausage on a sheet pan
    • Step 3:

      • Toss the broccoli florets in the remaining oil, garlic powder and sea salt. 
    broccoli tossed in oil, garlic powder and sea salt
    • Step 4:

      • Mix the optional garlic aioli in a bowl while the sausage is cooking. 
    garlic aioli in a bowl
    • Step 5:

      • Add the broccoli to the sheet pan and bake for an additional 20 more minutes.
    broccoli, sausage, and potatoes on a sheet pan

    Frequently Asked Recipe Questions:

    • Can I Make This WIth Chicken Apple Sausage?

      • Absolutely! That would be delicious. 
    • How Can I Reheat? 

      • I am a sucker for reheating everything in the air fryer because it gets it nice and crispy, but you can also reheat it in the oven. For both the air fryer and oven I suggest 400 degrees F for 5-10 minutes. 
    • How Long Does Cooked Sausage Last In The Fridge?

      • I will eat this meal within 7 days. 
    • Can I Make This Recipe In The Air Fryer?

      • Absolutely! However, it won’t take nearly as long to cook. I would start out with half of the suggested cooking times and go from there.
    sausage meal on a plate

    Chef’s Tips:

    • Depending on how big you cut your sausages, they may need a little longer of cooking. You want the sausage pieces to be nice and crispy!
    • Be sure to store the aioli separately if you decide to meal prep this meal. 
    sausage, broccoli and potatoes on a plate with a fork and garlic aioli

    If you liked this recipe, you will LOVE my other favorite paleo sheet pan dinners:

    • Sheet Pan Shrimp Scampi
    • Sheet Pan Shrimp Fajitas
    • Chicken Fajitas Sheet Pan Style
    • Paleo Cashew Chicken Sheet Pan Style

    If you enjoyed this recipe it would mean the world to me if you rated it and left a comment below. It helps others find it on google.xoxo-Allianna

    sausage sheet pan dinner 2

    Sausage Sheet Pan Dinner

    Course Meals
    Cuisine American
    Prep Time 15 minutes minutes
    Cook Time 55 minutes minutes
    Total Time 1 hour hour 10 minutes minutes
    Servings 3 servings
    Author Allianna Moximchalk
    856kcal
    Cost $6
    Print Recipe Pin Recipe

    Equipment

    • Sheet pan

    Ingredients

    • 1 pound polish sausage Teton waters ranch brand- This is the only brand I use. It is all grass fed and the best quality stuff.
    • 1 pound mini potatoes washed, sliced in half or fourths depending on the size of the potatoes. Sub extra broccoli for keto
    • 3 cup broccoli florets
    • 1/2 tsp sea salt divided into 2
    • 1 tbsp garlic powder divided into 2
    • 1 tbsp roasting oil I like avocado oil

    Optional but highly recommended garlic aioli-

    • 1 lemon juiced
    • 1/2 cup mayo I only use avocado mayo because it is loaded with healthier fats over regular mayo
    • 1 tsp dijon mustard
    • 6 cloves garlic minced

    Instructions

    • Preheat the oven to 400 degrees F. Chop up the sausage into 1/2 inch pieces. Add the sausage and potatoes to the sheet pan with half of the cooking oil, sea salt, and garlic powder to the potatoes and sausage. Make sure it is mixed well so everything is well seasoned. Then, place the sheet pan in the oven for 30 minutes or until crispy to your liking.
    • When the 30 minutes is up, toss the broccoli, remaining salt, garlic powder, and oil together and add the broccoli to the sheet pan and bake for an additional 20 minutes.
    • While the sheet pan is cooking, mix together the optional (but highly recommended) aioli by placing all ingredients in a bowl together and mixing.
    • Once the sheet pan is roasted, dip in the garlic aioli on the side.
      If you enjoyed this recipe it would mean the world to me if you rated it and left a comment below. It helps others find it on google.xoxo-Allianna

    Notes

    If you enjoyed this recipe it would mean the world to me if you rated it and left a comment below. It helps others find it on google.xoxo-Allianna
     
    If you are using this recipe for meal prep, be sure to keep the aioli on the side when refrigerating and reheating. It should be served warm. 
    Easy, delicious, one pan sheet pan dinner! Something the whole family will enjoy.
    Serving: 1serving | Calories: 856kcal | Carbohydrates: 41g | Protein: 28g | Fat: 77g | Saturated Fat: 21g | Polyunsaturated Fat: 22g | Monounsaturated Fat: 30g | Trans Fat: 1g | Cholesterol: 122mg | Sodium: 301mg | Potassium: 1366mg | Fiber: 7g | Sugar: 4g | Vitamin A: 604IU | Vitamin C: 133mg | Calcium: 104mg | Iron: 4mg
    Tried this recipe?Tag me on instagram @alliannaskitchen!
    tuna casserole on a plate with a fork

    April 9, 2022 Allergy Friendly

    Dairy Free Tuna Noodle Casserole

    This Healthy Dairy Free Tuna Noodle Casserole is so delicious and so simple to make. The creamy cashew cream combined with the gluten free noodles, wild caught tuna, broccoli and peas is seriously the best combination. This recipe only takes 15 minutes to prepare and 30 minutes in the oven which means you can have dinner on the table within 45 minutes!

    paleo tuna casserole in a casserole dish

    If you enjoy this recipe, you will also enjoy my Gluten Free Salmon Cakes, Gluten Free Ravioli and Dairy Free Lobster Bisque as well!

    Why Is This Recipe So Good?

    • First off, this is the most perfect back to school recipe to make for your family! Kids love it. 
    • Secondly, this recipe is naturally dairy free, gluten free, soy free, grain free, paleo, Whole30 and can be made AIP (autoimmune protocol friendly.) To make this recipe AIP friendly you can substitute the cashew cream with canned artichokes, it works like a charm!
    • This recipe was inspired just like the other dairy free casserole recipes on my blog, my husband missed this meal from his childhood so I created a healthier version of it. 
    • This recipe only takes 15 minutes to prepare which makes it a great weeknight dinner. 
    • You can make this recipe for meal prep too, it reheats so well!
    • If you do not eat fish you can substitute the tuna with cubed chicken. 
    • This recipe can be prepared ahead of time so all you need to do is reheat when you are ready to eat. 
    • This fish recipe has become a favorite in my house along with my Gluten Free Fish and Chips recipe.
    recipe ingredients laid out in a bowl

    Ingredients-

    • Pasta-I love Jovial cassava noodles, they by far make the best gluten free noodles. While you do not need to make this recipe gluten free, it is the only way I like to make it!
    • Tuna-You can use freshly baked and shredded or you can use canned. Whichever kind you choose, I prefer wild caught. You can taste a big difference between wild caught and farmed raised. That is why I order a ton of proteins every month from Butcher Box. They sent me all of my favorite meats and seafood right to my door. All I need to do is thaw. If you use my Butcher Box link, you can save on your order every month. 
    • Broccoli & peas-For the vegetables. I like using frozen peas and cauliflower florets. 
    • Red onion-Gives this recipe more flavor and a nice added crunch. 
    • Cooking oil spray-This prevents the casserole from sticking to the bottom of the dish. 

    For the Dairy Free Cheese Sauce-

    • Cashews-This is what makes the cheesy sauce! Cashew sauce is my favorite. If you have a nut allergy or are following the autoimmune protocol, you can substitute the nuts with canned artichokes. 
    • Lemon juice-For flavor.
    • Garlic & salt-For taste.
    • Nutritional yeast-This gives the dish the cheesy like flavor. It is commonly used in paleo cooking to give dishes a cheesy flavor. 
    • Bone broth-To make the cheese sauce. You can use water here but it won’t be as flavorful!
    gluten free noodles in a strainer

    How To Make:

    • Step 1-

      • Preheat the oven to 350 degrees F. Cook the pasta according to the instructions on the box. I like to add a little bit of salt to the pot to prevent the noodles from sticking together. 
    cheese sauce ingredients in a blender
    • Step 2-

      • While the pasta is cooking, place all of the sauce ingredients together in a blender and blend until smooth-about 3 minutes.
    cheese sauce in a blender
    • Step 3-

      • Spray your 9 by 13 casserole dish with cooking spray oil and add all ingredients to the dish. Bake for 20 minutes.
    tuna, broccoli, and peas in a casserole dish


    • Step 4-

      • Once the casserole is done baking, sprinkle on top with optional green onions and pork rinds. 
    tuna noodle casserole ingredients in a casserole dish- cashew cheese, pasta, broccoli, peas, and tuna in a casserole dish

    Recipe Frequently Asked Questions:

    • How Can I Reheat Paleo Tuna Noodle Casserole?

      • I suggest reheating in the oven at 350 degrees F for 5-10 minutes.
    • How Can I Make This Recipe AIP Friendly?

      • Canned artichokes do wonders, drain your artichokes and place them in the food processor with the other ingredients and blend until smooth.
    • How Long Does Tuna Last In The Fridge?

      • I would eat this dish within 4 days.
    • How Does This Creamy Casserole Work With No Cheese?

      • Cashew cheese does wonders and is commonly used in paleo cooking. I have people tell me all of the time that it tastes just like real cheese when you bake with it. I use cashew cheese in my Dairy Free Lasagna Recipe too!
    dairy free tuna noodle casserole close up on a plate

    Chef’s Tips:

    • Be sure not to overcook your noodles, your noodles will cook in the oven too!
    • Your cashew sauce should be runny and smooth, if it is not smooth place it back in the food processor for another minute or so until it is nice and smooth.
    tuna casserole on a plate with a fork

    If you liked this recipe, you will LOVE my other dairy free casserole recipes on my blog:

    • Paleo Pizza Casserole
    • Keto Big Mac Casserole
    • Gluten Free French Toast Casserole

    If you enjoyed this recipe it would mean the world to me if you rated it and left a comment below. It helps others find it on google.xoxo-Allianna

    close up photo of tuna noodle casserole

    Dairy Free Tuna Noodle Casserole

    Course Meals
    Cuisine American
    Prep Time 15 minutes minutes
    Cook Time 30 minutes minutes
    Total Time 45 minutes minutes
    Servings 4 servings
    Author Allianna Moximchalk
    736kcal
    Cost $10
    Print Recipe Pin Recipe

    Equipment

    • Food processor
    • casserole dish 9 by 13

    Ingredients

    For the cheese sauce:

    • 1.5 cup cashews sub canned and drained artichokes for AIP and nut free
    • 1 cup bone broth for AIP/ nut free use 1/3 cup
    • 1.5 tsp garlic powder
    • 1.5 tbsp nutritional yeast
    • 3/4 tsp sea salt
    • 2 lemons juiced

    For the casserole:

    • 1 cup frozen peas
    • 2 cups broccoli
    • 10 ounces tuna Fresh, canned or packets. Make sure it is wild caught. If you are making it fresh, be sure to shred it.
    • 1 box pasta I like Jovial cassava gluten free noodles.
    • 1/2 red onoin diced
    • cooking spray oil

    OPTIONAL: to serve-

    • crushed pork rinds

    Instructions

    • Preheat the oven to 350 degrees F. Make the pasta according to the instructions on the box and sprinkle in a little bit of salt to help prevent the noodles from sticking. While the noodles are cooking, make the sauce.
    • Add the "cheese" sauce ingredients to a blender and blend until smooth for 3-4 minutes.
    • Once the sauce is made and the pasta is done, spray the bottom of a casserole dish with cooking spray oil to prevent it from sticking. Add all ingredients to the casserole dish and mix together. Bake in the oven for 30 minutes. Sprinkle with optional pork rinds or red pepper flakes to serve.
      If you enjoyed this recipe it would mean the world to me if you rated it and left a comment below. It helps others find it on google.xoxo-Allianna

    Notes

    If you enjoyed this recipe it would mean the world to me if you rated it and left a comment below. It helps others find it on google.xoxo-Allianna
    Easy, delicious, gluten free Dairy Free Tuna Noodle Casserole.
    Serving: 1serving | Calories: 736kcal | Carbohydrates: 108g | Protein: 41g | Fat: 17g | Saturated Fat: 3g | Polyunsaturated Fat: 4g | Monounsaturated Fat: 8g | Trans Fat: 1g | Cholesterol: 26mg | Sodium: 492mg | Potassium: 942mg | Fiber: 10g | Sugar: 9g | Vitamin A: 613IU | Vitamin C: 84mg | Calcium: 94mg | Iron: 6mg
    Tried this recipe?Tag me on instagram @alliannaskitchen!
    cashew chicken on a sheet pan

    April 8, 2022 Allergy Friendly

    Healthy Cashew Chicken Sheet Pan Style

    This Healthy Cashew Chicken Sheet Pan Meal is so delicious, yet so quick, easy and it does not require much work at all! The sweet yet salty Chinese sticky sauce combined with the nice and crunchy peppers, cashews, and broccoli is so good. This recipe only requires 10 minutes of hands-on time and can be on your dinner table within 30 minutes. 

    cashew chicken on a plate

    Chicken is one of my go to’s for dinner in our house! This recipe is one of my favorites because it is so easy to make. You literally just throw everything on one sheet pan. If you love easy chicken recipes like I do, be sure to check out my Gluten Free Fried Chicken Recipe, Healthy Poke Chicken Bowls, Gluten-Free Chicken Piccata, Sheet Pan Chicken Sausage Meal and Keto Chicken Tenders.

    Why Should I Make This Recipe?

    • First off, this recipe is so simple! I love sheet pan meals because you literally can throw everything all together and just let it bake.
    • Secondly, this meal is great for meal prep as it reheats super well.
    • This recipe is naturally dairy free, gluten free, grain free, paleo, refined sugar free and it can be made AIP (autoimmune protocol friendly) Whole30 and meatless, too!
    • This recipe reminds me so much of my other favorite sheet pan meals, like my favorite Sheet Pan Chicken Fajitas. 
    • The sauce on this recipe is SO delicious. It is the perfect combination of both sweet and salty-it tastes just like Chinese Chicken!
    • This recipe can be easily made vegan by substituting the chicken for chickpeas!
    • Lastly, kids love this meal! This meal is super kid friendly-kids love the sweet sauce. 
    ingredients laid out in bowls

    Recipe Ingredients: 

    • Chicken breasts-You can totally use chicken thighs here if you prefer the darker meat flavor. If you do go the thigh route I suggest trimming the thighs. I love to get all of my chicken from the Butcher Box. They have the best quality stuff and it gets shipped right to your door. If you use my Butcher Box link you can get 2 pounds of free meat every month!
    • Salt, pepper, garlic powder-To flavor the chicken. 
    • Cooking oil spray-I love using avocado oil cooking spray. Avocado oil is a great roasting oil because it has a high smoke point. I always try to avoid oils with lower smoke points like olive oil when roasting because they become quite toxic. 

    For the Cashew Chicken Sauce:

    • Bone broth-This is your base. I like Kettle & Fire. Use code BLANK
    • Coconut aminos-This is a great soy sauce alternative for those of you who cannot tolerate soy or gluten. If you can tolerate both of those you can use regular soy sauce here. 
    • Sesame oil-For the Chinese flavoring. If you are doing the autoimmune protocol, you can use avocado oil. 
    • Honey-To add the sweetness to this dish. If you are vegan you can use maple syrup and for Whole30 you can use minced dates. 
    • Fresh ginger-Ginger is a key in this recipe! If you do not have fresh, you can use ground ginger. Note that ground ginger is a lot stronger than fresh ginger so you only need half of the amount. 
    • Garlic-For flavor.
    • Apple cider vinegar-Give this sauce a nice kick without making it spicy!
    • Arrowroot powder- This thickens the sauce so the sauce is not running, without the arrowroot it would be watery. Arrowroot is the Paleo alternative for cornstarch. 

    The Sides

    • Broccoli & peppers-As your vegetable! If you are doing AIP you can substitute extra broccoli for the peppers. 
    • Cashews-This is a must in cashew chicken! Note for AIP you can substitute the cashews with tiger nuts which is a great nut free alternative. 
    • Avocado oil-To help the vegetables roast. 
    • Sea salt & garlic-For flavor. 

    To Serve:

    • Red pepper flakes
    • Sesame seeds
    raw chicken in a bowl with seasoning

    How To Make:

    • Step 1-

      • First, preheat the oven to 400 degrees F. Mix your cubed chicken with the salt, pepper and garlic powder. Add the chicken to a sheet pan and spray with cooking oil. Bake in the oven for 10 minutes. 
    peppers, broccoli, cashews and oil in a bowl
    • Step 2-

      • While the chicken is cooking, toss the broccoli, peppers, oil, salt and garlic powder together then set aside. 
    sauce ingredients in a sauce pan
    • Step 3-

      • Place all of the sauce ingredients in a sauce pan and bring to a boil. Then simmer for 2 minutes. It is important to continuously whisk the sauce with a whisk or it will clump up. This is the arrowroot in it that will clump. 
    sauce in a sauce pan whisk together
    • Step 4-

      • When the chicken is done, add the vegetable mixture to one side of the sheet pan and bake for an additional 10-12 minutes.
    chicken, broccoli, and peppers on a sauce pan
    • Step 5-

      • Once the sheet pan meal is done, pour the sauce on top and garnish with red pepper flakes and sesame seeds. 
    side view of paleo cashew chicken

    Recipe Frequently Asked Questions:

    How Long Does This Last In The Fridge?

    • I would eat this within 5 days. 

    How Can I Reheat?

    • I suggest reheating on the stovetop for 5-10 minutes. 

    What Is Arrowroot Powder?

    • Arrowroot is a commonly used alternative in paleo cooking to help thicken sauces. It works just like corn starch!

    Chef’s Tips:

    • Be sure to whisk your sauce, or else it will clump together. 
    cashew chicken on a sheet pan

    If you like this recipe, you will LOVE my other sheet pan meals:

    • Honey Garlic Chicken Thigh Sheet Pan Meal
    • Sheet Pan Keto Shrimp Scampi
    • Sheet Pan Shrimp Tacos

    If you enjoyed this recipe it would mean the world to me if you rated it and left a comment below. It helps others find it on google.xoxo-Allianna

    cashew chicken on a sheet pan

    Paleo Cashew Chicken

    Course Dinner, Meals
    Cuisine American, Chinese
    Prep Time 10 minutes minutes
    Cook Time 20 minutes minutes
    Total Time 29 minutes minutes
    Servings 3 servings
    Author Allianna Moximchalk
    463kcal
    Cost $6
    Print Recipe Pin Recipe

    Equipment

    • Sheet pan
    • sauce pot

    Ingredients

    For the chicken:

    • 1 pound chicken breasts or chicken thighs (cut into 1 inch cubes). If you are looking for a meatless option, you can sub 2 cans of chickpeas.
    • 1/2 tsp sea salt
    • 1/4 tsp black pepper
    • cooking spray oil

    For the sauce:

    • 1/3 cup coconut aminos soy sauce is ok if you tolerate soy
    • 1 tbsp apple cider vinegar
    • 1/3 cup honey use maple syrup for vegan, sub 3 minced dates for Whole30
    • 1 tsp sesame oil can sub avocado oil for AIP
    • 1 tsp fresh ginger sub 1/2 tsp for ground dried ginger
    • 2 cloves garlic minced
    • 1 tbsp arrowroot powder
    • 1/4 cup bone broth
    • 1/2 cup water

    Everything else:

    • 3 cups broccoli florets
    • 3 peppers sliced, sub for AIP with 3 extra more cups of broccoli
    • 1/3 cup cashews sub tigernuts for AIP
    • 2 tbsp avocado oil
    • 1 tsp garlic powder
    • 1/2 tsp sea salt

    To serve:

    • 1 tbsp sesame seeds omit for AIP
    • red pepper flakes omit for AIP

    Instructions

    • Preheat the oven to 400 degrees F. Mix your cubed chicken in a bowl with the salt and pepper. Add the chicken to a baking sheet and spray with cooking oil on top. Bake for 10 minutes.
    • Add the peppers, broccoli, cashews, oil, salt and garlic powder to a bowl and mix well. When the 10 minutes is up for the chicken, add the broccoli, peppers, and cashews to the sheet pan and bake for an additional 10-12 minutes.
    • While the meal is cooking, mix together the sauce in a saucepan and bring to a boil. Be sure to continuously to whisk it so it does not clump (the arrowroot will clump if it is not mixed) Allow it to simmer for 2 minutes. Then remove from the heat.
    • Once the sheet pan is done cooking, pour over the sauce and sprinkle with sesame seeds and red pepper flakes.
      If you enjoyed this recipe it would mean the world to me if you rated it and left a comment below. It helps others find it on google.xoxo-Allianna

    Notes

    If you enjoyed this recipe it would mean the world to me if you rated it and left a comment below. It helps others find it on google.xoxo-Allianna
    Easy, delicious, 30 minute meal the whole family will love.
    Serving: 1serving | Calories: 463kcal | Carbohydrates: 48g | Protein: 40g | Fat: 13g | Saturated Fat: 3g | Polyunsaturated Fat: 3g | Monounsaturated Fat: 6g | Trans Fat: 1g | Cholesterol: 97mg | Sodium: 1213mg | Potassium: 1194mg | Fiber: 5g | Sugar: 29g | Vitamin A: 1054IU | Vitamin C: 180mg | Calcium: 103mg | Iron: 3mg
    Tried this recipe?Tag me on instagram @alliannaskitchen!
    cooked chicken thighs on a sheet pan

    April 7, 2022 Allergy Friendly

    Honey Garlic Sheet Pan Chicken Thighs Meal

    This Honey Garlic Sheet Pan Chicken Thighs Meal is so good! This recipe is so simple yet so delicious. With just 10 minutes of hands-on time, you can have dinner on the table in no time. We love this meal for busy weeknights and even when we have company too, because it’s so good!

    chicken thighs and brussel sprouts on a plate with honey mustard and lemons

    I love a good easy dinner! This Sheet Pan chicken dinner is one of the many easy chicken recipes on my blog. If you love this recipe, you will love my Gluten Free Fried Chicken Recipe, Gluten Free Chicken Piccata, Sheet Pan Chicken Sausage, AIP Turkey Breast in a Maple Garlic Sauce, and Keto Chicken Tenders recipes.

    Why Should I Make This Recipe?

    • This recipe is so simple to make! It only requires 10 minutes of hands-on time and can be on the dinner table within 45 minutes. 
    • The combination of lemon, honey, and dijon is so delicious. 
    • This recipe is naturally refined sugar free, paleo, gluten free, grain free and dairy free. This recipe can also be made AIP (autoimmune protocol friendly) if you omit the mustard. 
    • This recipe is super kid friendly which means you can finally make a meal that the whole family will enjoy. 
    • This recipe reminds me so much of my other favorite sheet pan meal because it is so simple. If you like simple meals be sure to check out my Sheet Pan Chicken Fajitas. 
    • You can bulk cook this recipe and it stores really well which makes it a great meal prep option.
    • This recipe can be easily wrapped out with white chicken meat if you prefer that over dark meat. 
    Honey Garlic Sheet Pan Chicken Thighs Meal 14

    Ingredients: 

    • Chicken thighs-I love dark meat because it just has so much more flavor. However, if you prefer lighter meat you can make this dish with breast meat. You will have to adjust the cooking times. I like to get my thighs from Butcher Box. Every month they send me a monthly supply of all of my favorite proteins, all I need to do is defrost. I like having it frozen because I never have to worry about the meat going bad. If you shop with my Butcher Box link, you can get free meat with your order for the rest of your life!
    • Brussel sprouts– My favorite vegetable! Make sure to chop off the ends and slice in half. If your brussel sprouts are really big, cut them into fourths. 
    • Red onions-I love the taste of roasted onions, but if you are not an onion fan, you can skip this ingredient!
    • Avocado oil-To roast and pan sear the chicken in and also roast the veggies. I like avocado oil because it has a higher roasting point which means that it doesn’t become toxic in the oven unlike other oils like olive oil. 
    • Sea salt-To taste. 

    For the sauce:

    • Dijon mustard-I love the 365 Whole Foods dijon brand. It is clean and only contains mustard. 
    • Honey-I prefer to make my own honey mustard in this recipe. With that said if you want to use up the honey mustard you have in the fridge, you can add the measurements for the dijon and honey together and just use that. 
    • Lemon-This will add a nice kick for the sauce! Adding a bit of an acid is so important. If you do not have lemons, you can use 1 tbsp apple cider vinegar for the kick. 
    • Avocado oil-This is the base of the sauce. Like I had mentioned above, the oils you roast with are so important. I never roast with olive oil because it is a low smoke point oil which means it becomes toxic when you cook with it. 
    • Garlic cloves & sea salt-For flavor. 
    pan searing chicken thighs in a pan

    How To Make:

    Step 1:

    • Preheat the oven to 400 degrees F. 

    Step 2:

    • Then, place 1 tbsp of avocado oil in a non-stick pan on medium heat. Sprinkle your chicken thighs with sea salt and add to the pan for 4 minutes, then flip and sear for 4 more minutes. 
    sauce ingredients in a bowl

    Step 3:

    • While the chicken is searing, place all of the dressing in a bowl and mix well. 
    honey sauce whisked in a bowl

    Step 4:

    • Next, add the brussel sprouts, oil, onions, salt, and garlic powder to a bowl and mix.
    brussel sprouts and onions in a bowl

    Step 5: 

    • Divide the sauce up into 2 bowls. Set one bowl aside and in the other bowl dip the chicken. Add the chicken to the sheet pan with the skin side facing up and add in the veggies. Roast for 15 minutes, then toss the vegetables around and roast for an additional 15-20 minutes or until the chicken reaches 165 degrees F.
    chicken dipped in honey mustard sauce

    Step 6:

    • Once the chicken is done, remove from the oven and drizzle additional sauce on top. Serve with optional red pepper flakes. 
    raw chicken and brussel sprouts in a sheet pan

    Recipe Frequently Asked Questions:

    • What Is The Cooking Time If I Am Swapping For Chicken Breasts?

      • If you are cooking chicken breasts in this recipe, still pan sear the chicken but put the brussels sprouts in the oven for 25 minutes, then flip and add in the chicken breasts and bake the chicken until it reaches 165 degrees F.
    • How Long Does Chicken Last In The Fridge?

      • I would eat this recipe within 7 days. 
    • What Does Pan Searing Chicken Do?

      • It gets the outside nice and crispy, while this is not a must it helps with the texture and flavor!
    • Can I Buy Skinless Thighs?

      • Absolutely, but note that they may not be as crispy. 
    brussel sprouts, onions and chicken on a sheet pan

    Chef’s Tips:

    • Make sure you cut your brussel sprouts small enough, if you have large ones cut them into fourths!
    • I love reheating this dish in the air fryer, but you can also reheat it in the oven at 350 degrees F for 5-10 minutes in the oven.
    close up photo of thicken thighs on a plate

    If you like this recipe, you will LOVE:

    • Sheet Pan Shrimp Fajitas
    • Brussel Sprout Sheet Pan Breakfast
    • Lemon Garlic Sheet Pan Shrimp

    If you enjoyed this recipe it would mean the world to me if you rated it and left a comment below. It helps others find it on google.xoxo-Allianna

    cooked chicken thighs on a sheet pan

    Honey Garlic Sheet Pan Chicken Thighs

    Course Dinner, Meals
    Cuisine American
    Prep Time 10 minutes minutes
    Cook Time 50 minutes minutes
    Total Time 1 hour hour
    Servings 3 servings
    Author Allianna Moximchalk
    803kcal
    Cost $6
    Print Recipe Pin Recipe

    Equipment

    • Sheet pan

    Ingredients

    • 1 pound chicken thighs I like the skin on because it gets crispy in the oven. See the recipe FAQ's for instructions on how to use chicken breasts instead of thighs.
    • 1 pound brussel sprouts washed and cut in half
    • a pinch sea salt
    • 1 tsp garlic powder
    • 1 small red onion sliced
    • 3 tbsp avocado oil 1 tbsp for pan searing, the rest for the brussels and onions
    • 1 tsp garlic powder

    For the sauce:

    • 1.5 tbsp honey
    • 1 lemon juiced
    • 3 cloves garlic minced
    • 1/2 tsp sea salt
    • 1/3 cup olive oil
    • 2 tbsp dijon mustard omit for AIP

    To serve:

    • red pepper flakes

    Instructions

    • Preheat your oven to 400 degrees F. Put 1 tbsp of avocado in a frying pan and sprinkle a pinch of salt on your chicken thighs. Place the chicken thighs in the frying pan and pan sear for 4 minutes on each side for a total of 8 minutes.
    • While the chicken is pan searing, chop up the brussels and slice up the onions. Toss the onions and brussles in a bowl with the remaining avocado oil and salt. Then, mix the honey mustard sauce in a bowl-set aside.
    • When the chicken is done searing, toss it in HALF (save half to serve with. Make sure you prepare it separately so the other half does not get contaminated with raw chicken) the honey mustard sauce then add to the sheet pan. Place the vegetables around the chicken skin side up and roast in the oven for 15 minutes then toss around the vegetables and bake for an additional 15-20 minutes or until your chicken reaches 165 degrees F. Serve with remaining sauce and red pepper flakes.
      If you enjoyed this recipe it would mean the world to me if you rated it and left a comment below. It helps others find it on google.xoxo-Allianna

    Notes

    If you enjoyed this recipe it would mean the world to me if you rated it and left a comment below. It helps others find it on google.xoxo-Allianna
     
    Be sure to read my recipe FAQ’s if you are cooking with chicken breasts. 
     
    Quick, easy dinner loaded with flavor!
    Calories: 803kcal | Carbohydrates: 32g | Protein: 31g | Fat: 64g | Saturated Fat: 12g | Polyunsaturated Fat: 10g | Monounsaturated Fat: 38g | Trans Fat: 1g | Cholesterol: 148mg | Sodium: 656mg | Potassium: 1046mg | Fiber: 8g | Sugar: 15g | Vitamin A: 1274IU | Vitamin C: 151mg | Calcium: 107mg | Iron: 4mg
    Tried this recipe?Tag me on instagram @alliannaskitchen!
    close up photo of marshmallows

    April 5, 2022 Allergy Friendly

    Healthy Marshmallows

    These Healthy Marshmallows are super simple and fun to make. My homemade marshmallows are super fluffy, light and have the perfect amount of sweetness. This recipe only requires 20 minutes of hands-on time and these homemade treats store so well which means you can have a batch in your fridge at all times. 

    marshmallows on wax paper

    What Makes This Recipe So Good?

    • First off, these homemade marshmallows taste better than store bought!
    • Secondly, this recipe is actually good for you-only a few simple ingredients, no additives here!
    • This recipe is naturally paleo, gluten free, dairy free, grain free, refined sugar free, elimination diet friendly, AIP (autoimmune protocol.)
    • This recipe only requires 20 minutes of hands-on time which makes it a great fun thing to make when you do not have much time. 
    • Kids love these marshmallows, no one even knows they are not loaded with all of the additives like store bought ones. 
    • This recipe is used to make my homemade Dairy Free S’mores Fudgesicles. 
    • These marshmallows store really well, which means you can make them in bulk and store them for later use. 

    homemade marshmallow ingredients laid out

    Ingredients: 

    • Gelatin-This is the key ingredient for marshmallows. This is what holds everything together. Gelatin is a great supplement for the body too. It can support gut health, bone health, joint health and so much more. It also helps with skin. I love Vital Proteins gelatin brand. 
    • Honey-This is my go to sweetener in this recipe. Note you can use maple syrup but the honey tastes better in my opinion. I like to get my honey from Costco, I found that you get the most for your money there. 
    • Vanilla-This is totally optional, but does help with flavor. If you are doing the autoimmune protocol (AIP) you can use vanilla powder or omit. 
    • Arrowroot powder-This prevents the marshmallows from sticking and gives them a white color. 
    • Water-To make the honey mixture and the gelatin. 

    gelatin and water in a bowl

    How To Make:

    Step 1: 

    • Place half of the water in a bowl and sprinkle the gelatin. Allow the gelatin to bloom (bloom means to allow it to set and form.)

    honey and water in a bowl

    Step 2:

    • Place the other half of the water in a saucepan and pour in the honey. Whisk the water in honey together and add in the optional vanilla. Allow the mixture to be brought to a boil on medium heat for about 12 minutes or until the mixture reaches 240 degrees F with a candy thermometer. 

    arrowroot in a casserole dish

    Step 3:

    • Add a piece of wax paper to an 8 by 8 casserole dish and sprinkle with arrowroot on the bottom to prevent the marshmallows from sticking.

    marshmallow fluff

    Step 4:

    • Once the honey mixture is done, add the gelatin mixture into a large bowl and slowly pour in the honey mixture while using a hand mixer on the low setting. It is important to act fast as the gelatin will soon start to set and we do not want that. Mix the mixture on low for 5-7 minutes until soft peaks form (like whipped cream.)

    marshmallows in a casserole dish

    Step:5

    • Pour the mixture into the casserole dish and allow it to set in the fridge for 6 hours. 

    cut up marshmallows

    Step 6:

    • Once the marshmallows set, sprinkle with a little bit more arrowroot powder on top to help cut through it. Then, grease a knife with oil and cut the marshmallows into small cubes by first cutting horizontally, then cutting vertically.

    marshmallows and arrowroot powder in a bowl

    Step 7:

    • Add the cubes to the bowl and pour in the remaining arrowroot powder and mix. This will give the marshmallows the white appearance and prevent them from sticking. Now serve!

    tossed marshmallows

    Recipe Frequently Asked Questions:

    • How Long Do Homemade Marshmallows Last?

      • These marshmallows can last for 3 weeks when they are covered and stored in the fridge. 
    • Can I Turn This Into Marshmallow Fluff?

      • Yes! Just skip steps 3,5,6 and 7.
    • What Kind Of Healthier Marshmallow Based Desserts Can I Make With This?

      • I love making my homemade Fudgesicles! 
    • How Should I Store Them?

      • I suggest storing the homemade marshmallows covered in the fridge.

    close up photo of marshmallows

    Chef’s Tips:

    • Be sure not to over mix your honey and gelatin mixture in step 4. If you overmix it, it will get real firm and set way too quick. 
    • Make sure you do not overcook the honey mixture on the stovetop, just cook it for 12 minutes on the dot!

    marshmallows on a plateIf you like this recipe, you will LOVE my other fun desserts:

    • Vegan Reece’s Cups
    • Homemade Vegan Twix Bars
    If you enjoyed this recipe it would mean the world to me if you rated it and left a comment below. It helps others find it on google.xoxo-Allianna

    marshmallows on a plate

    Healthy Marshmallows

    Course Dessert, Snack
    Cuisine American
    Prep Time 10 minutes minutes
    Cook Time 10 minutes minutes
    rest time 6 hours hours
    Total Time 6 hours hours 20 minutes minutes
    Servings 24 pieces
    Author Allianna Moximchalk
    49kcal
    Cost $2
    Print Recipe Pin Recipe

    Equipment

    • 8 by 8 baking dish
    • mixer
    • wax paper

    Ingredients

    • 1 cup water divided into 2 half cups
    • 3 tbsp gelatin I like grass fed
    • 1 cup honey or maple syrup
    • 1 tsp vanilla optional for flavor. omit for AIP
    • 2 tbsp arrowroot powder to coat the marshmallows

    Instructions

    • Line a 8 by 8 inch casserole dish with parchment paper and spread a pinch of the the arrowroot powder to prevent sticking.
    • Now, add 1/2 cup of water to a bowl and sprinkle the gelatin allow it to bloom (sit without touching it) for 10 minutes. Now combine water and the honey in a saucepan on medium heat and bring to a boil for 12 minutes or until a candy thermometer reaches 240 degrees F. Be sure to whisk throughout so the honey gets mixed in.
    • Next, pour the honey mixture in the bowl quickly while whisking on low. Then, kick up the speed on the mixture and whisk for 5-7 minutes until soft peaks form (looking kinda like a whipped cream.) This will turn the mixture from brown to white and it will explode in volume. Now pour the cream into the casserole dish and spread out with a spatula. You will need to act fast as the marshmallows will have started to set for 6 hours in the fridge. Once the 6 hours is up, add the remaining arrowroot on top and grease a sharp knife with oil to cut the marshmallows into 24 small pieces.
    • Once the squares are cut, add them to a bowl and pour in the rest of the arrowroot powder. Toss in the arrowroot powder so they get a white look to them. Store in the fridge.
      If you enjoyed this recipe it would mean the world to me if you rated it and left a comment below. It helps others find it on google.xoxo-Allianna

    Notes

    If you enjoyed this recipe it would mean the world to me if you rated it and left a comment below. It helps others find it on google.xoxo-Allianna
     
    Be sure not to over whisk your honey mixture or it will set too fast.
     
     
    These quick, easy and delicious marshmallows really hit the spot! Super easy to make too.
    Serving: 1piece | Calories: 49kcal | Carbohydrates: 12g | Protein: 1g | Fat: 1g | Saturated Fat: 1g | Polyunsaturated Fat: 1g | Monounsaturated Fat: 1g | Sodium: 3mg | Potassium: 8mg | Fiber: 1g | Sugar: 12g | Vitamin C: 1mg | Calcium: 2mg | Iron: 1mg
    Tried this recipe?Tag me on instagram @alliannaskitchen!

    easter brunch ideas

    April 1, 2022 Featured Home

    Paleo Easter Brunch

    easter brunch ideas

    Easter Brunch Ideas:

    lemon garlic asparagus 1 scaled

    Lemon Garlic Asparagus 

    • This roasted lemon garlic asparagus recipe is quick, easy and delicious. It has the most perfect combination of garlic and lemon. This recipe goes great with just about anything!

    slice pulled out of the carrot cake

    Paleo Carrot Cake

    • This Paleo Carrot Cake is a staple in my house. We make it every year for Easter. The moist and fluffy grain free cake combined with the sweet and smooth buttercream frosting is quite delightful. This recipe only requires 30 minutes of hands-on time and is perfect for Spring.

    cookie bars on a baking sheet

    Paleo Mint Cookie Bars

    • These Paleo Mint Chocolate Cookie Bars are so simple and easy to make! We love making this recipe around the holidays: Christmas, Saint Patrick’s Day and Easter! This recipe only takes 30 minutes of hands on time, which makes it a great quick dessert to whip up yet still so elegant.

    whole30 deviled eggs 1 scaled

    Whole30 Deviled Eggs

    • These Whole30 deviled eggs are perfect for every occasion! The creamy avocado mayonnaise confined with the dijon mustard and pickle juice makes for the most perfect filling. We like to top these eggs off with black olives and mini pickles. This recipe includes two ways to make these deviled eggs.

    close up photo of hollandaise sauce over paleo eggs benedict

    Dairy Free Hollandaise Sauce

    • This Dairy Free Hollandaise Sauce is seriously to die for. This paleo sauce only takes 5 minutes to make and goes great on just about anything: steak, eggs, salmon and so much more!

    spinach mushroom frittata

    Spinach Mushroom Frittata

    • This quick and easy spinach mushroom frittata is perfect for all of your breakfast needs. We like to make it for our weekly meal prep as well as all of our family breakfasts. It only requires 10 minutes of prep time. You can have breakfast on the table within 30 minutes!

    strawberry poppyseed salad 14 scaled

    Strawberry Poppyseed Salad

    • This strawberry poppyseed salad is perfect for summer and spring! It is light and full of flavor. It reminds me so much of the strawberry poppyseed from Panera, but even better! This recipe is paleo and Whole30 friendly. With only taking less than 15 minutes to prepare, you can have this salad on the table in no time.

    raspberry muffins with lemons on top

    Gluten Free Raspberry Lemon Muffins

    • These Gluten Free Raspberry Lemon Muffins are super easy to make and are perfect for snacks and breakfasts! This muffin recipe is blender friendly which means all you have to do is put all of the ingredients in the blender, and blend. This recipe only takes 5 minutes to prepare and can be warm on your kitchen table in under 25 minutes.


    raspberry muffins stacked on a plate

    March 27, 2022 Breakfast

    Gluten Free Raspberry Lemon Muffins

    These Gluten Free Raspberry Lemon Muffins are super easy to make and are perfect for snacks and breakfasts! This muffin recipe is blender friendly which means all you have to do is put all of the ingredients in the blender and blend.

    Raspberry muffins with a lemon wedge on top on a white plate.

    This recipe only takes 5 minutes to prepare and can be warm on your kitchen table in under 25 minutes. You’ll fall in love with this tangy and tart treat! If you like to bake with fresh fruit, you should also check out my Vegan Peach Cobbler and Gluten Free Apple Muffins and Gluten-Free Blackberry Muffins recipe. If you are looking for another seasonal recipe, check out my Gluten Free Zucchini Bread.

    [feast_advanced_jump_to]

    Why You Will Love This Recipe

    • First off, the raspberry lemon combination is so delicious. It reminds me so much of spring. 
    • Secondly, this recipe is so easy and is a perfect recipe to make with your kids! I love using the blender to mix up the batter. It prevents a big mess from happening!
    • This recipe is naturally gluten free, grain free, dairy free, flourless, cassava free, paleo, soy free, and refined sugar free. 
    • These muffins are a great blood sugar balanced snack with the perfect balance of nut butter and fruit.
    • This recipe only takes 5 minutes to prepare which means you do not have to be baking all day in the kitchen to make these gourmet from scratch muffins. 
    • These muffins are freezer friendly which makes them a great bulk meal prep item. 
    • This recipe reminds me so much of my other favorite flourless muffin recipe: Gluten Free Banana Chocolate Chip Muffins. 

    Ingredients

    Ingredients for raspberry lemon muffins in glass bowls on a tabletop.
    • Almond butter-This acts as the base and “flour” of this recipe. I love getting my almond butter from Costco. I find that it is most economical there. If you do not get it from Costco, make sure you get a brand that does not have any additives. A lot of brands add added sugars and processed oils which are not necessary! 
    • Apple cider vinegar & baking soda-This is my go-to leavening combination for baking. Mixing the two together causes a chemical reaction that makes these muffins nice and fluffy. 
    • Lemon juice-I LOVE the combination of fresh berries and lemon. It reminds me so much of springtime. A little bit of lemon juice goes a long way in this recipe. 
    • Banana-The banana helps bind everything together. 
    • Eggs-The eggs in this recipe help with binding everything together and keeping these muffins nice and moist. 

    See recipe card below for a full list of ingredients and measurements.

    Substitutes and Variations

    • Maple syrup- Honey can be substituted in place of maple syrup for the sweetener.
    • Raspberries- You can substitute other berries for this recipe such as blueberries or strawberries.
    • Almond butter- Peanut butter can be used in place of almond butter, but be aware that the flavor of the muffins will be changed a bit.

    This recipe has not been tested with other substitutions or variations. If you replace or add any ingredients, please let us know how it turned out in the comments below.

    Step by Step Instructions

    All ingredients for muffins in a blender.
    Step #1: Preheat the oven to 375 degrees F. Place all ingredients in a blender aside from the berries, and blend until smooth.
    Muffin batter in the muffin pan.
    Step #2: Line the muffin pan with the muffin liners. Then, divide up the batter amongst the 9 muffin liners.
    Raspberries on top of muffins in muffin pan.
    Step #3: Sprinkle the berries on top of each, and mix them in with a spoon.
    Muffins in the muffin pan.
    Step #4: Bake in the oven at 375 degrees F for 18-20 minutes. Allow the muffins to set and cool for 10 minutes prior to serving.

    Equipment Needed

    • high speed blender
    • muffin pan

    Expert Tips

    • Tip #1: If you do not have a food processor be sure to really mix the almond butter well together with a handheld blender. Almond butter is thick and will stick if it is not mixed well!
    • Tip #2:You can use honey instead of maple syrup in this recipe for the sweetener. 
    • Tip #3: The best way to test if these muffins are done is by using a toothpick or fork. If you stick the toothpick or fork in and it comes out clean, it means these muffins are done!

    Recipe FAQs

    Can I make these muffins with other berries?

    Yes, you can! Blueberries and strawberries are great substitutions. If you use strawberries, be sure to chop them up into really small pieces.

    Can I freeze this recipe?

    You can freeze these muffins! However, if you do use the paper muffin liners, be sure to remove the liners beforehand as they will stick and become hard to remove after being in the freezer.

    Can I use a silicone muffin pan?

    Absolutely! I love using my silicone muffin pan. It makes for a super easy cleanup, and you do not need to use liners with this pan.

    Raspberry lemon muffins in a muffin pan.

    Storage Instructions

    • This recipe can last for up to 5 days in an airtight container.

    Other Healthy Berry Treats You Will Love

    • Raspberry lemonade poured in a whicker cup on a marble plate with berries on the side.
      Healthy Raspberry Lemonade
    • strawberry oat bar with bananas on top
      Strawberry Oatmeal Bars
    • dairy free strawberry pretzel salad on a plate with whipped cream on top
      Gluten Free Strawberry Pretzel Salad
    • Vegan blueberry cheesecake jars on a tray.
      Vegan Blueberry Cheesecake Cups

    Did you try this recipe?

    Leave a rating and a review below.

    Be sure to tag me on Instagram.
    raspberry muffins stacked on a plate

    Gluten Free Raspberry Lemon Muffins

    Course Breakfast, Snack
    Cuisine American
    Prep Time 5 minutes minutes
    Cook Time 18 minutes minutes
    Total Time 23 minutes minutes
    Servings 8 muffins
    Author Allianna Moximchalk
    237kcal
    Cost $3
    Print Recipe Pin Recipe

    Equipment

    • high speed blender

    Ingredients

    • 1 cup creamy almond butter I like the Costco brand
    • 1 lemon juiced
    • 2 eggs
    • 3 tbsp maple syrup
    • 1 tsp baking soda
    • 2/3 cup raspberries washed
    • 1 tsp apple cider vinegar
    • 1 banana ripe

    Instructions

    • Preheat the oven to 375 degrees F. Then, place all ingredients in the food processor except the raspberries and blend until smooth.
    • Add the muffin liners to the muffin pan and divide up the batter (fill each cup about 1/2 way.) Then sprinkle in the raspberries and fold in until smooth. Bake the muffins for 18-20 minutes. Allow the muffins to stand and cool for 10 minutes prior to serving.

    Notes

    Storage: This recipe can be stored in an airtight glass container for up to 5 days.
     
    Nutrition:  The nutrition for this recipe is an estimate, and the calorie count is not guaranteed.  It is based on 8 servings.
     
    Servings: This recipe should yield 8 servings.
    Quick, easy, and delicious gluten free muffins ready in under 30 minutes!
    Serving: 1muffin | Calories: 237kcal | Carbohydrates: 13g | Protein: 8g | Fat: 18g | Saturated Fat: 2g | Polyunsaturated Fat: 5g | Monounsaturated Fat: 11g | Trans Fat: 1g | Cholesterol: 41mg | Sodium: 156mg | Potassium: 300mg | Fiber: 4g | Sugar: 7g | Vitamin A: 66IU | Vitamin C: 10mg | Calcium: 129mg | Iron: 1mg
    Tried this recipe?Tag me on instagram @alliannaskitchen!
     
    pretty jello cut outs on a plate

    March 18, 2022 Allergy Friendly

    Homemade Healthy Jello

    These Healthy Jello shapes are perfect for Easter! Kids (and my husband) love them. They are super easy to make and make for a fun little treat. This recipe only requires 15 minutes of hands-on time and 4 hours to set. Plus this homemade treat is good for you!

    Pretty red jello eggs and bunnies on a plate.

    This recipe is not only a staple around the holidays, but I love making fresh homemade jello and having it on hand in the house. It makes for a great easy snack!

    [feast_advanced_jump_to]

    Why This Recipe Works

    • First off, they are super simple to make!
    • Secondly, this recipe is good for you. Unlike traditional jello, this recipe contains no hidden and processed ingredients. 
    • This recipe is naturally refined sugar free, paleo, gluten free, AIP, autoimmune protocol friendly, gluten free, soy free, nut free, and dairy free.
    • If you want to learn more about gelatin, check out my recipe about How To Make A Gelatin Egg.
    • These homemade jello cut outs are perfect for Easter. I love to make them with my Easter brunch.
    • With this recipe, you can either use homemade juice like my Carrot Apple Ginger Juice or you can buy store bought. Totally up to you!
    • You can prepare this recipe beforehand which makes it a great make ahead option for hosting around the Springtime Holidays.

    Recipe Ingredients

    Ingredients laid out in individual small glass bowls on the counter.
    • Gelatin-You can buy it in your local health foods store or you can buy it online. I like the Vital Protien brand.
    • Fruit juice-You can make your own or you can buy store bought. Just make sure it doesn’t have any added sugars. 
    • Honey-This will give these homemade jello shapes a nice sweet flavor without any processed sugars. 

    See the full recipe card below with a full list of ingredients and measurements.

    Substitutions And Variations

    • Juice-Any kind of juice will work in this recipe! I love making my own Carrot Apple Ginger Juice to use to make homemade jello.

    This recipe has not been tested with any other substitutions or variations. If you replace or add any ingredients, please let us know by leaving a comment below!

    Step By Step Instructions

    Juice and maple syrup in a sauce pan with gelatin sprinkled in on top.
    Step #1: Add the juice and maple syrup to a sauce pan on medium heat. Once it gets to a simmer, remove from the heat and sprinkle in the gelatin and mix it together.
    Jello in a blue silicone easter mold setting on the counter.
    Step #2: Carefully add the jello mixture into the silicone molds. Then add the molds to the fridge for at minimum 4 hours to allow the jello to set.

    Equipment Needed

    • Silicone jello molds.
    • Saucepan.

    Expert Tips

    • Tip #1: Give your jello enough time to set prior to popping the jello out of the molds.
    • Tip #2: In order for the jello to form, the jello needs to blossom. For it to blossom the liquid needs to be warm.
    • Tip #3: If you do not have jello molds, you cam use a casserole dish! However, be sure to spray the dish prior to adding the jello mixture inside.

    Other Easter Brunch Recipes To Serve With Jello

    • Gluten Free French Toast Casserole
    • Oven Baked Turkey Bacon
    • Dairy Free Hollandaise Sauce
    • Banana Chia Pudding
    • Spinach Mushroom Frittata 
    close up picture of a jello easter bunny

    Recipe FAQs

    What is the difference between gelatin and collagen peptides?

    Gelatin is a form of collagen peptides. It is just broken down into a more useable and small form. Collagen is great for the skin, joints, and your hair! Gelatin is used in a lot of gut healing protocols because of its benefits for the gut too. It helps seal up tight junctions in the gut lining.

    What kind of juice should I use?

    Any kind of pulp free juice will work in this recipe!

    What else can I make with gelatin?

    I love using gelatin to make a lot of things, like my Homemade Healthy Marshmallows.

    Storage Instructions

    • You can store homemade jello in the fridge for up to 5 days.
    • Be sure to store the jello in an air tight container to ensure optimal freshness.

    Other Healthy Snacks You Will Love

    • close up photo of dehydrated kale chips in a bowl with nutritional yeast on top
      Dehydrated Kale Chips
    • strawberry banana smoothie bowl in a bowl with berries on top
      Strawberry Banana Smoothie Bowl
    • banana chia pudding 6 scaled
      Banana Chia Pudding
    • whole30 guacamole 7 scaled
      Whole30 Guacamole With Pork Belly (Paleo, Keto)

    Do you want to live a healthier lifestyle? Be sure to check out my go-to anti-inflammatory swap guide!

    download your FREE guide
    close up picture of a jello easter bunny

    Healthy Jello

    Course Breakfast, Dessert, Snack
    Cuisine American
    Diet Gluten Free
    Prep Time 10 minutes minutes
    set time 4 hours hours
    Total Time 4 hours hours 10 minutes minutes
    Servings 10 servings
    Author Allianna Moximchalk
    46kcal
    Cost $2
    Print Recipe Pin Recipe

    Equipment

    • silicone jello molds

    Ingredients

    • 4 cups juice I like orange or apple juice
    • 2 tbsp unflavored gelatin

    Instructions

    • Add 1 cup of the juice to a bowl and sprinkle in the gelatin while continuously whisking. Now, allow it to sit for 3 minutes to set. Next, pour the remaining liquid into a sauce pan on medium heat and bring to a boil. Remove from the heat and add in the gelatin mixture as well as the optional sweetener. Spray you jello molds with cooking spray oil and wipe the oil throughout the mold. This is important or they will stick! Pour into jello molds and allow to sit for 4 hours.

    Notes

    Storage: You can store this recipe in the fridge for up to 5 days.
    Nutrition: The nutriton in this recipe is an estimate and cannot be guaranteed. 
    Servings: This recipe yields approximately 10 servings. 
    Tip: If you do not have jello molds, you cam use a casserole dish! However, be sure to spray the dish prior to adding the jello mixture inside. 
    Quick & easy fun Jello Easter Egg.
    Serving: 1serving | Calories: 46kcal | Carbohydrates: 11g | Protein: 0.1g | Fat: 0.1g | Saturated Fat: 0.02g | Polyunsaturated Fat: 0.04g | Monounsaturated Fat: 0.01g | Sodium: 4mg | Potassium: 100mg | Fiber: 0.2g | Sugar: 10g | Vitamin A: 1IU | Vitamin C: 1mg | Calcium: 8mg | Iron: 0.1mg
    Tried this recipe?Tag me on instagram @alliannaskitchen!
    air fried cod on a plate with mixed greens

    March 18, 2022 Air Fryer

    Easy Frozen Cod In Air Fryer

    Cooking Frozen Cod In The Air Fryer is one of the easiest ways to do it! The best part is you do not have to wait for the cod to defrost, yet the fish comes out crispy on the outside and nice and juicy on the inside. This recipe only takes 5 minutes to prep and 15 minutes to make. 

    air fried cod on a plate with mixed greens

    This recipe is delicious on its own but also tastes wonderful with the addition of my Dairy Free Pesto Sauce or my Nut Free Pesto if you cannot have nuts. If you are into air fryer recipes lately like I am, check out my Air Fryer Turkey Burger Recipe too! If you are looking for other fish recipes, check out my Gluten Free Salmon Cakes. I love to serve this recipe with my Homemade Pineapple Pico de Gallo and Mango Pico de Gallo.

    What Makes This Recipe So Good?

    • First off, it is super simple, only requiring a few minutes of hands-on time. 
    • Secondly, it doesn’t require you to defrost your fish which saves so much time! You can just grab your cod from the freezer and cook it right away. 
    • I get Butcher Box every month. They send me a monthly box of all of my favorite seafoods and meats. It is the highest quality of stuff. Their fish is one of my favorite things in the box! If you use my Butcher Box link, you can save on your order every month. 
    • This recipe is great during lent. 
    • One of my favorite ways to cook cod is in the air fryer because it gets crispy on the outside, yet it is nice and juicy on the inside. 
    • This recipe is a great weeknight dinner!
    • I also love prepping this recipe for meal prep during the week. 
    • This recipe is naturally Keto, low carb, AIP, autoimmune protocol, Whole30 and paleo friendly. 
    • If you are trying to eat more fish like myself, check out my other favorite fish recipe on my blog Gluten Free Fish and Chips. If you are looking for another easy weeknight dinner, check out my Gluten Free Fried Fish recipe.
    frozen cod with seasonings and oil in bowls

    Ingredients: 

    • Frozen cod–I love getting my cod from Butcher Box. They send me a monthly supply of all of my favorite meats and seafood right to my door. I love keeping a stash of their stuff frozen in my freezer so I can just grab it and use it! I never have to worry about not having food in the house or worrying if my meat is going to go bad in the fridge. 
    • Lemon juice-Adds so much flavor. 
    • Salt & pepper-To taste. 
    • Avocado oil-My go to cooking oil, but any kind will work. 
    • Cooking oil spray-I like using the avocado oil spray from Costco! But any kind of cooking oil spray will work. 
    cod in the air fryer on a basket

    How To Make:

    • First, spray your air fryer frying rack! This is essential or the cod will stick to the rack. If you do not have your air fryer rack, that is ok, just skip this and make sure you spray the bottom of the air fryer insert to prevent any sticking. 
    • Next, add the cod to the air fryer and drizzle the cooking oil on top. 
    • Sprinkle it with salt and pepper.
    • Bake the cod at 350 degrees F for 7 minutes, then flip the cod and spray with cooking spray oil and bake for an additional 7 minutes. 
    • Once the cod is done, drizzle with lemon juice on top. 
    flipped cod in the air fryer

    What Is Cod?

    • Cod is a saltwater fish. I love cod because it is a light and flakey fish. It just melts in your mouth! 

    What Should I Serve With This?

    • I love eating my cod with fresh mixed greens or coleslaw. My Creamy Coleslaw Recipe is delicious and would go great with this recipe! 

    Can I Make Just One Cod Filet?

    • Absolutely! You would just split the oil and lemon juice amount in half.

    What Air Fryer Do You Suggest?

    • I have this 11 in 1 Ninja Air Fryer and LOVE it! It has 11 different functions yet it only takes up one spot on the counter.

    Chef’s Tips:

    • To reheat your cod, I highly suggest reheating in the air fryer at 350 for 5-10 minutes. 
    • To prevent drying out of the fish, make sure you really lather it in oil or you can even use butter or ghee. I love to make my own homemade ghee. 
    fish on a plate with mixed greens

    If you like this recipe, you will LOVE my other fish recipes:

    • Easy Blackened Cod
    • Lemon Garlic Butter Sheet Pan Shrimp Scampi 
    • Maple Crusted Salmon 
    • Pan Seared Chilean Sea Bass

    If you enjoyed this recipe it would mean the world to me if you rated it and left a comment below. It helps others find it on google.xoxo-Allianna

    air fried cod on a plate with mixed greens

    Easy Frozen Cod In The Air Fryer

    Course Meals
    Cuisine American
    Prep Time 5 minutes minutes
    Cook Time 15 minutes minutes
    Total Time 20 minutes minutes
    Servings 1 servings
    Author Allianna Moximchalk
    805kcal
    Cost $10
    Print Recipe Pin Recipe

    Equipment

    • Air fryer

    Ingredients

    • 1 cod filet I like getting mine from Butcher Box
    • 1 lemon juiced
    • 1 tsp cooking oil I like avocado oil
    • pinch sea salt
    • pinch pepper
    • cooking spray oil

    Instructions

    • Spray the metal rack of the air fryer with your cooking spray oil. Place your metal rack in the air fryer. Add the cod to the rack in the air fryer. Drizzle the cooking oil on top of the cod and sprinkle with salt and pepper.
    • Bake the cod at 350 for 7 minutes, then flip the cod, spray the other side and cook for an additional 7 minutes. Once the cod is done, drizzle with lemon juice on top.
      If you enjoyed this recipe it would mean the world to me if you rated it and left a comment below. It helps others find it on google.xoxo-Allianna

    Notes

    If you enjoyed this recipe it would mean the world to me if you rated it and left a comment below. It helps others find it on google.xoxo-Allianna
    Quick, easy, crispy on the outside and juicy on the inside cod.
    Serving: 1seerving | Calories: 805kcal | Carbohydrates: 10g | Protein: 161g | Fat: 10g | Saturated Fat: 2g | Polyunsaturated Fat: 3g | Monounsaturated Fat: 3g | Trans Fat: 1g | Cholesterol: 387mg | Sodium: 488mg | Potassium: 3866mg | Fiber: 3g | Sugar: 3g | Vitamin A: 384IU | Vitamin C: 66mg | Calcium: 172mg | Iron: 4mg
    Tried this recipe?Tag me on instagram @alliannaskitchen!
    steak bites on a plate with garlic aioli

    March 16, 2022 Air Fryer

    Air Fryer Steak Bites With Garlic Aioli

    These Keto Air Fryer Steak Bites are juicy on the inside, crispy on the inside and full of flavor! They pair so wonderfully with our homemade low carb garlic aioli. We love using these air fryer bites for snacks and appetizers. This recipe only takes minutes to prep.

    steak bites made in the air fryer on a plate

    If you enjoy this recipe, you will also enjoy my Steak Date Night Dinner with Garlic Aioli as well.

    What Makes These Air Fryer Steak Bites So Good?

    • They are super crispy on the outside yet still so juicy and tender on the inside. 
    • They make for the best finger foods when having company!
    • This recipe requires minimal clean up.
    • You can make them in the air fryer! No need to mess up your whole kitchen. If you are into air fryer recipes like I am lately, check out my Air Fryer Turkey Burger Recipe. 
    raw steak, oil and spices laid out in bowls

    What Do I Need To Make Steak Bites In The Air Fryer?

    • Sirloin steak chunks-You can buy these pre-cut into 1 inch cubes OR you can use a sirloin and chop it yourself. I like to buy mine already chopped up from Butcher Box. If you use my link HERE you can get a free thing of meat with every box you order! 
    • Sea salt, black pepper & garlic powder-For flavor. All meat needs to be seasoned with salt to reach optimal flavor.
    • Avocado oil-To help marinate the steak. Any kind of oil will work, my favorite is avocado. 
    raw steak marinating in a bowl

    For the optional garlic aioli:

    • Avocado mayo-I use this instead of regular mayo. It is loaded with healthy fats!
    • Dijon mustard-This is a must for aioli.
    • Lemon juice-To taste.
    • Fresh garlic-Always use fresh, the taste is so much better!
    steak bites in an air fyer

    How To Make:

    • First, if your steak is not already cut into 1 inch cubes, cut it into 1 inch cubes. 
    • Now, place your steak in a bowl with the oil and seasonings. Mix together with both hands and allow to marinate. If you do not have time to let it sit-that is ok! However, time to marinate is ideal. Now, place the mixture in the air fryer basket for 3 minutes, then flip and cook for an additional 3 more minutes. 

    For the garlic aioli:

    • Place all ingredients in a bowl and mix until smooth. 

    What If I Like My Air Fried Steak Bites Medium Rare?

    • I suggest cooking the steak for 4 minutes total-flipping it after 2 minutes.

    What If I Like My Steak Well Done?

    • I suggest cooking your steak for 8 minutes total, 4 minutes on each side!

    What Should I Serve With These Air Fried Steak Bites?

    • I love the combination of steak and potatoes! These mini crispy garlic potatoes are to die for. 
    steak bites on a toothpick

    If you like this appetizer you will LOVE:

    • Crispy Buffalo Chicken Wings
    • Everything But The Bagel Chicken Wings
    • Air Fryer Potato Skins
    • Keto Jalapeno Poppers

    If you enjoyed this recipe it would mean the world to me if you rated it and left a comment below. It helps others find it on google.xoxo-Allianna

    steak bites on a plate with garlic aioli

    Air Fryer Steak Bites

    Prep Time 5 minutes minutes
    Cook Time 6 minutes minutes
    Total Time 11 minutes minutes
    Servings 6 servings
    Author Allianna Moximchalk
    256kcal
    Cost $6
    Print Recipe Pin Recipe

    Equipment

    • Air fryer

    Ingredients

    • 1 pound sirloin steak chopped into 1 inch cubes or you can buy it already chopped from Butcher Box.
    • 1 tsp sea salt
    • 1 tbsp steak sauce
    • 1/4 tsp black pepper
    • 1/2 tsp garlic powder
    • 1 tbsp avocado oil

    For the aioli: (optional but SO delicious)

    • 1 lemon juiced
    • 1/2 cup avocado mayo
    • 1 tsp dijon mustard
    • 6 cloves garlic minced

    Instructions

    • Place all the steak ingredients in a bag/or bowl and let sit. This will allow the steak to marinate. Ideally, it marinates for a few hours but 15 minutes will do if time does not permit. Once the steak has marinated, add to the air fryer at 400 degrees F for 3 minutes, then toss and cook for an additional 3 minutes.
    • For the optional aioli-place all ingredients in a bowl and whisk until smooth.
      If you enjoyed this recipe it would mean the world to me if you rated it and left a comment below. It helps others find it on google.xoxo-Allianna

    Notes

    If you enjoyed this recipe it would mean the world to me if you rated it and left a comment below. It helps others find it on google.xoxo-Allianna
     
     
    Quick, easy, juicy on the inside, crispy on the outside steak bites paired with garlic aioli.
    Serving: 1serving | Calories: 256kcal | Carbohydrates: 5g | Protein: 17g | Fat: 18g | Saturated Fat: 3g | Polyunsaturated Fat: 1g | Monounsaturated Fat: 3g | Cholesterol: 46mg | Sodium: 589mg | Potassium: 309mg | Fiber: 1g | Sugar: 1g | Vitamin A: 13IU | Vitamin C: 11mg | Calcium: 33mg | Iron: 1mg
    Tried this recipe?Tag me on instagram @alliannaskitchen!
    picture of allianna moximchalk

    March 13, 2022 Blog

    Reinventing Yourself

    As we are packing up our house to move I stumbled across things from the past-books, journals and pictures. I barely recognize the person in those pictures. So much has changed in the past few years. I went from being a care-free girl that didn’t really have goals or care about much to someone who has SO many goals and cares so much about the path I am on. I went from being someone who was at the mercy of my physician to becoming someone who took responsibility for their health (despite how hard it was at times.) I went from being so miserable and in so much pain to waking up everyday feeling not just good but excited to tackle my day. I went from taking over a dozen medications a day to now managing my symptoms with diet and lifestyle. So the question is how?

    picture of allianna moximchalk

    What I have realized over the years is that goals are important and changes in behavior are a must to see changes in your life but the real magic happens when you change your identity (reinventing yourself.) I remember when I was really sick and at my rock bottom I started daydreaming/ visualizing what it would look like for me to feel good.

    I started asking myself questions like:

    • What does that person do daily that makes her feel so good?
    • Who does that person surround herself with?
    • What does that person eat?
    • What does that person drink?
    • What does that person prioritize?
    • What does that person let go of?

    From there I started doing everything my highest self “that person” said to do even when it was really hard at times. In time my life was transformed and the thing is you have the power to do that too. At times when it can be hard to look at the pain and discomfort in our lives it truly is a gift and an invitation for us to go deeper. If you are struggling, I challenge you today to take 10 minutes out of your day and daydream about you living your best life and ask yourself the same questions I listed above. If you are really committed here, do it daily. I do this every night before I go to bed. I call it my designated daydreaming time, and I sure do love it!


    Lots of love, 

    Allianna


    If you enjoyed this blog post, you will LOVE:

    • 5 Tips For Sustainable Weight Loss
    • What Is Functional Medicine?
    • How To Find Your Passion
    hand holding a fudgsicle

    March 13, 2022 Allergy Friendly

    3 Ingredient Dairy Free S’mores Fudgesicles

    These Dairy Free S’mores Fudgesicles are so easy to make and so fun for the summer! This dairy free dessert only takes 10 minutes to prep and lasts for up to a month in the freezer. The creamy and silky dairy free chocolate combined with the crunchy gluten free graham crackers topped off with dairy free marshmallows is so delicious. This recipe is definitely a keeper in my house. 

    Fudgsicle on a tray with a bite taken out of it

    What Makes This Recipe So Good?

    • First off, it only takes 10 minutes to make!
    • Secondly, these fudgesicles store so well in the freezer so it is a great dessert to bulk make. 
    • The crunchy gluten free graham cracker crust adds a whole new level of crunch. 
    • This recipe is naturally dairy free, gluten free, paleo and vegan. This recipe can be adapted to be made AIP (autoimmune protocol friendly.) 
    • If you are having company, this is a great prep ahead dessert option. If you are like me I hate having to be in the kitchen while company is over, with this recipe it can all be done beforehand. 
    • If you are a dairy free fudge lover like me, you may also want to check out my Vegan Chocolate Truffles. 
    • This no bake recipe doesn’t require you to turn the oven on, which is perfect for summer!

    ingredients laid out in bowls

    Ingredients:

    • Dairy free chocolate chips-I love the Hu brand. You can use any brand you would like but Hu is my favorite. If you are not dairy free, just use regular chocolate chips. If you are following the autoimmune protocol (AIP) you can use carob chips. 
    • Gluten free graham crackers-You can use regular graham crackers if you are not gluten free. If you are doing the autoimmune protocol (AIP) you can also use Lovebird AIP cereal. It will give these fudge bars a nice crunch. You can also use chopped tigernuts. 
    • Dairy free marshmallows-You can buy store bought or make your own! If you are doing the Autoimmune protocol (AIP) you can check out this AIP marshmallow recipe on how to make your own complaint ones.

    How To Make:

    • Place your chocolate in a glass bowl in the microwave and microwave for 30 seconds, then whisk and microwave for 30 seconds, then whisk and microwave again for 30 seconds until the chocolate sauce is all smooth. 

    melted dairy free chocolate in a bowl

    • Then, add a thin layer of the chocolate to the bottom of the silicone popsicle molds. 

    chocolate in a silicone mold

    • Now, chop up the graham crackers. You do not want them to be too thin because you really want to feel the crunch. If you are using the Lovebird Cereal do not chop it because it is already small enough. 

    chopped up graham crackers

    • Add a layer of the graham crackers or cereal to the molds. Then, pour the remaining chocolate on top and smooth the chocolate out with a spatula. 

    graham cracker layer spread on top

    • Next, insert the popsicle molds. 

    Popsicle molds silicone molds

    • Finally, add the marshmallows to the microwave for 30 seconds and whisk. Pull apart the marshmallows and spread on top. 

    melted Marshmallows

    • Now, place the fudgesicles in the freezer for at least 4 hours. 

    How Long Do These Last In The Freezer?

    • These fun little treats last for up to a month in the freezer.

    hand holding a fudgsicle

    What Kind Of Molds Do You Suggest?

    • I use these silicone molds. 

    Chef’s Tips:

    • Be sure not to chop up your graham crackers not too fine because you really want the crunch.
    • I highly suggest using the silicone molds because a lot of molds are sticky meaning it will be hard to get your treat out all in one piece.
    • Make sure you mix your chocolate every 30 seconds in the microwave, this will prevent it from burning!

    two fudgesicles on a plate with ice

    If you like this recipe, you will LOVE my other dairy free chocolate recipes:

    • Vegan Twix Bars
    • Dairy Free Mint Chocolates 
    • Vegan Reece’s
    • Vegan Christmas Crack

    If you enjoyed this recipe it would mean the world to me if you rated it and left a comment below. It helps others find it on google.xoxo-Allianna

    hand holding a fudgsicle

    Dairy Free Fudgesicles

    Course Dessert
    Cuisine American
    Prep Time 10 minutes minutes
    Total Time 4 hours hours 10 minutes minutes
    Servings 3 treats
    Author Allianna Moximchalk
    554kcal
    Cost $5
    Print Recipe Pin Recipe

    Equipment

    • silicone popsicle molds

    Ingredients

    • 2.5 cups dairy free chocolate I like the Hu brand. If you are doing the autoimmune protocol, substitute with carob chips.
    • 1 graham cracker I always do gluten free. If you are doing AIP, substitute with Love Bird cereal or chopped tigernuts.
    • 1 cup dairy free marshmallows see notes for AIP recommendation

    Instructions

    • Place the chocolate in the microwave for 30 seconds, then take the chocolate out and whisk. Do this 3 times ensuring you mix the chocolate in between to prevent it from burning.
    • Now, chop up the graham crackers into chunks (not too fine because you want there to be a nice crunch.) Pour a nice layer of the chocolate sauce into the silicone molds (this should account for half of the chocolate.)
    • Now, add a layer of the graham crackers. If you are following AIP, use the chopped tigernuts or the Love Bird Cereal. Next, pour the remaining chocolate on top.
    • Finally, melt the marshmallows in the microwave for 30 seconds and whisk. Drizzle the marshmallows on top and place in the freezer for at least 4 hours.
      If you enjoyed this recipe it would mean the world to me if you rated it and left a comment below. It helps others find it on google.xoxo-Allianna

    Notes

    If you enjoyed this recipe it would mean the world to me if you rated it and left a comment below. It helps others find it on google.xoxo-Allianna
     
    For AIP marshmallows. check out this homemade recipe.
    10 minute no bake summer dessert that everyone will love!
    Serving: 1treat | Calories: 554kcal | Carbohydrates: 74g | Protein: 11g | Fat: 31g | Saturated Fat: 20g | Polyunsaturated Fat: 1g | Monounsaturated Fat: 1g | Sodium: 51mg | Potassium: 10mg | Fiber: 10g | Sugar: 86g | Calcium: 199mg | Iron: 11mg
    Tried this recipe?Tag me on instagram @alliannaskitchen!


    • « Go to Previous Page
    • Page 1
    • Interim pages omitted …
    • Page 12
    • Page 13
    • Page 14
    • Page 15
    • Page 16
    • Interim pages omitted …
    • Page 38
    • Go to Next Page »

    Primary Sidebar

    Allianna Headshots

    Hi, I'm Allianna! Allianna's Kitchen started by accident after battling an undiagnosed autoimmune disease for nearly my whole life.

    More about me →

    GLUTEN FREE DINNER RECIPES

    • steak date night dinner 1
      Steak Date Night Dinner with Garlic Aioli
    • gluten free fried shrimp 3 scaled
      Gluten Free Fried Shrimp
    • cooked frozen pork chops with chives on top on a white plate with a gold fork
      Easy Frozen Pork Chops In The Air Fryer
    • halibut fish tacos on a pale blue plate
      Halibut Fish Tacos

    EASY WHOLE30 RECIPES

    • Beetroot dip on a plate with crackers and fresh parsley on top.
      Simple Beetroot Dip Recipe
    • close up photo of ginger apple pork in a bowl
      Apple Ginger Pulled Pork
    • dairy free lobster bisque in a bowl with a gold spoon and garnished with lemon, fresh green herbs, and red pepper flakes.
      Dairy Free Lobster Bisque
    • juicy filet mignon on a plate
      Air Fryer Filet Mignon

    GLUTEN FREE APPETIZERS

    • peanut butter and jelly chicken wings on a plate with limes
      Peanut Butter And Jelly Wings
    • Stuffed mushrooms on a brown and white plate with fresh parsley on top.
      Gluten-Free Stuffed Mushrooms
    • Gluten free pigs in a blanket in a pile on a plate.
      Gluten Free Pigs In A Blanket
    • Pretty french onion dip in a silver bowl with potato chips and chives on top.
      Vegan French Onion Dip Recipe

    EASY MOCKTAIL RECIPES

    • honey simple syrup 2
      Honey Simple Syrup
    • orange lime cranberry mocktail 4
      Cranberry Mocktail Recipe
    • Clear glass with a brown drink and a cinnamon stick in it.
      Pear Cocktail Recipe
    • Grapefruit mocktail in a glass with jalapeño slice and grapefruit slice.
      Easy Grapefruit Mocktail Recipe

    Footer

    • Recipes
    • My Courses
    • Meal Prep Services
    • Accessibility Policy
    • Contact
    • About Me
    • Blog
    • Privacy Policy
    • Pinterest
    • Instagram
    • Facebook
    • Twitter

    Allianna’s Kitchen 2025 - All Rights Reserved

    Rate This Recipe

    Your vote:


    A rating is required
    A name is required
    An email is required